
Crota's End Guide
Done by: Kenai#2066 | Sept 2nd 2023
Loot Table
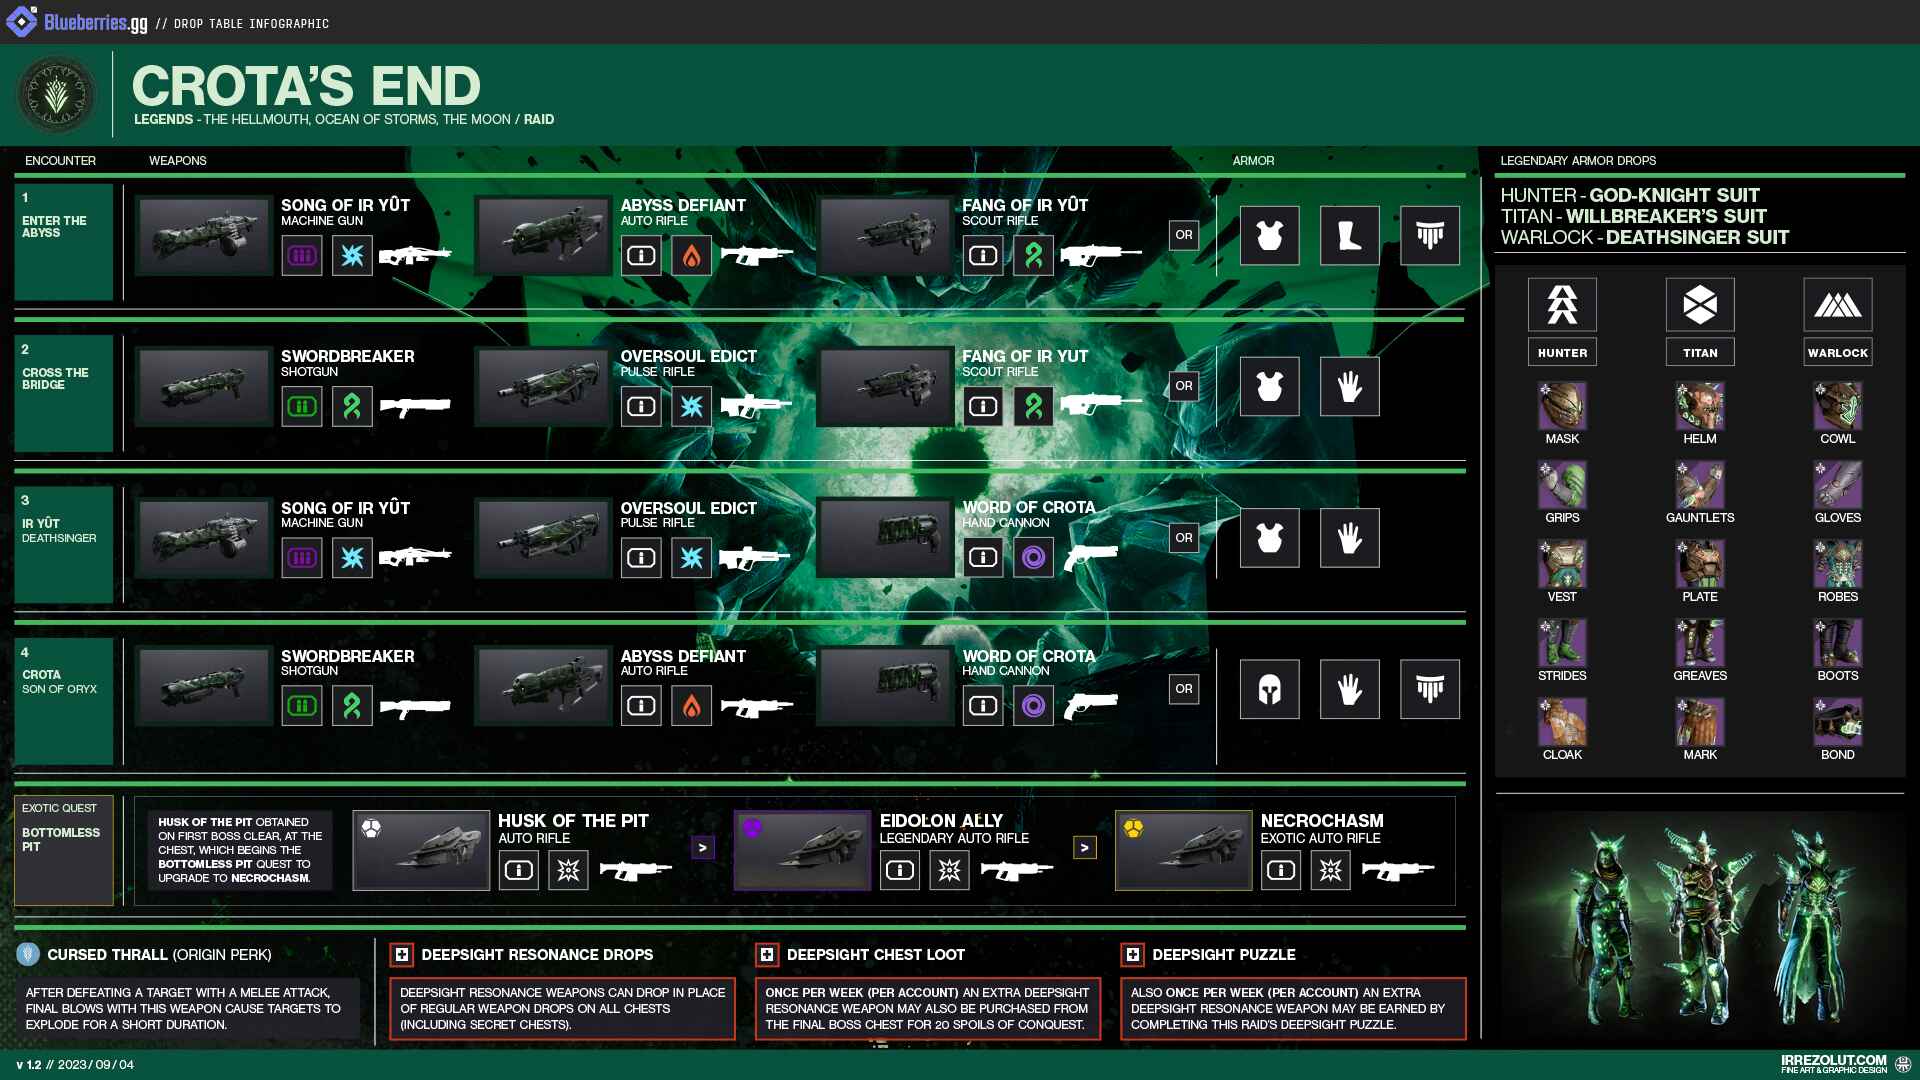
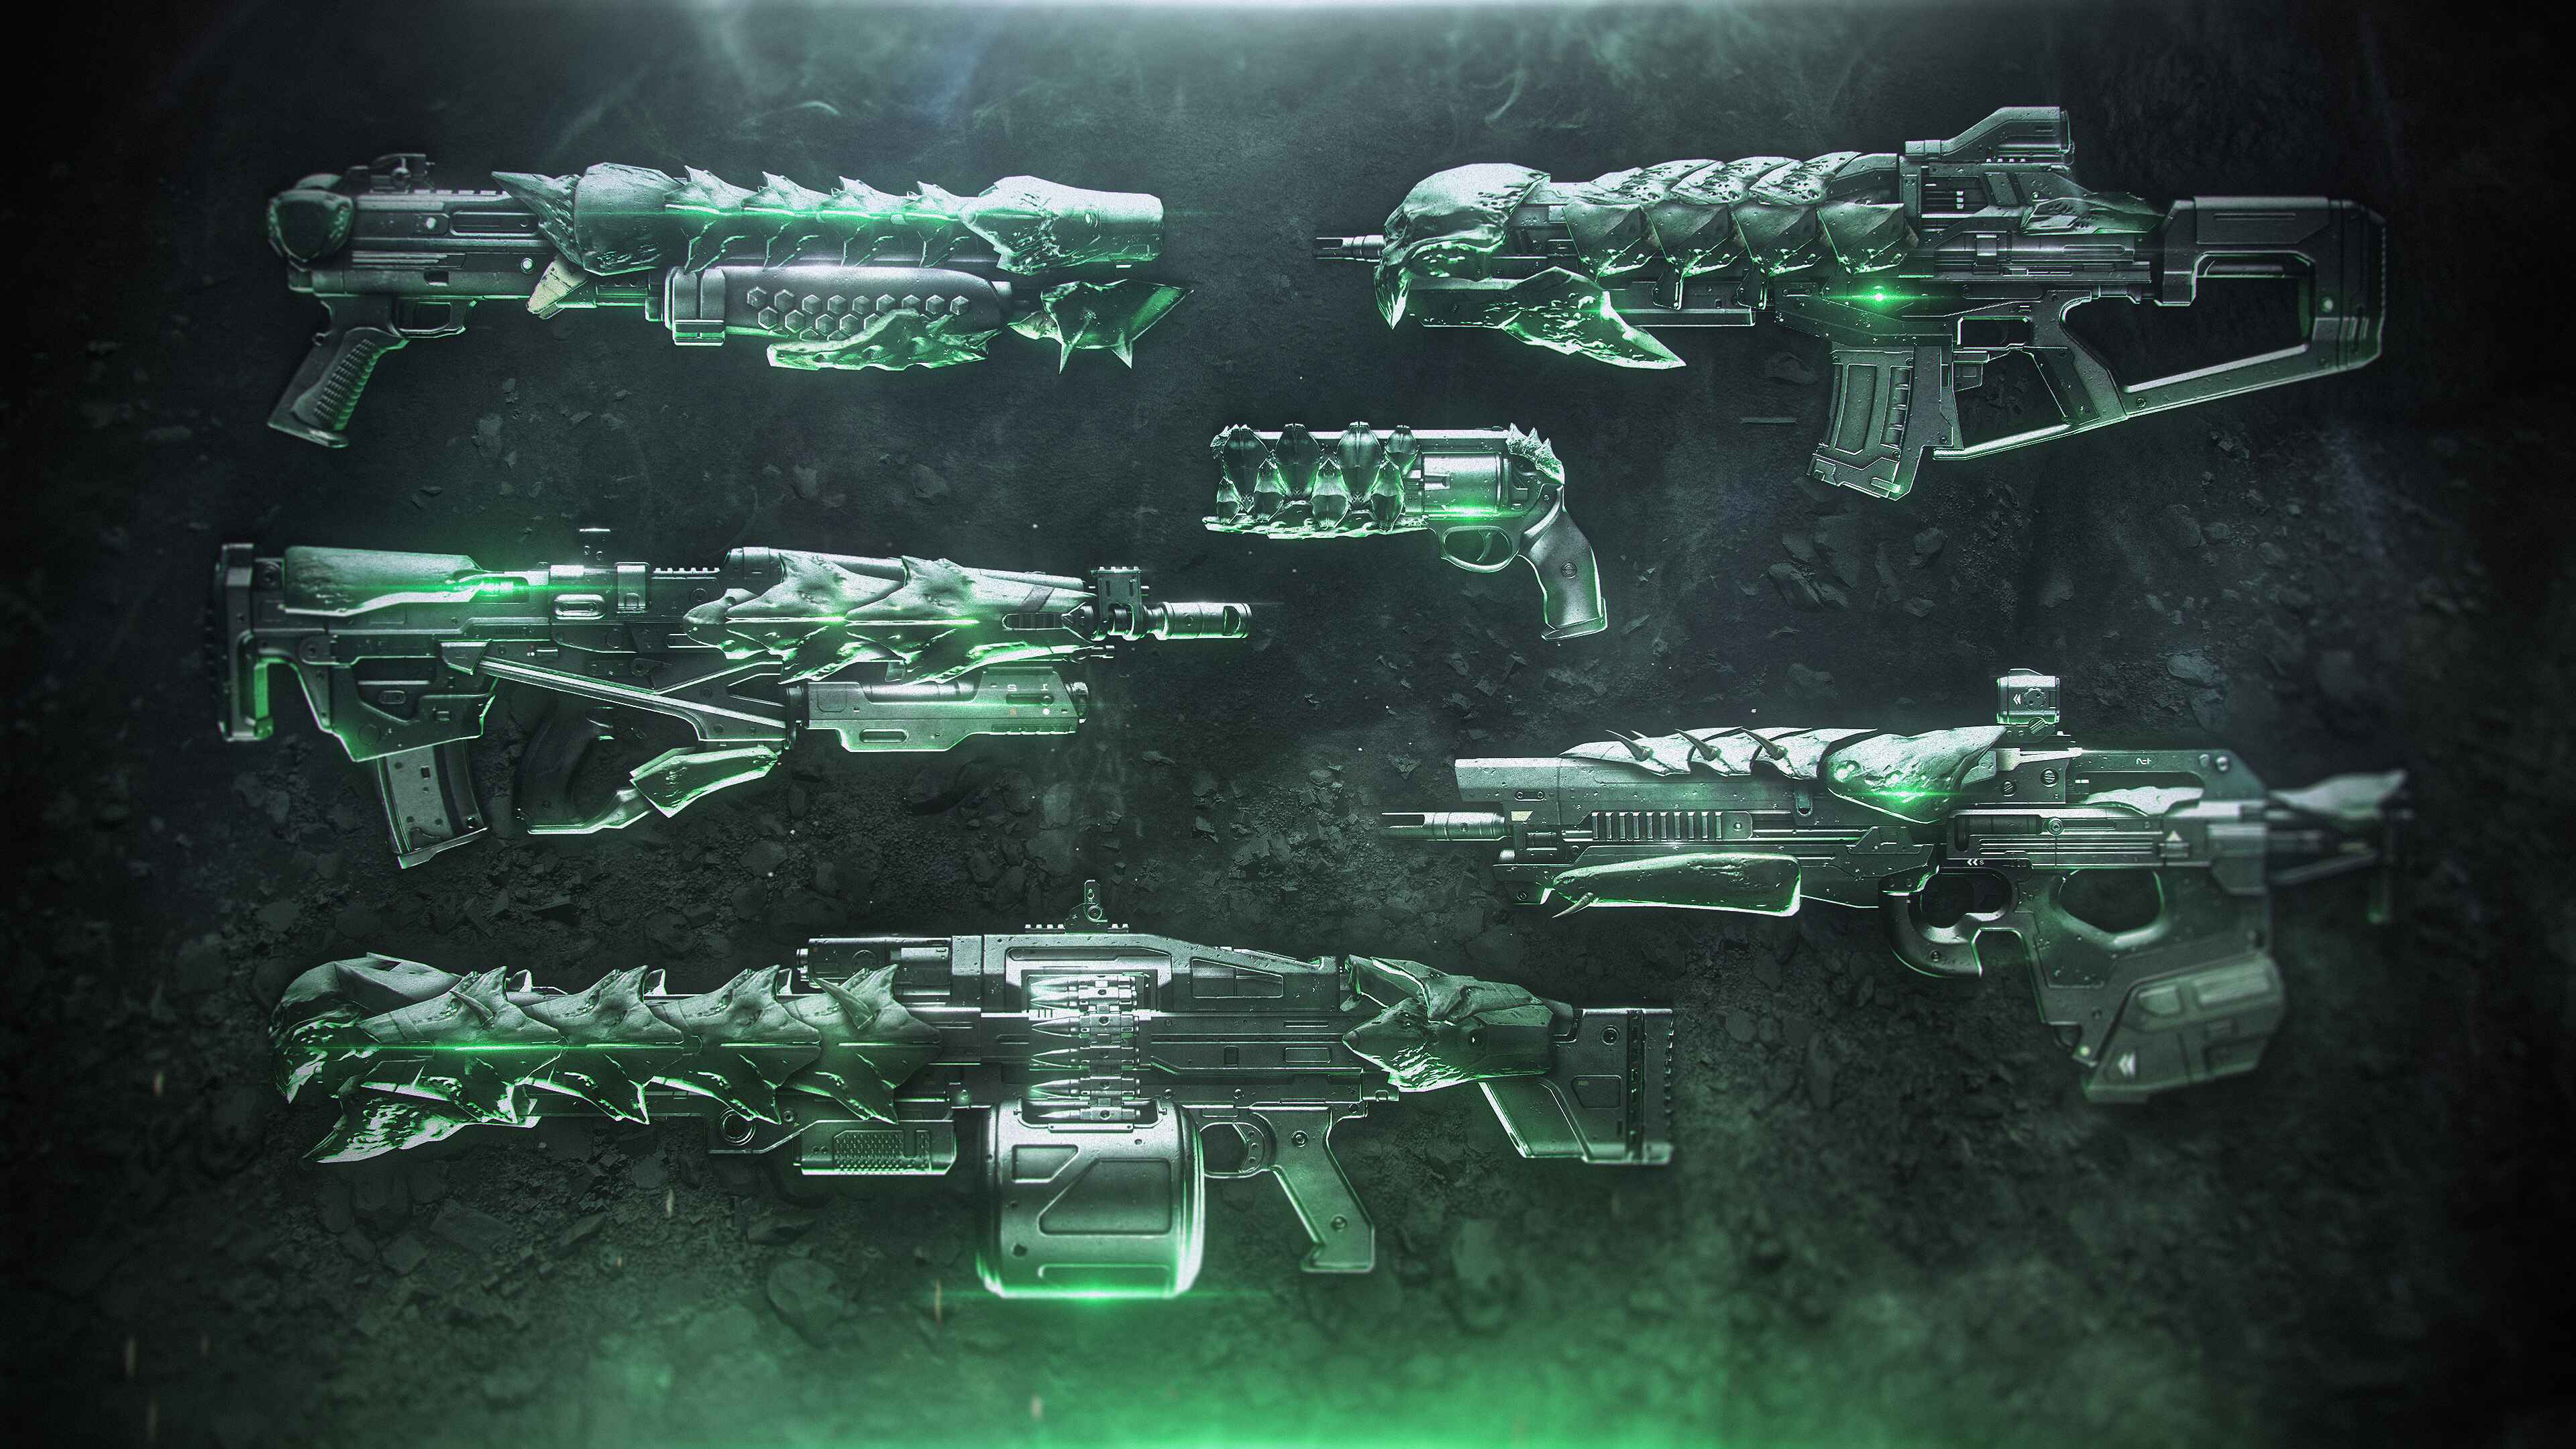
Weapons

Cursed Thrall - After defeating a target with a melee attack, final blows with this weapon cause targets to explode for a short duration.
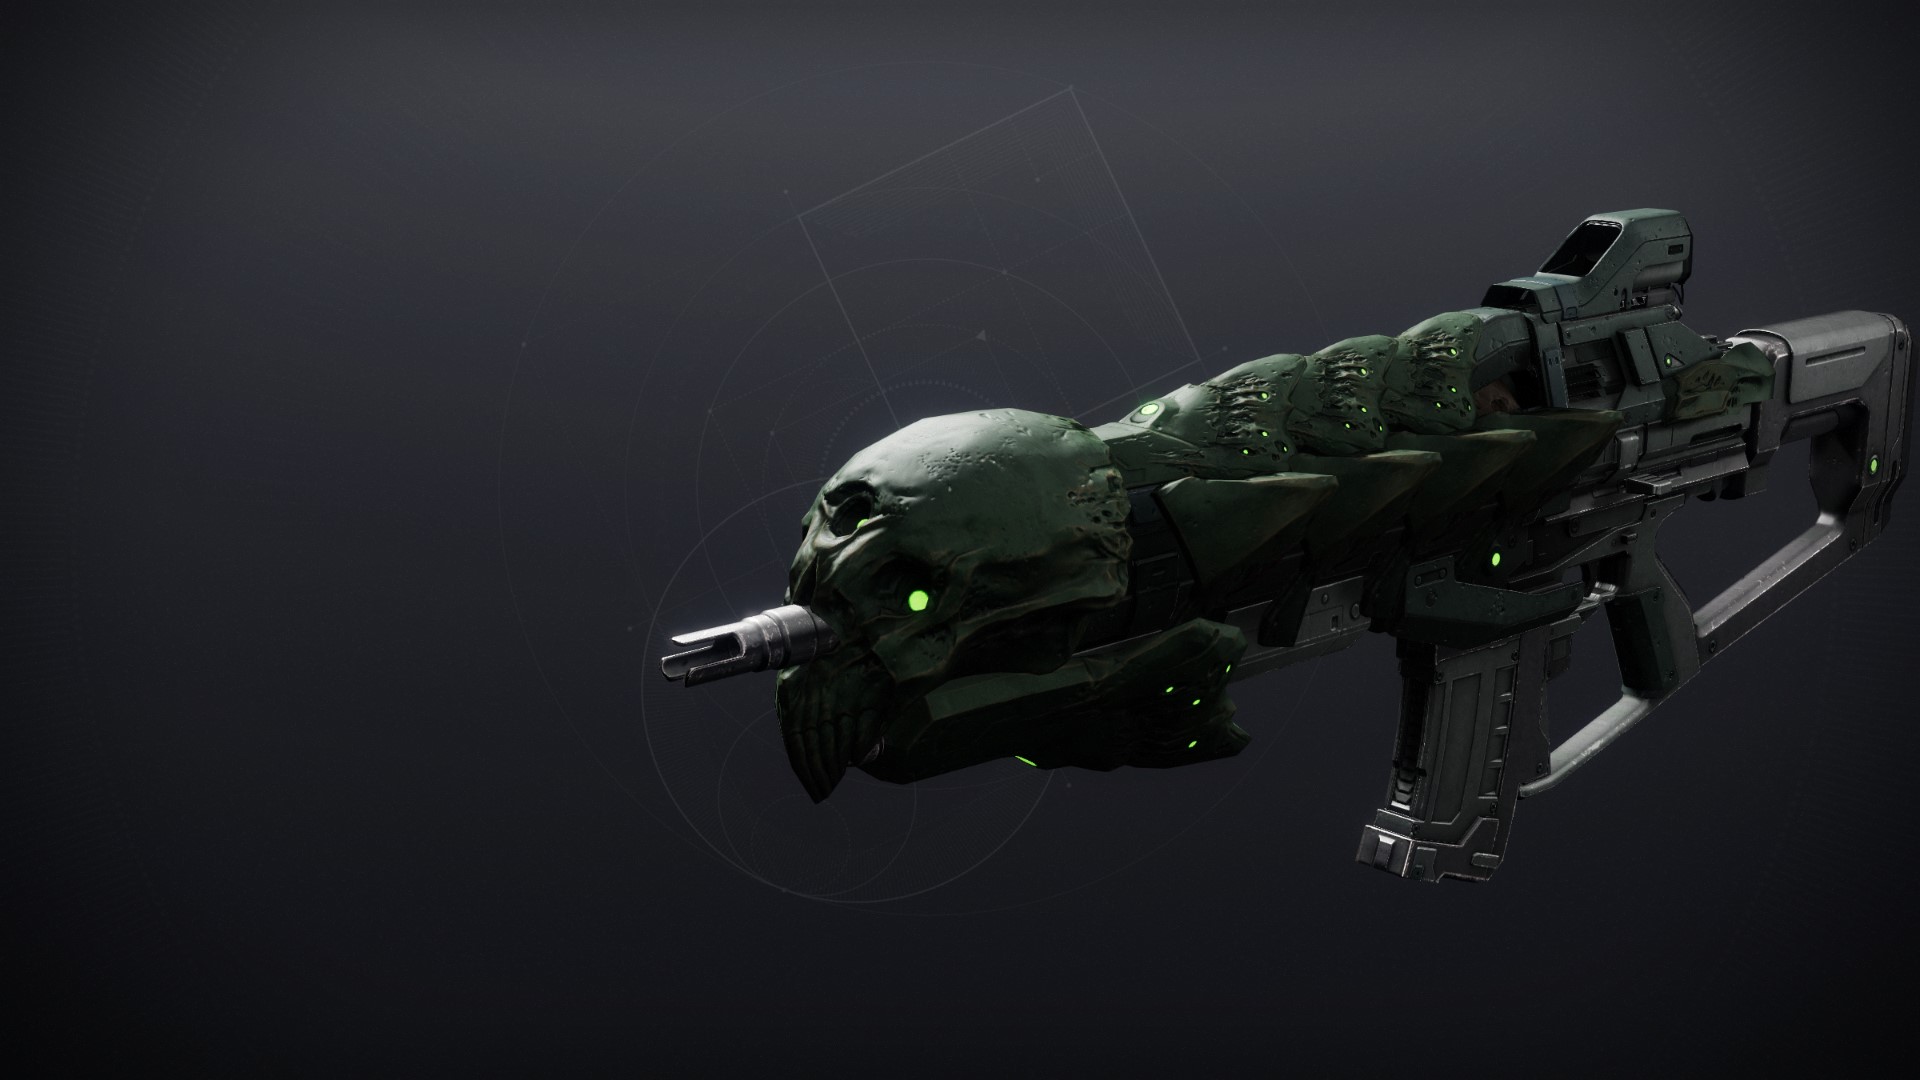
 Fang of Ir Yût
Legendary //
Rapid-Fire Frame // Scout Rifle
Desirable Perks
- Barrel:
- Arrowhead Brake
- Magazine:
- Extended Magazine
- Column 1 Perks:
- Reconstruction
- Demolitionist
- Column 2 Perks:
- Sword Logic
- Hatchling
Masterwork: Reload Speed
Mod Slot: Minor Spec, Adept Range, Adept Big Ones Spec,
Counterbalance Stock
Not meta defining by any means, even in terms of scouts, but usable nonetheless. In PvE, Rapid Hit continues to be an excellent consistency perk, pairing with Hatchling for a decent strand scout rifle if you missed out on the Taraxippos from Guardian Games. In PvP, while Rapid-fire scout rifles are not very strong, the Fang has strong consistency perks in Keep Away and Opening Shot, and maybe even Kill Clip for 6v6.
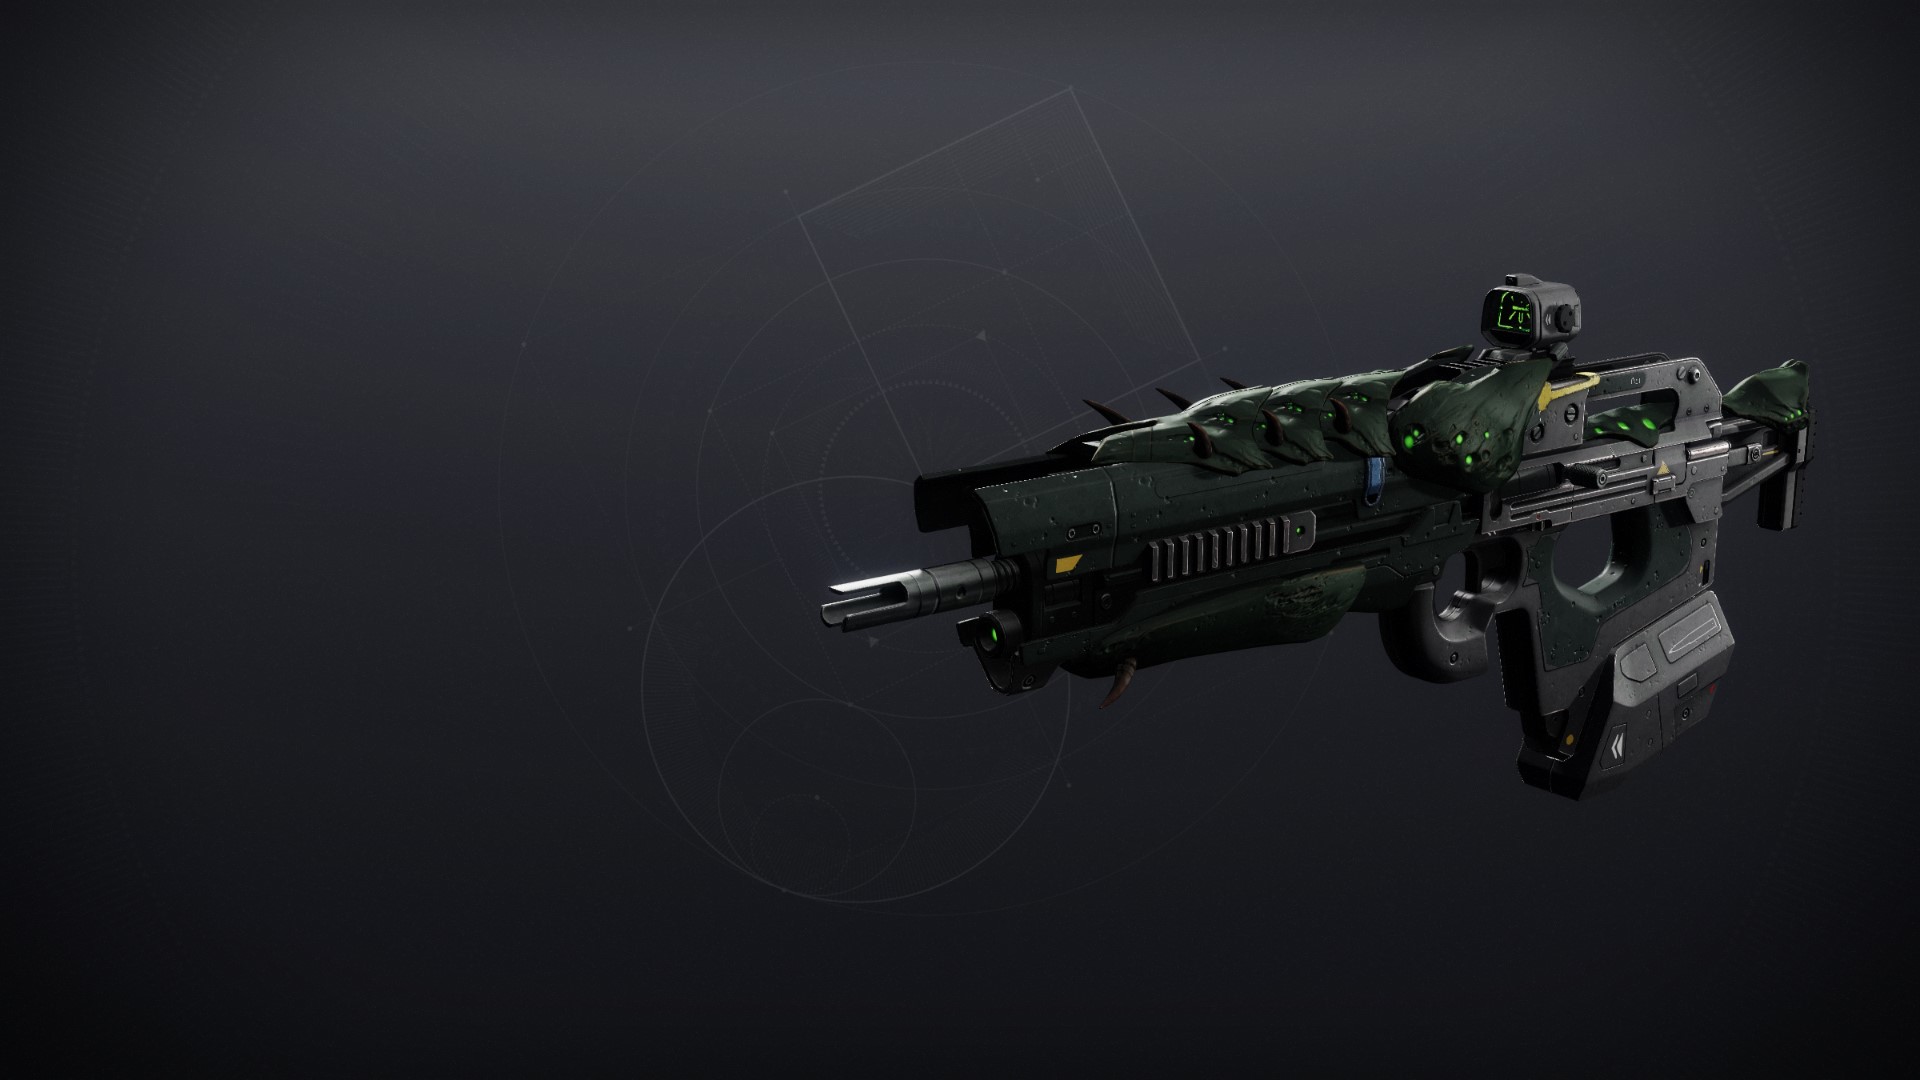
 Oversoul Edict
Legendary //
Rapid-Fire Frame // Pulse Rifle
Desirable Perks
- Barrel:
- Arrowhead Brake
- Magazine:
- Extended Mag
- Ricochet Rounds
- Column 1 Perks:
- Demolitionist
- Keep Away
- Perpetual Motion
- Column 2 Perks:
- Voltshot
- Sword Logic
- Headseeker
Masterwork: Range
Mod Slot: Minor Spec, Adept Big Ones Spec, Adept Range,
Counterbalance Stock
Oversoul Edict seems to be a fairly decent pulse rifle for both PvP and PvE. In PvE, this is pretty much on par with any other modern arc pulse rifle, though Oversoul rolling demolitionist with voltshot allows it to edge its competitors out ever so slightly in lower-end content. In higher-end PvE, Insidious from Vow will likely stay the king of Arc Pulses. In PvP, Rapid-fire pulses are certainly dangerous in the right conditions, and Oversoul continues this tradition with its consistency-prioritising rolls of Keep Away + Headseeker/Moving target.
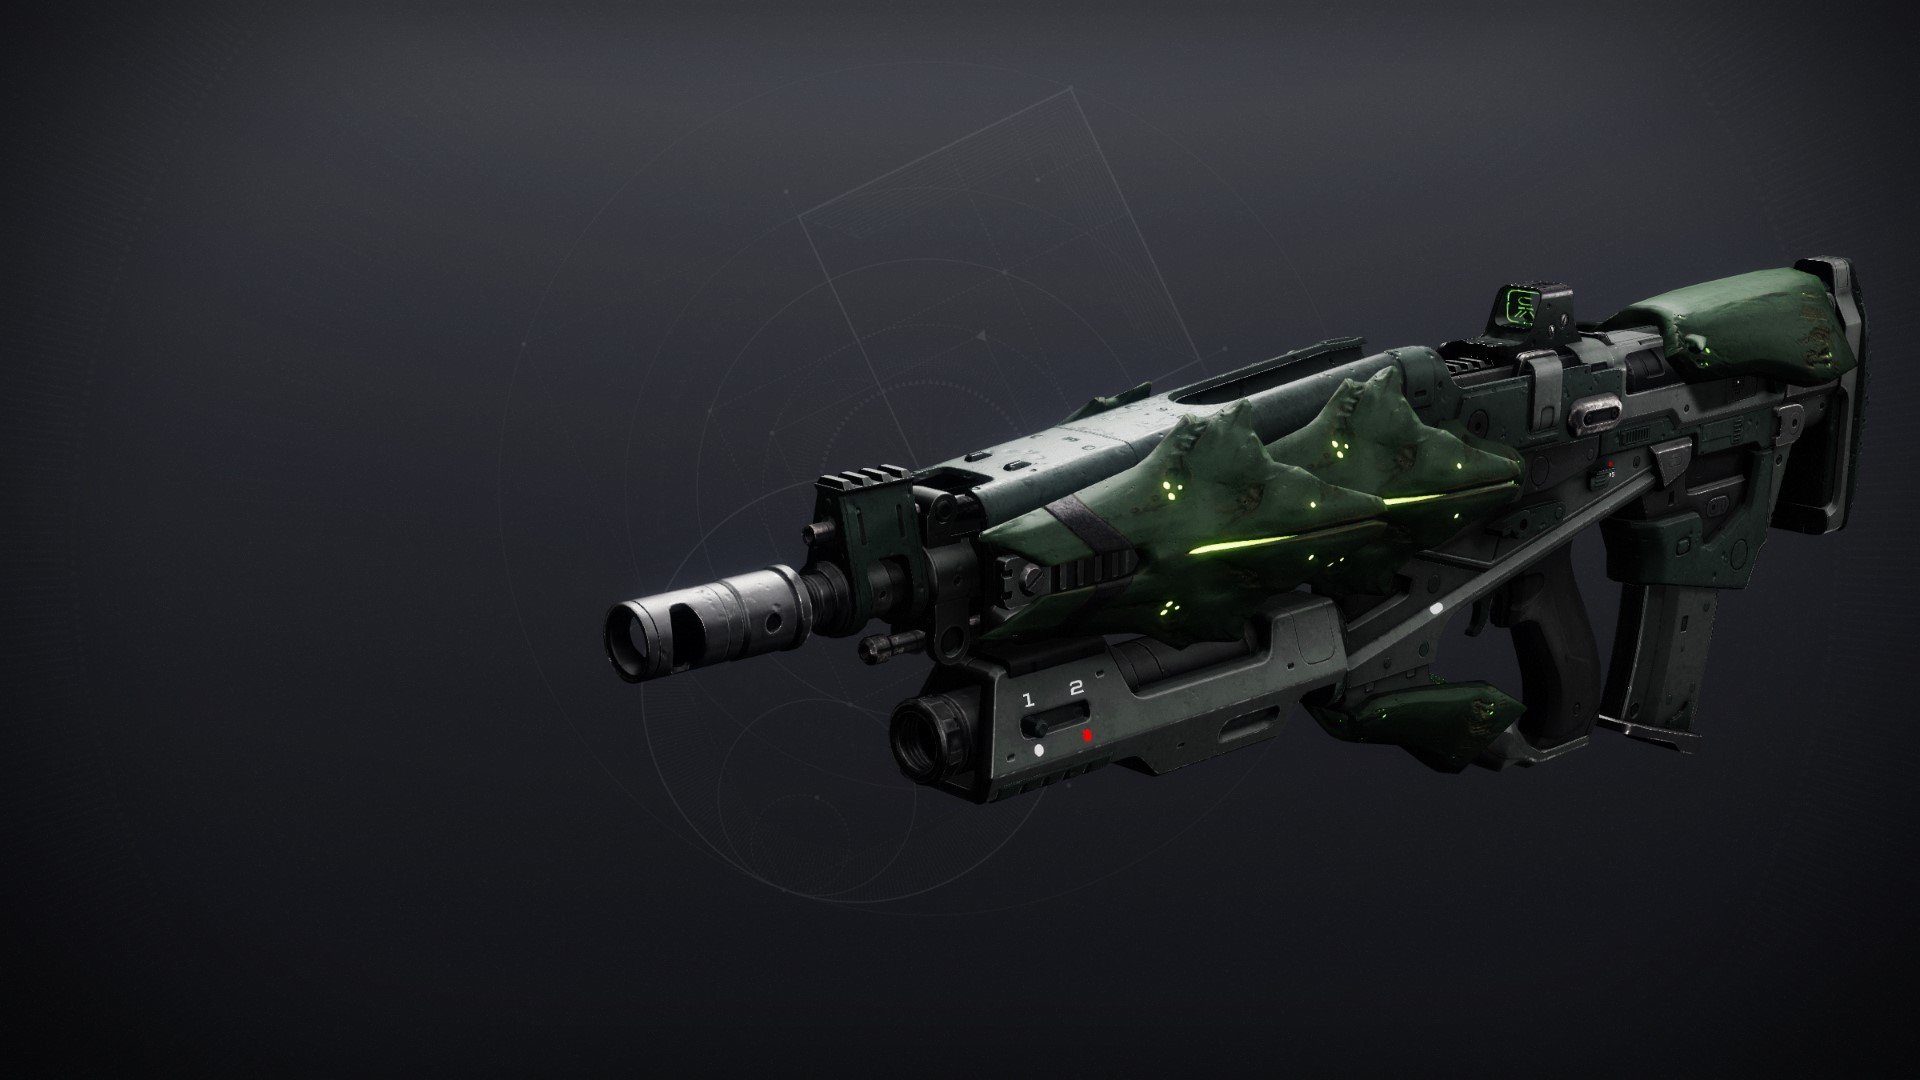
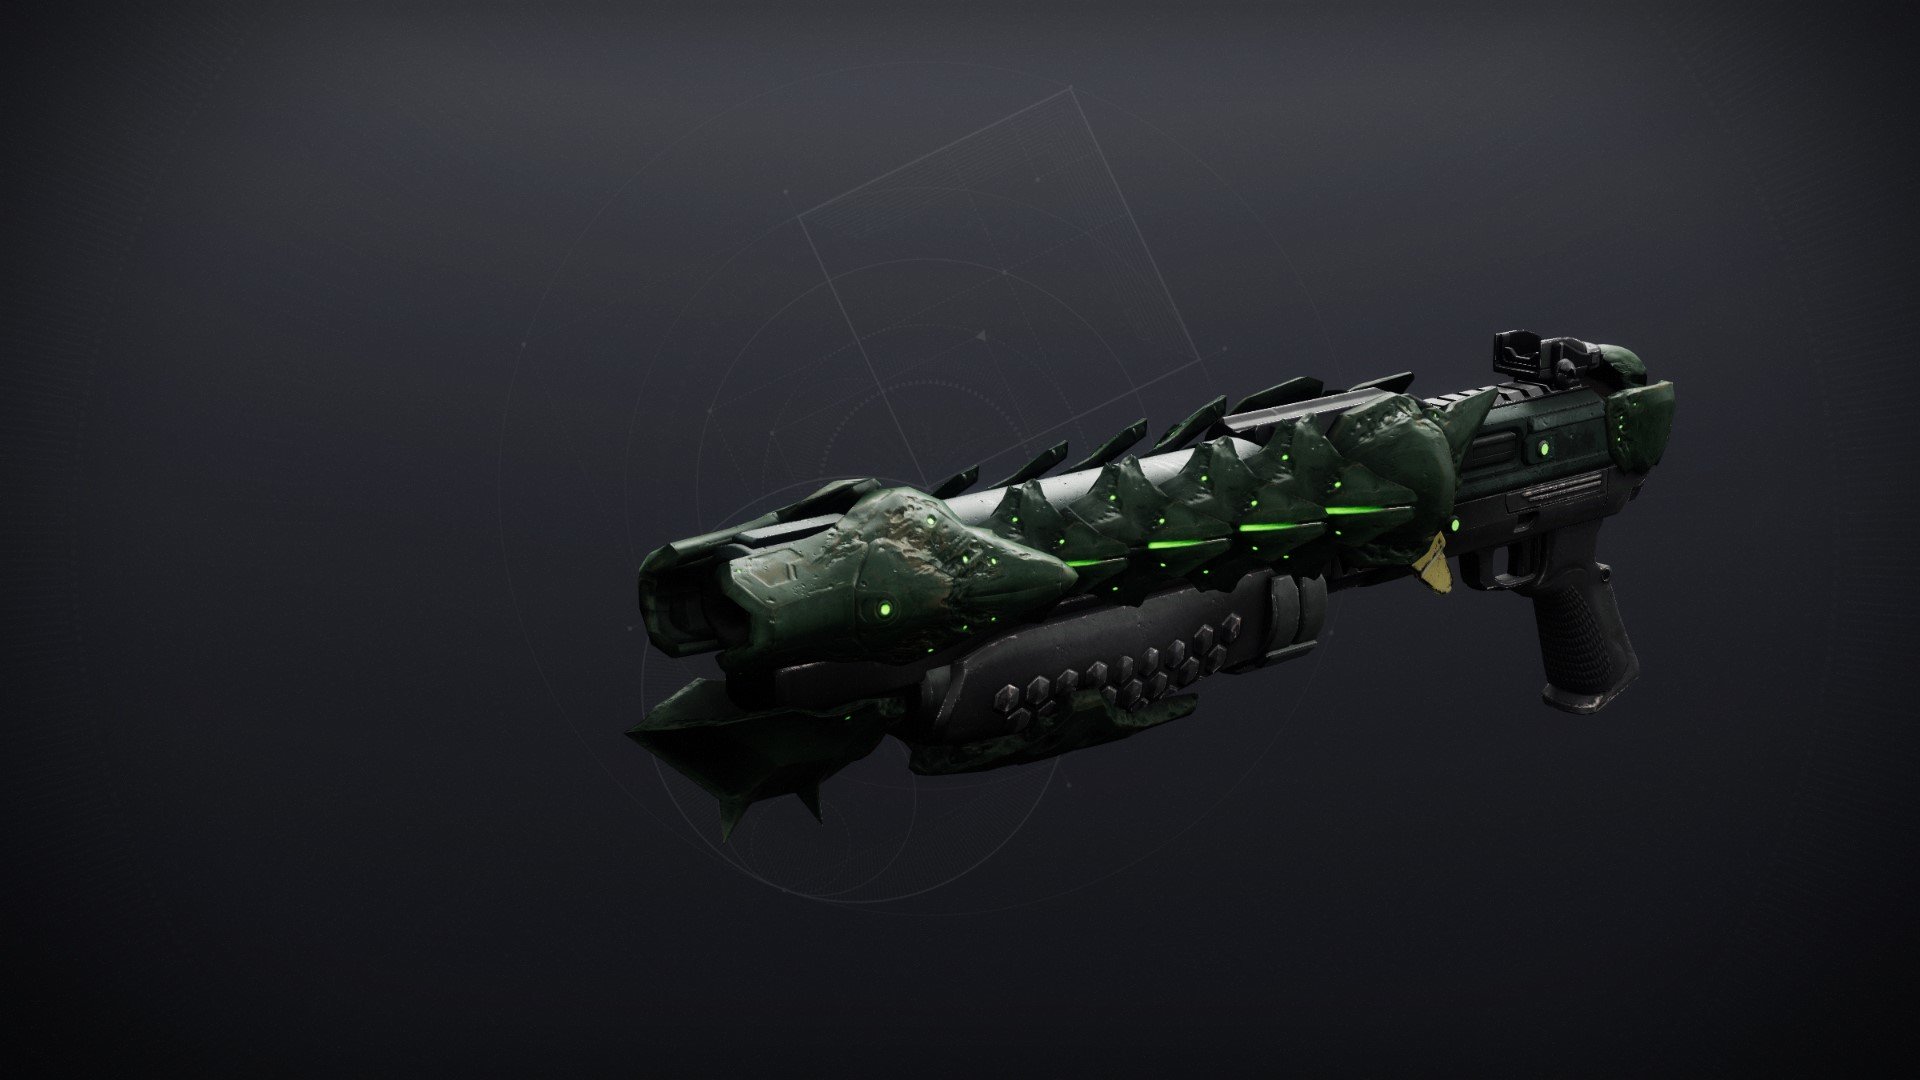
 Abyss Defiant
Legendary //
High-Impact Frame // Auto Rifle
Desirable Perks
- Barrel:
- Arrowhead Brake
- Magazine:
- Ricochet Rounds
- Column 1 Perks:
- Reconstruction
- Heal Clip
- Column 2 Perks:
- Incandescent
- Sword Logic
Masterwork: Range
Mod Slot: Minor Spec, Major Spec, Adept Big Ones Spec
Perk wise, a pretty good auto rifle. The frame of the weapon, however, pulls it down drastically to make the Abyss Defiant a Mid weapon overall. In PvE, Abyss Defiant can get decent ad-clear rolls of Subsistence/Reconstruction and Incandescent. Given the higher damage that comes with this frame of weapon, Sword Logic may be fairly decent. Abyss Defiant's frame makes it essentially worthless in PvP.
 Word of Crota
Legendary //
Precision Frame // Hand Cannon
Desirable Perks
- Barrel:
- Arrowhead Brake
- Corkscrew Rifling
- Magazine:
- Steady Rounds
- Accurized Rounds
- Column 1 Perks:
- Repulsor Brace
- Demolitionist
- Column 2 Perks:
- Destabalizing Rounds
- Sword Logic
Masterwork: Range, Reload
Mod Slot: Minor Spec, Major Spec, Adept Big Ones Spec
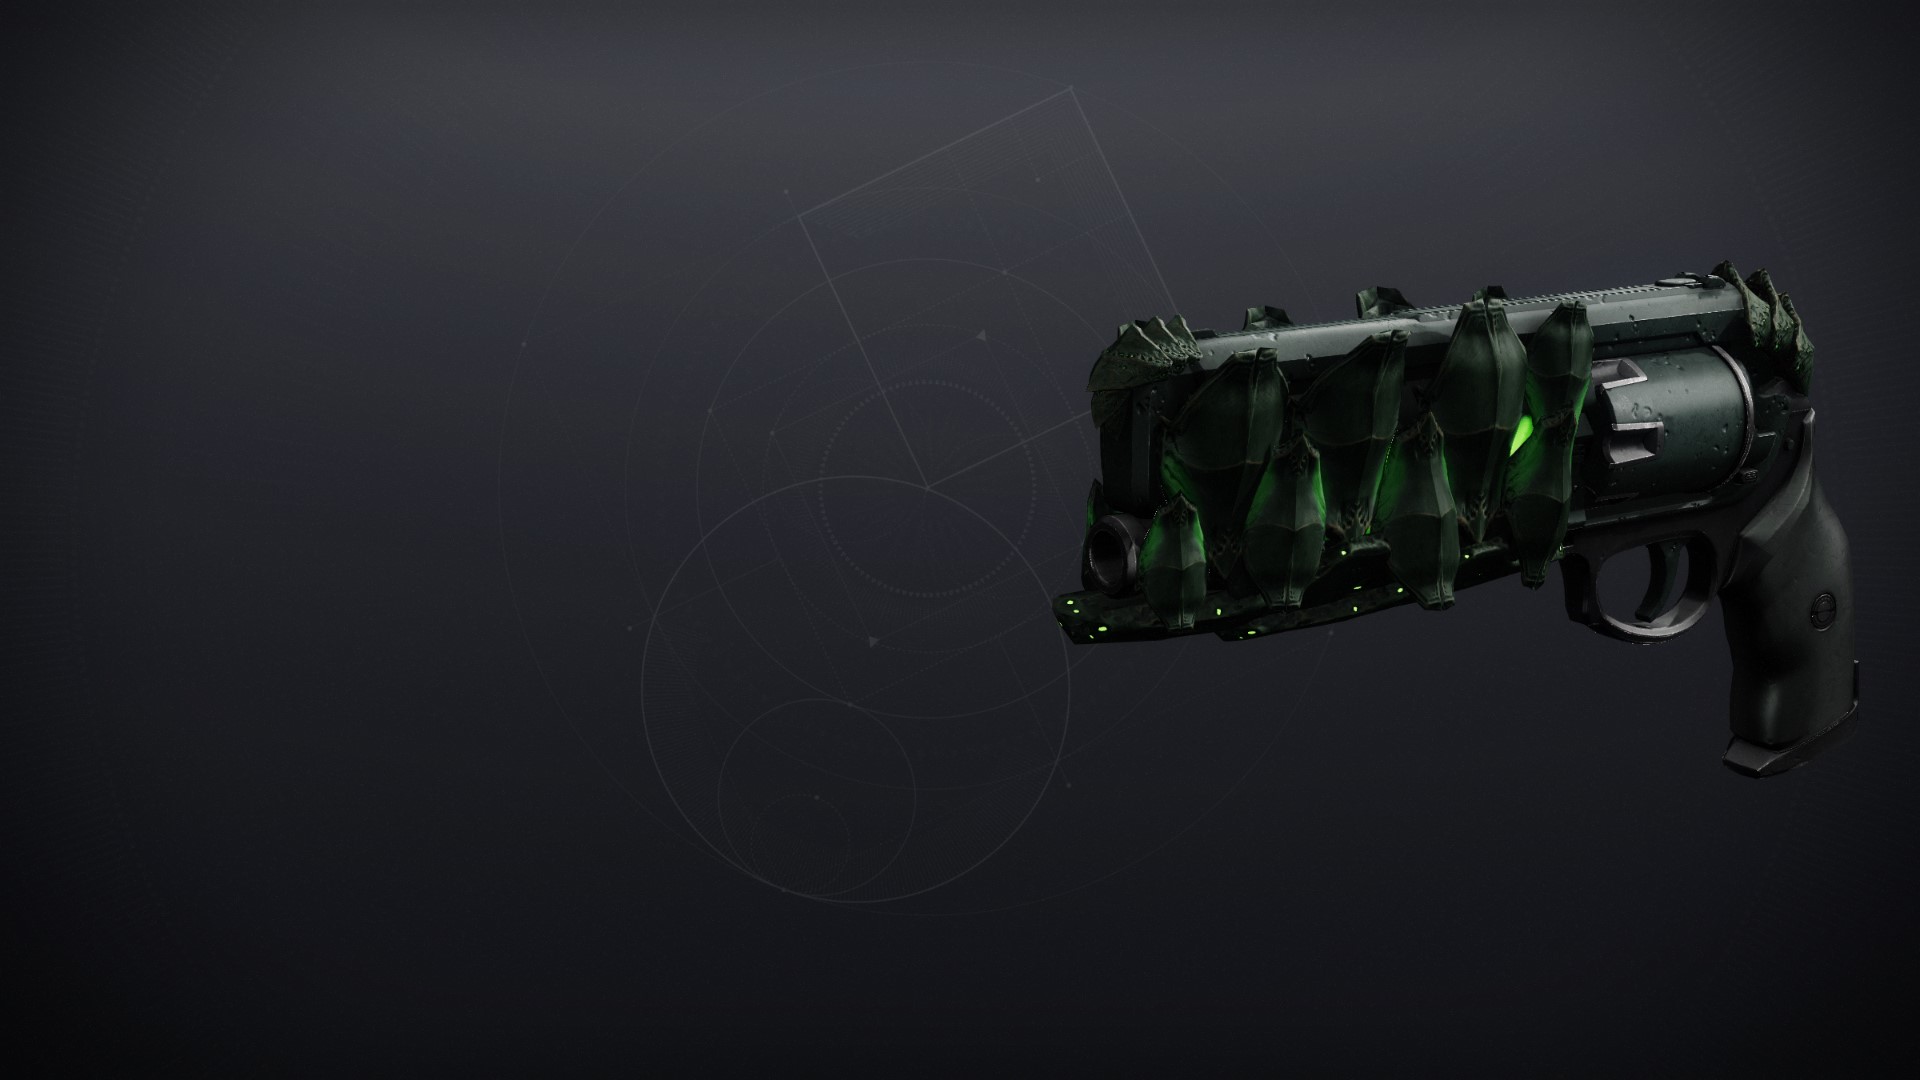
Word of Crota is a fairly decent hand cannon, especially with the S22 buffs to them. Yet, it belongs to the Precision frame, which immediately makes it less useful due to not being an Adaptive frame.
In PvE, Demolitionist and Frenzy will be the most consistent roll, with Repulsor + Destabilising being a decent roll for void builds as well. Thanks to the recent buff to Hand Cannons against majors, Sword Logic may be fairly decent on this weapon. In PvP, Word of Crota already suffers from its undesirable frame. Although Killing Wind+Rampage is a fairly decent roll for 6v6 PvP, at the end of the day any 140RPM Hand Cannon is better.
Swordbreaker
Legendary //
Lightweight Frame // Shotgun
Desirable Perks
- Barrel:
- Rifled Barrel
- Magazine:
- Assault Maga
- Column 1 Perks:
- Slideshot
- Threat Detector
- Column 2 Perks:
- Opening Shot
- One-Two Punch
Masterwork: Handling, Range
Mod Slot: Quick Access Sling, Major Spec
Swordbreaker isn't anything special in PvE, being a pellet shotgun confines it to the role of one-two punch enabler. For those interested in weapon swap rotations, swordbreaker can be fairly decent in double pellet swaps if you can get Surrounded active, otherwise riiswalker is still better.
PvP is this weapon's home. Fragile Focus and Slideshot can help this lightweight shotgun reach impressive ranges, with threat detector providing even more handling and pullout animation buffs if you want the weapon to be unbelievably wieldy. Opening shot is likely the only worthwhile perk in the second column, though it is pretty much the best perk a PvP shotgun wants. Barrel constrictor could be fairly strong as well, but kill-based perks on shotguns are hardly ever worthwhile.
Song of Ir Yût
Legendary //
Adaptive Frame // Machine Gun
Desirable Perks
- Barrel:
- Arrowhead Brake
- Magazine:
- Extended Mag
- Column 1 Perks:
- Reconstruction
- Column 2 Perks:
- Target Lock
- Sword Logic
Masterwork: Reload Speed, Range
Mod Slot: Boss Spec, Adept Big Ones Spec
Song of Ir Yut may be one of the best machine guns in Destiny 2 for PvE. With Reconstruction effectively removing the need to reload and Sword Logic being presumably a strong damage perk on this weapon. Sword Logic is good on this weapon as compared to the other weapons from this raid because the Song, being a Machine Gun possesses major-clearing firepower that the other weapons being primaries are unlikely to have. This weapon's ad-clearing capabilities are only boosted by its origin perk. Overall a pretty good machine gun on paper.
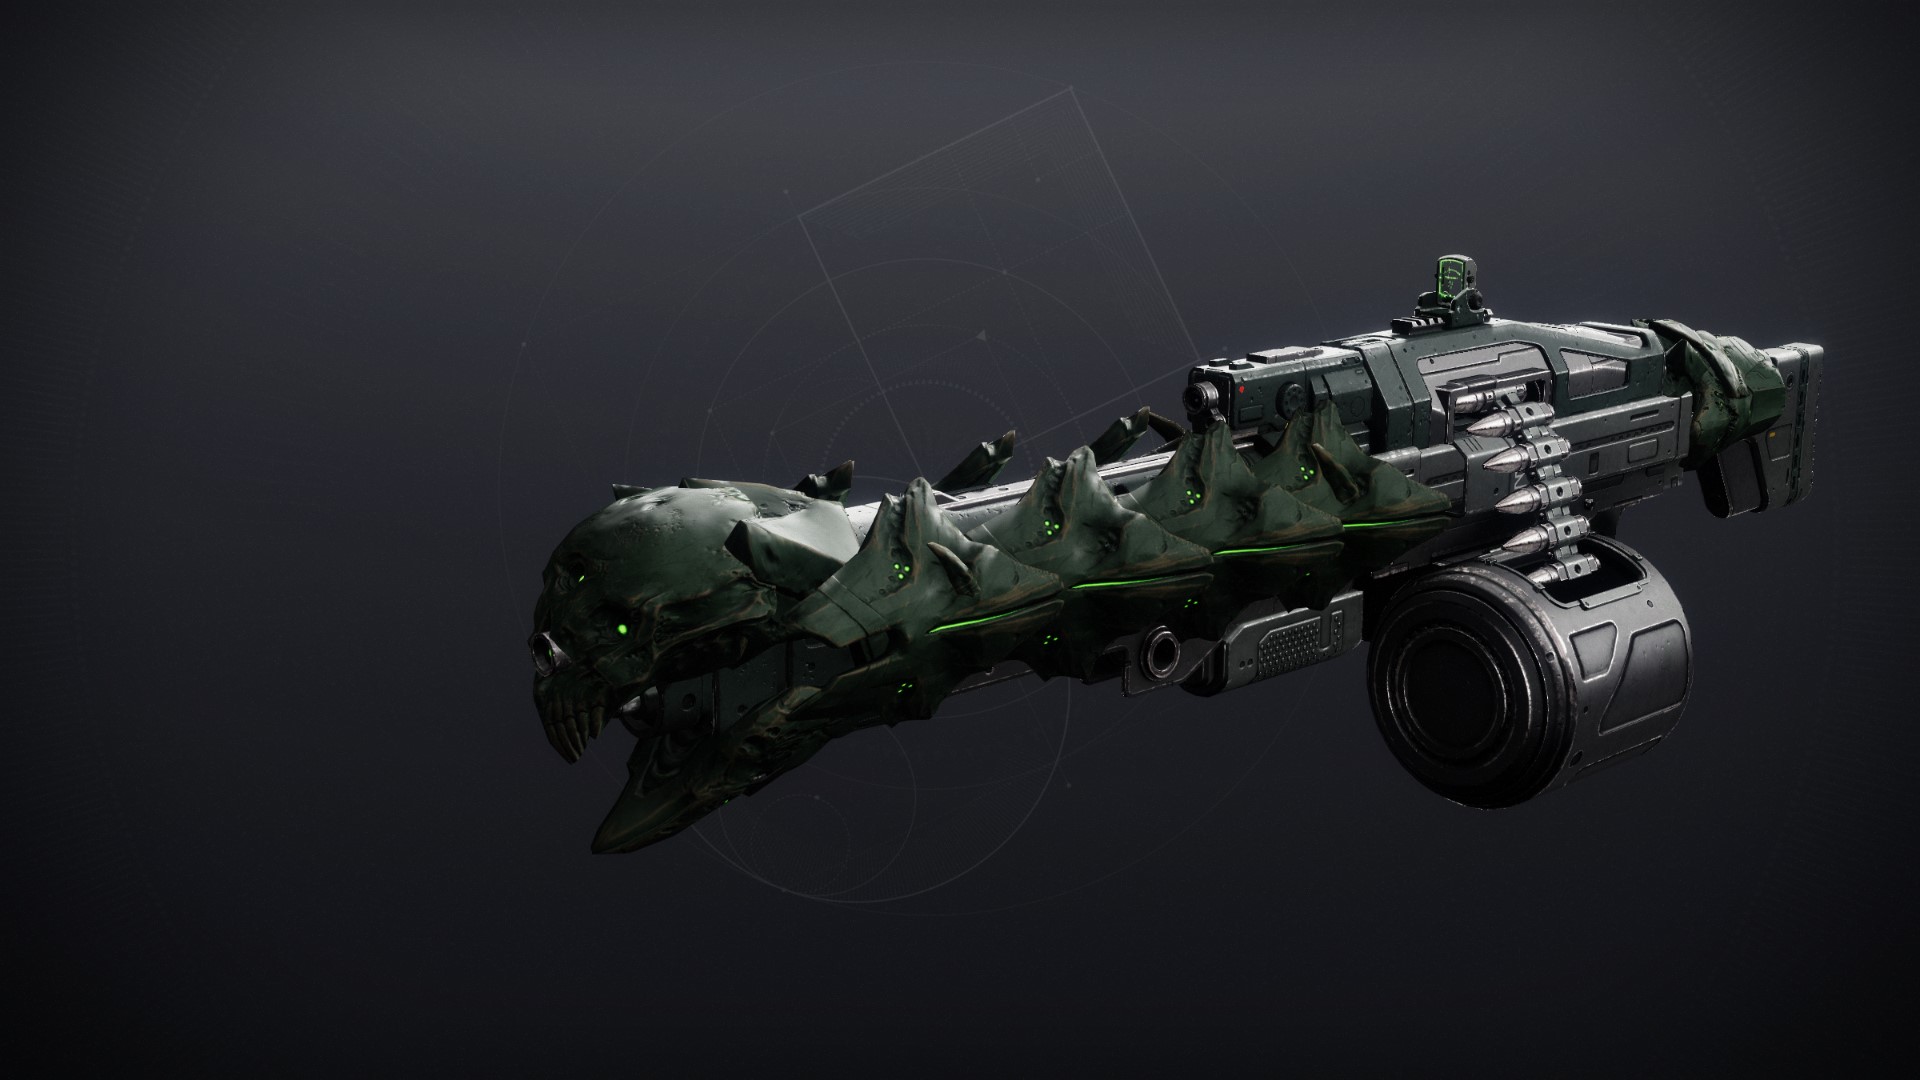
 Necrochasm
Exotic // Auto
Rifle
Details
Precision final blows with this weapon trigger a Cursed Thrall explosion. Final blows with Cursed Thrall explosions refill the magazine.
Reloading after a precision final blow or a final blow with a Cursed Thrall explosion increases your rate of fire and improves stability and aim assist.
A fan favourite from Destiny 1, but how does it hold up in the vastly different Destiny 2 meta? Simply put, this weapon is above average at best and anti synergistic at worst. Sure, the explosions on kill are cool, but in today's meta this isn't anything ground breaking or special, given the existence of strand weapons with Hatchling, Quicksilver Storm, Osteo Striga etc. . Certainly fun to use, but that's where the positives end.
The perks Cursebringer and Desperation seem to counteract each other. Final blows with the explosion refill the magazine, but you need to reload to activate Desperation. If the explosions refill the magazine, it makes reloading much more inconvenient. As the gun has yet to be released, this anti synergy may not exist, but it is yet to be seen.
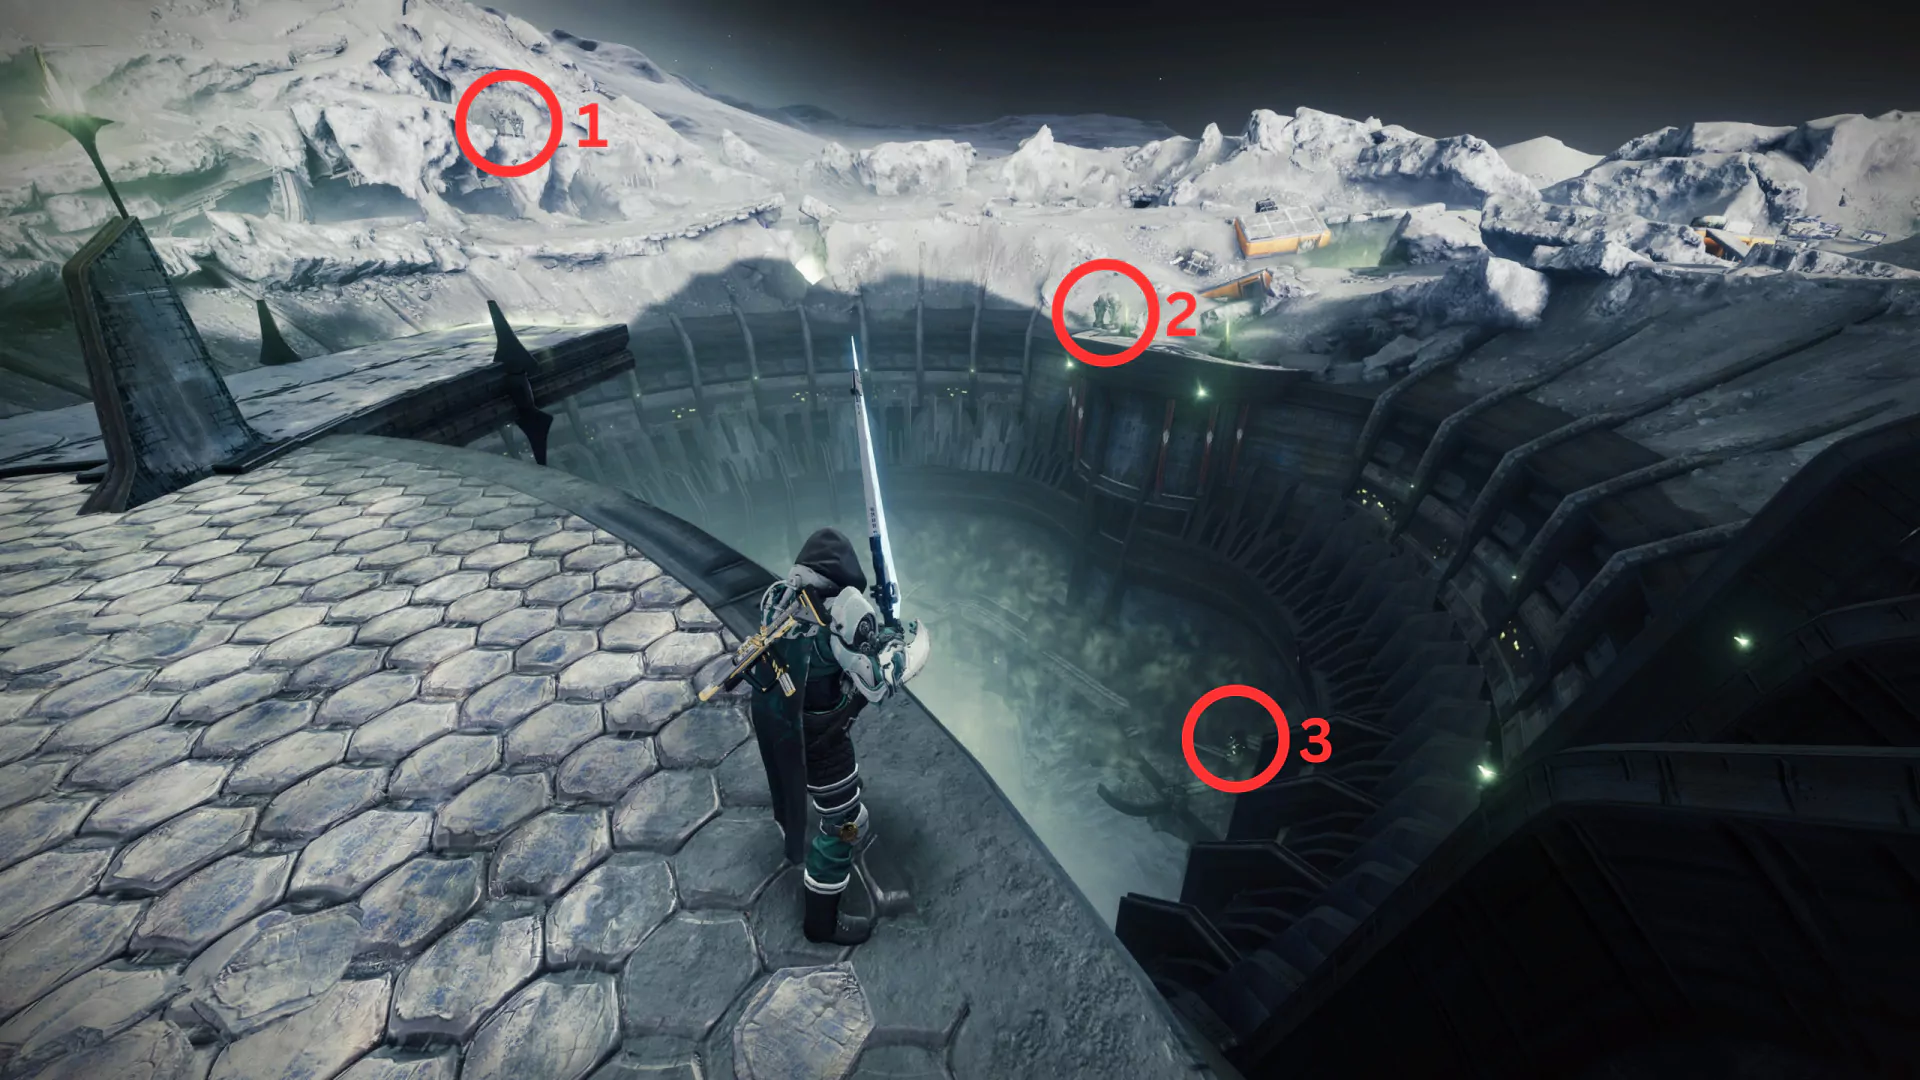
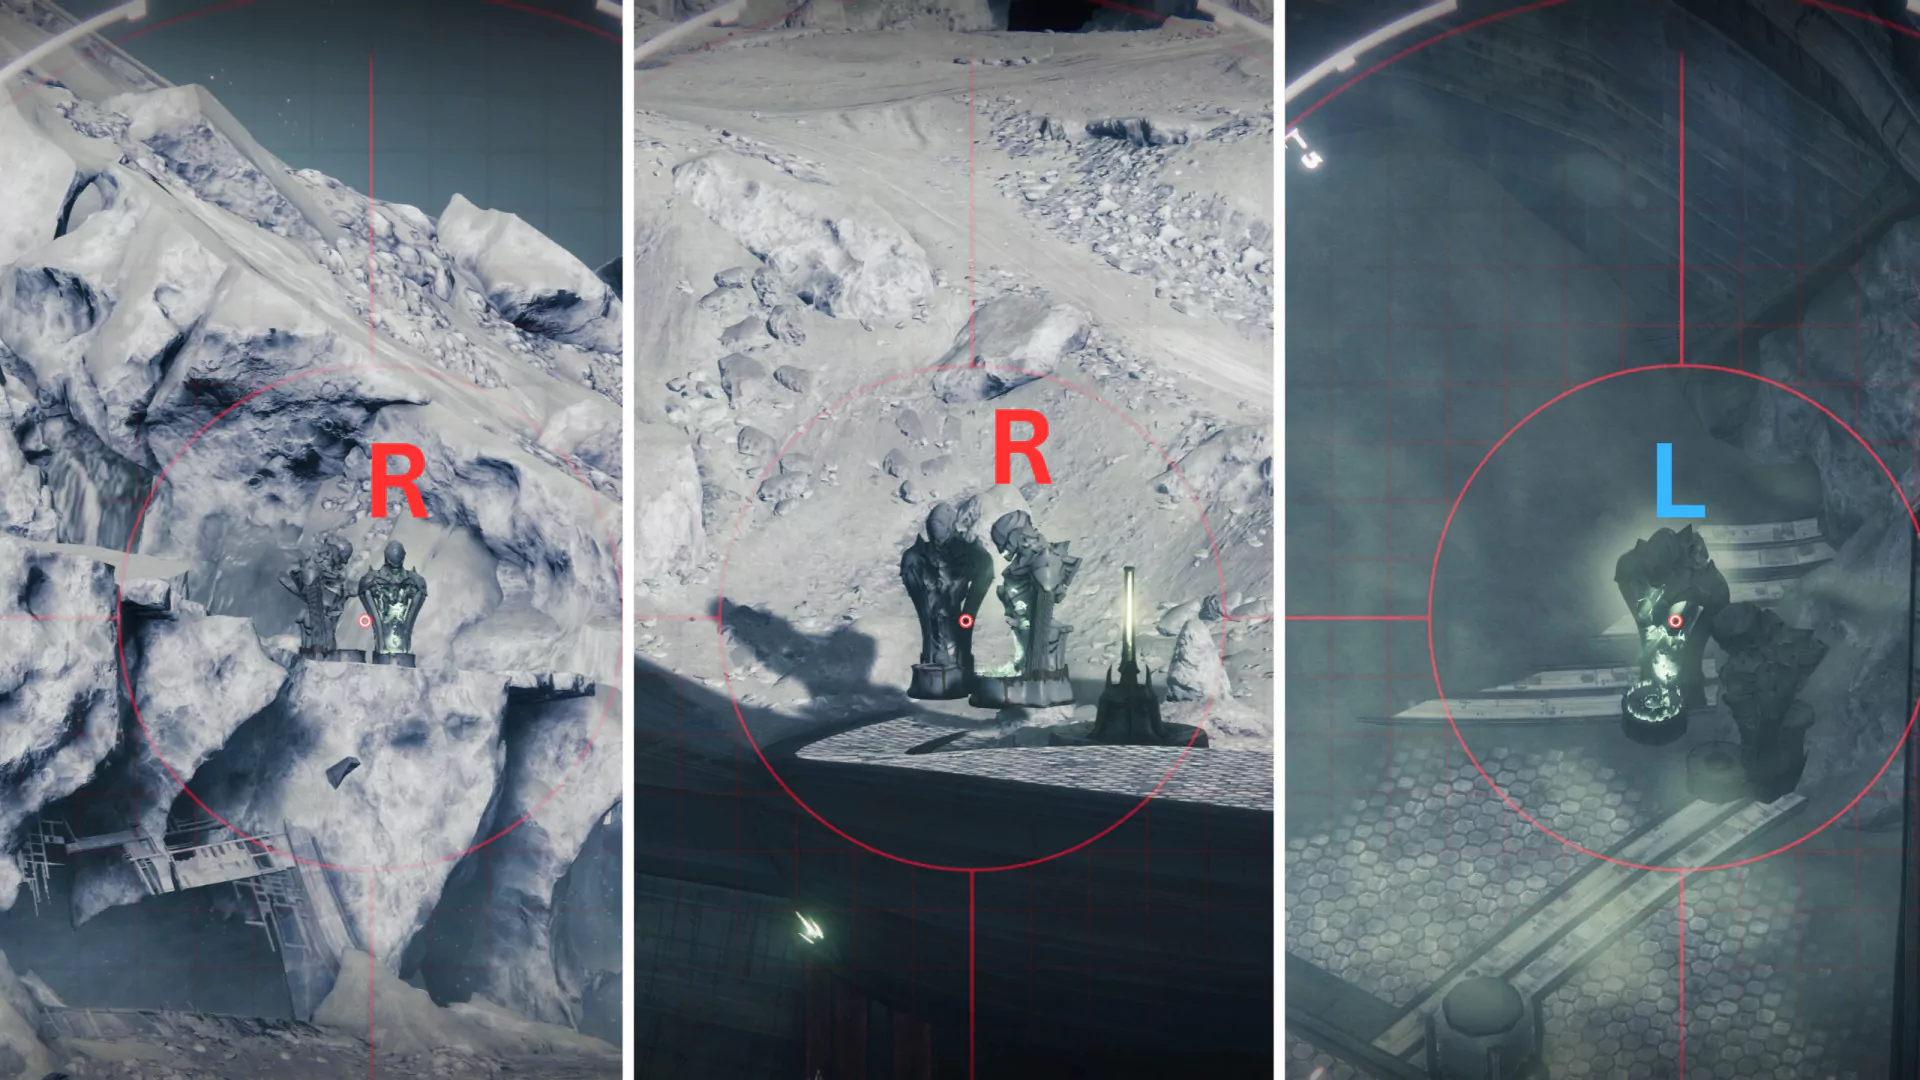
Deepsight Chest
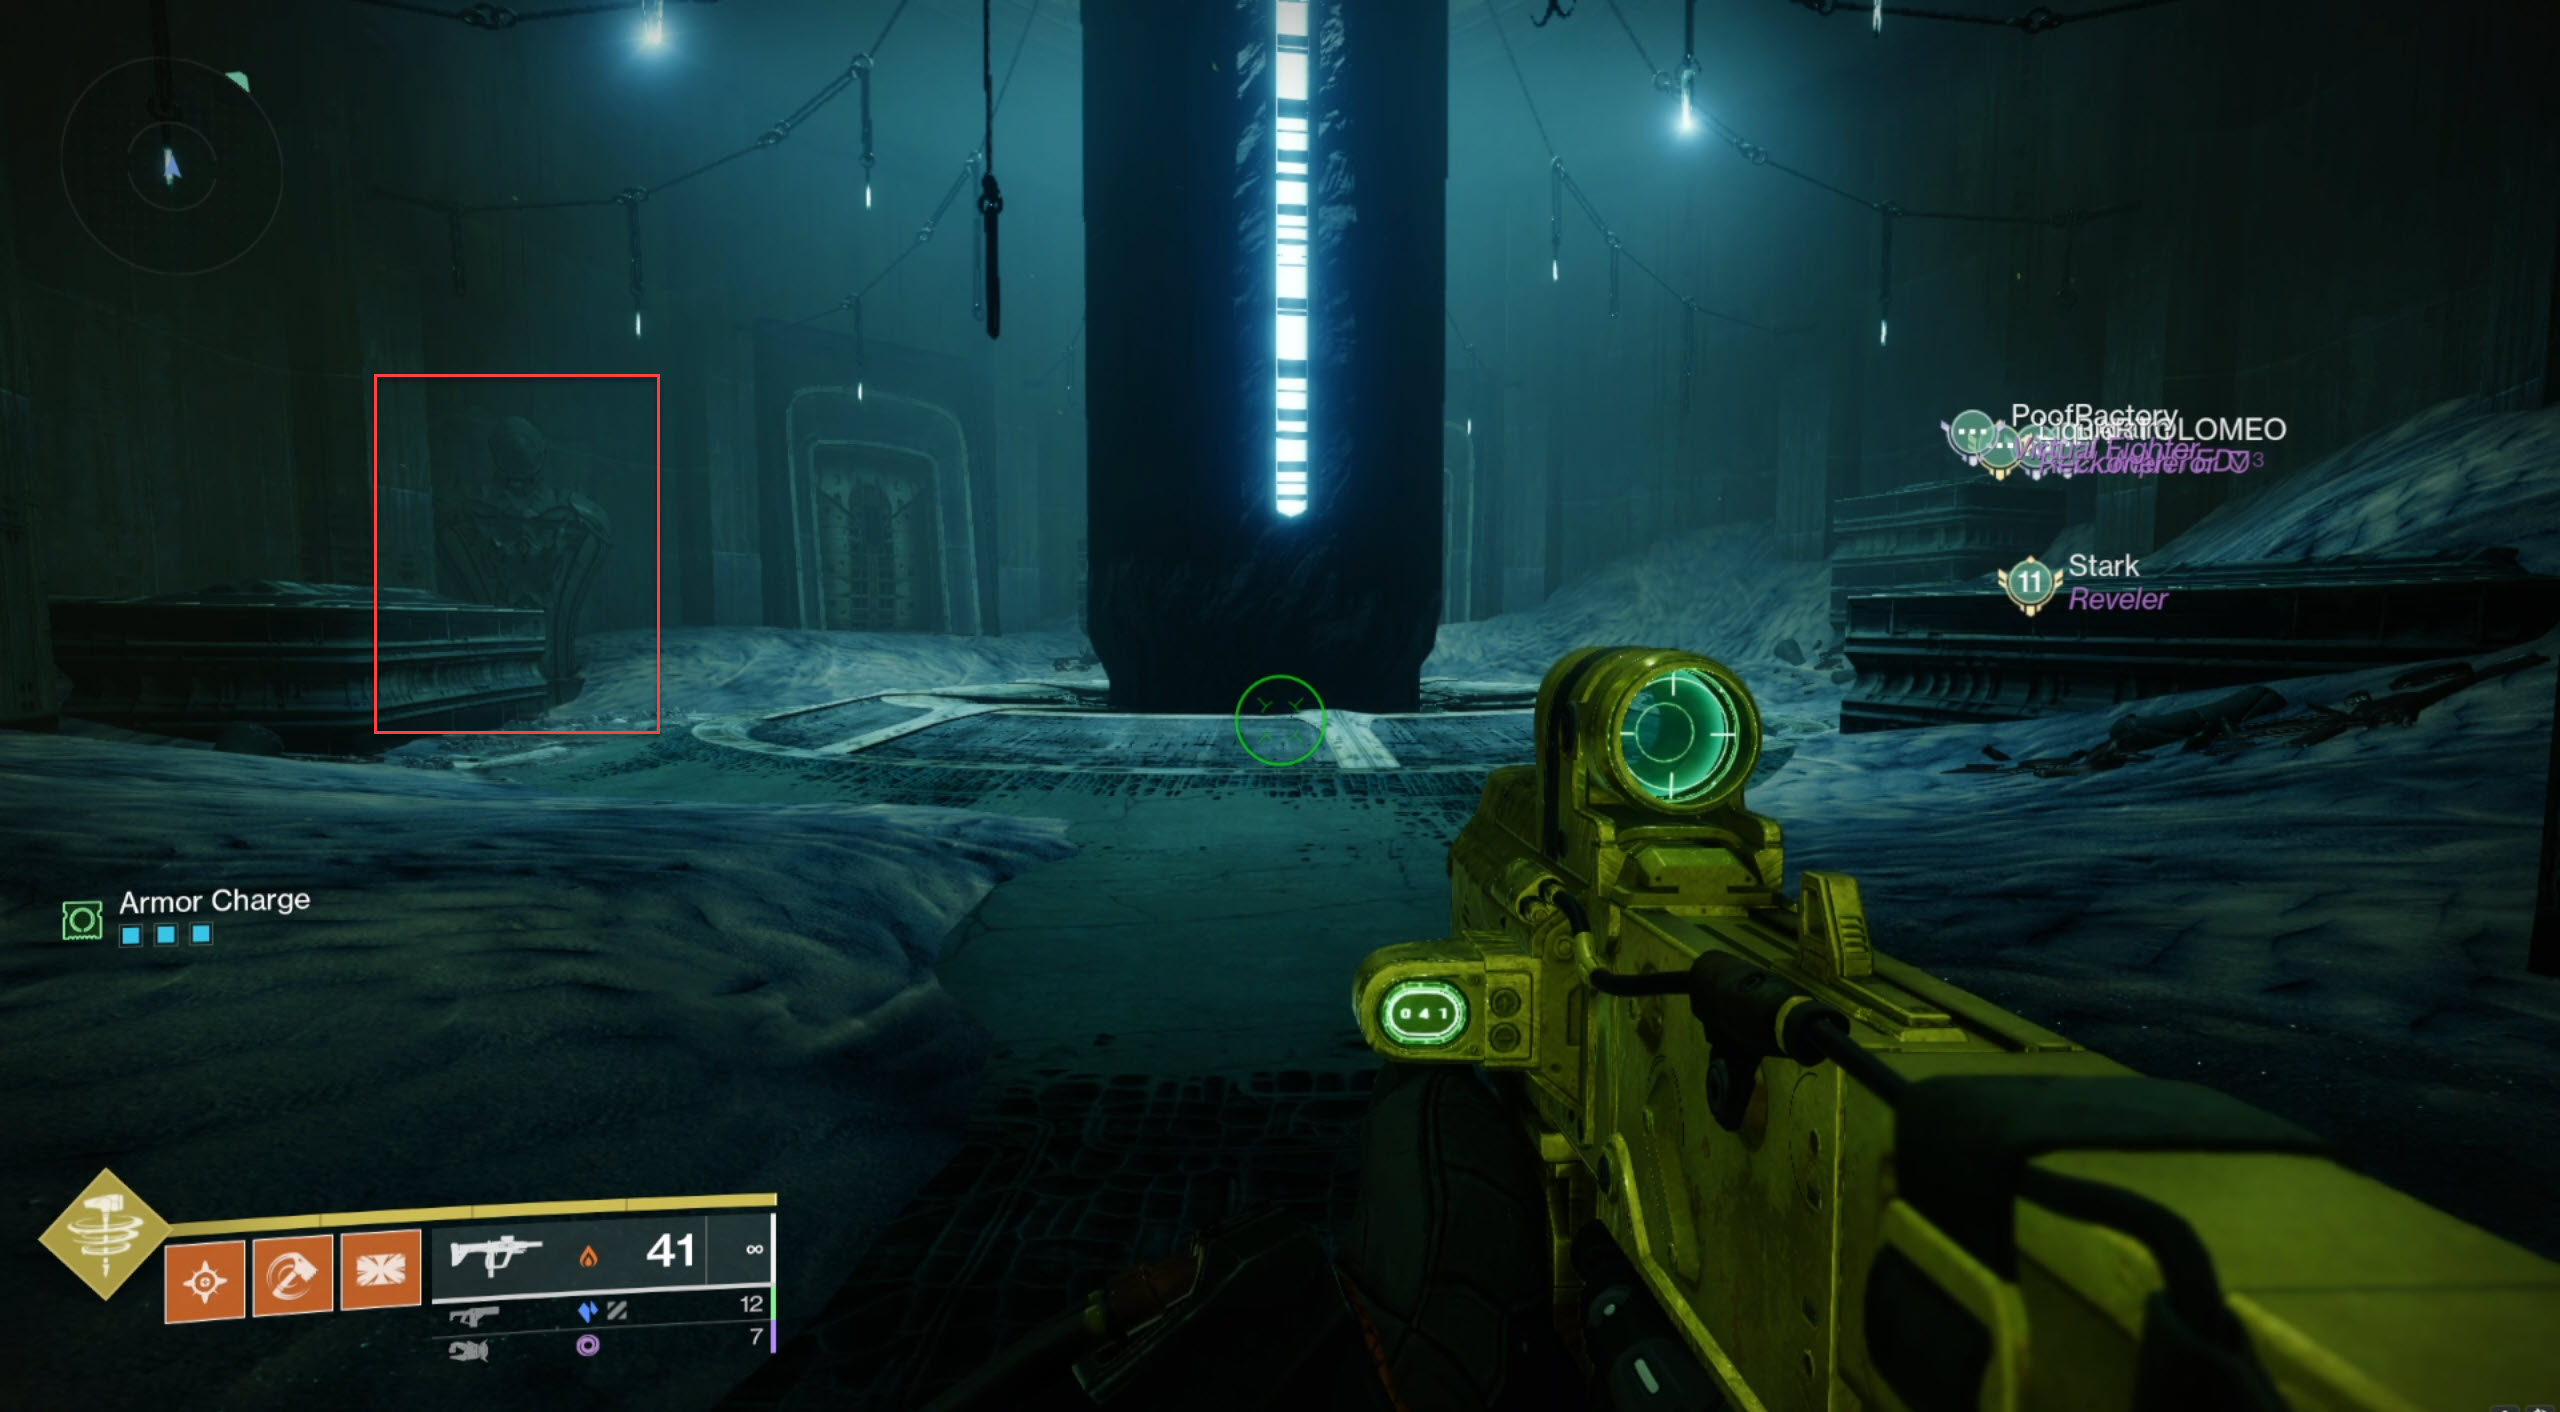
It's really simple to summon the Deepsight Resonance chest after killing Crota. As you first enter the raid, approach and examine the Hellmouth. Three groups of Hive statues will be visible. There are two sculptures in each pair, one of which will be illuminated. From left to right, read the statue sets, noting either "left" or "right" for each set. That would be right, right, left in this instance. Make your way through the raid until you encounter the bridge.
Deepsight Statue Set 1
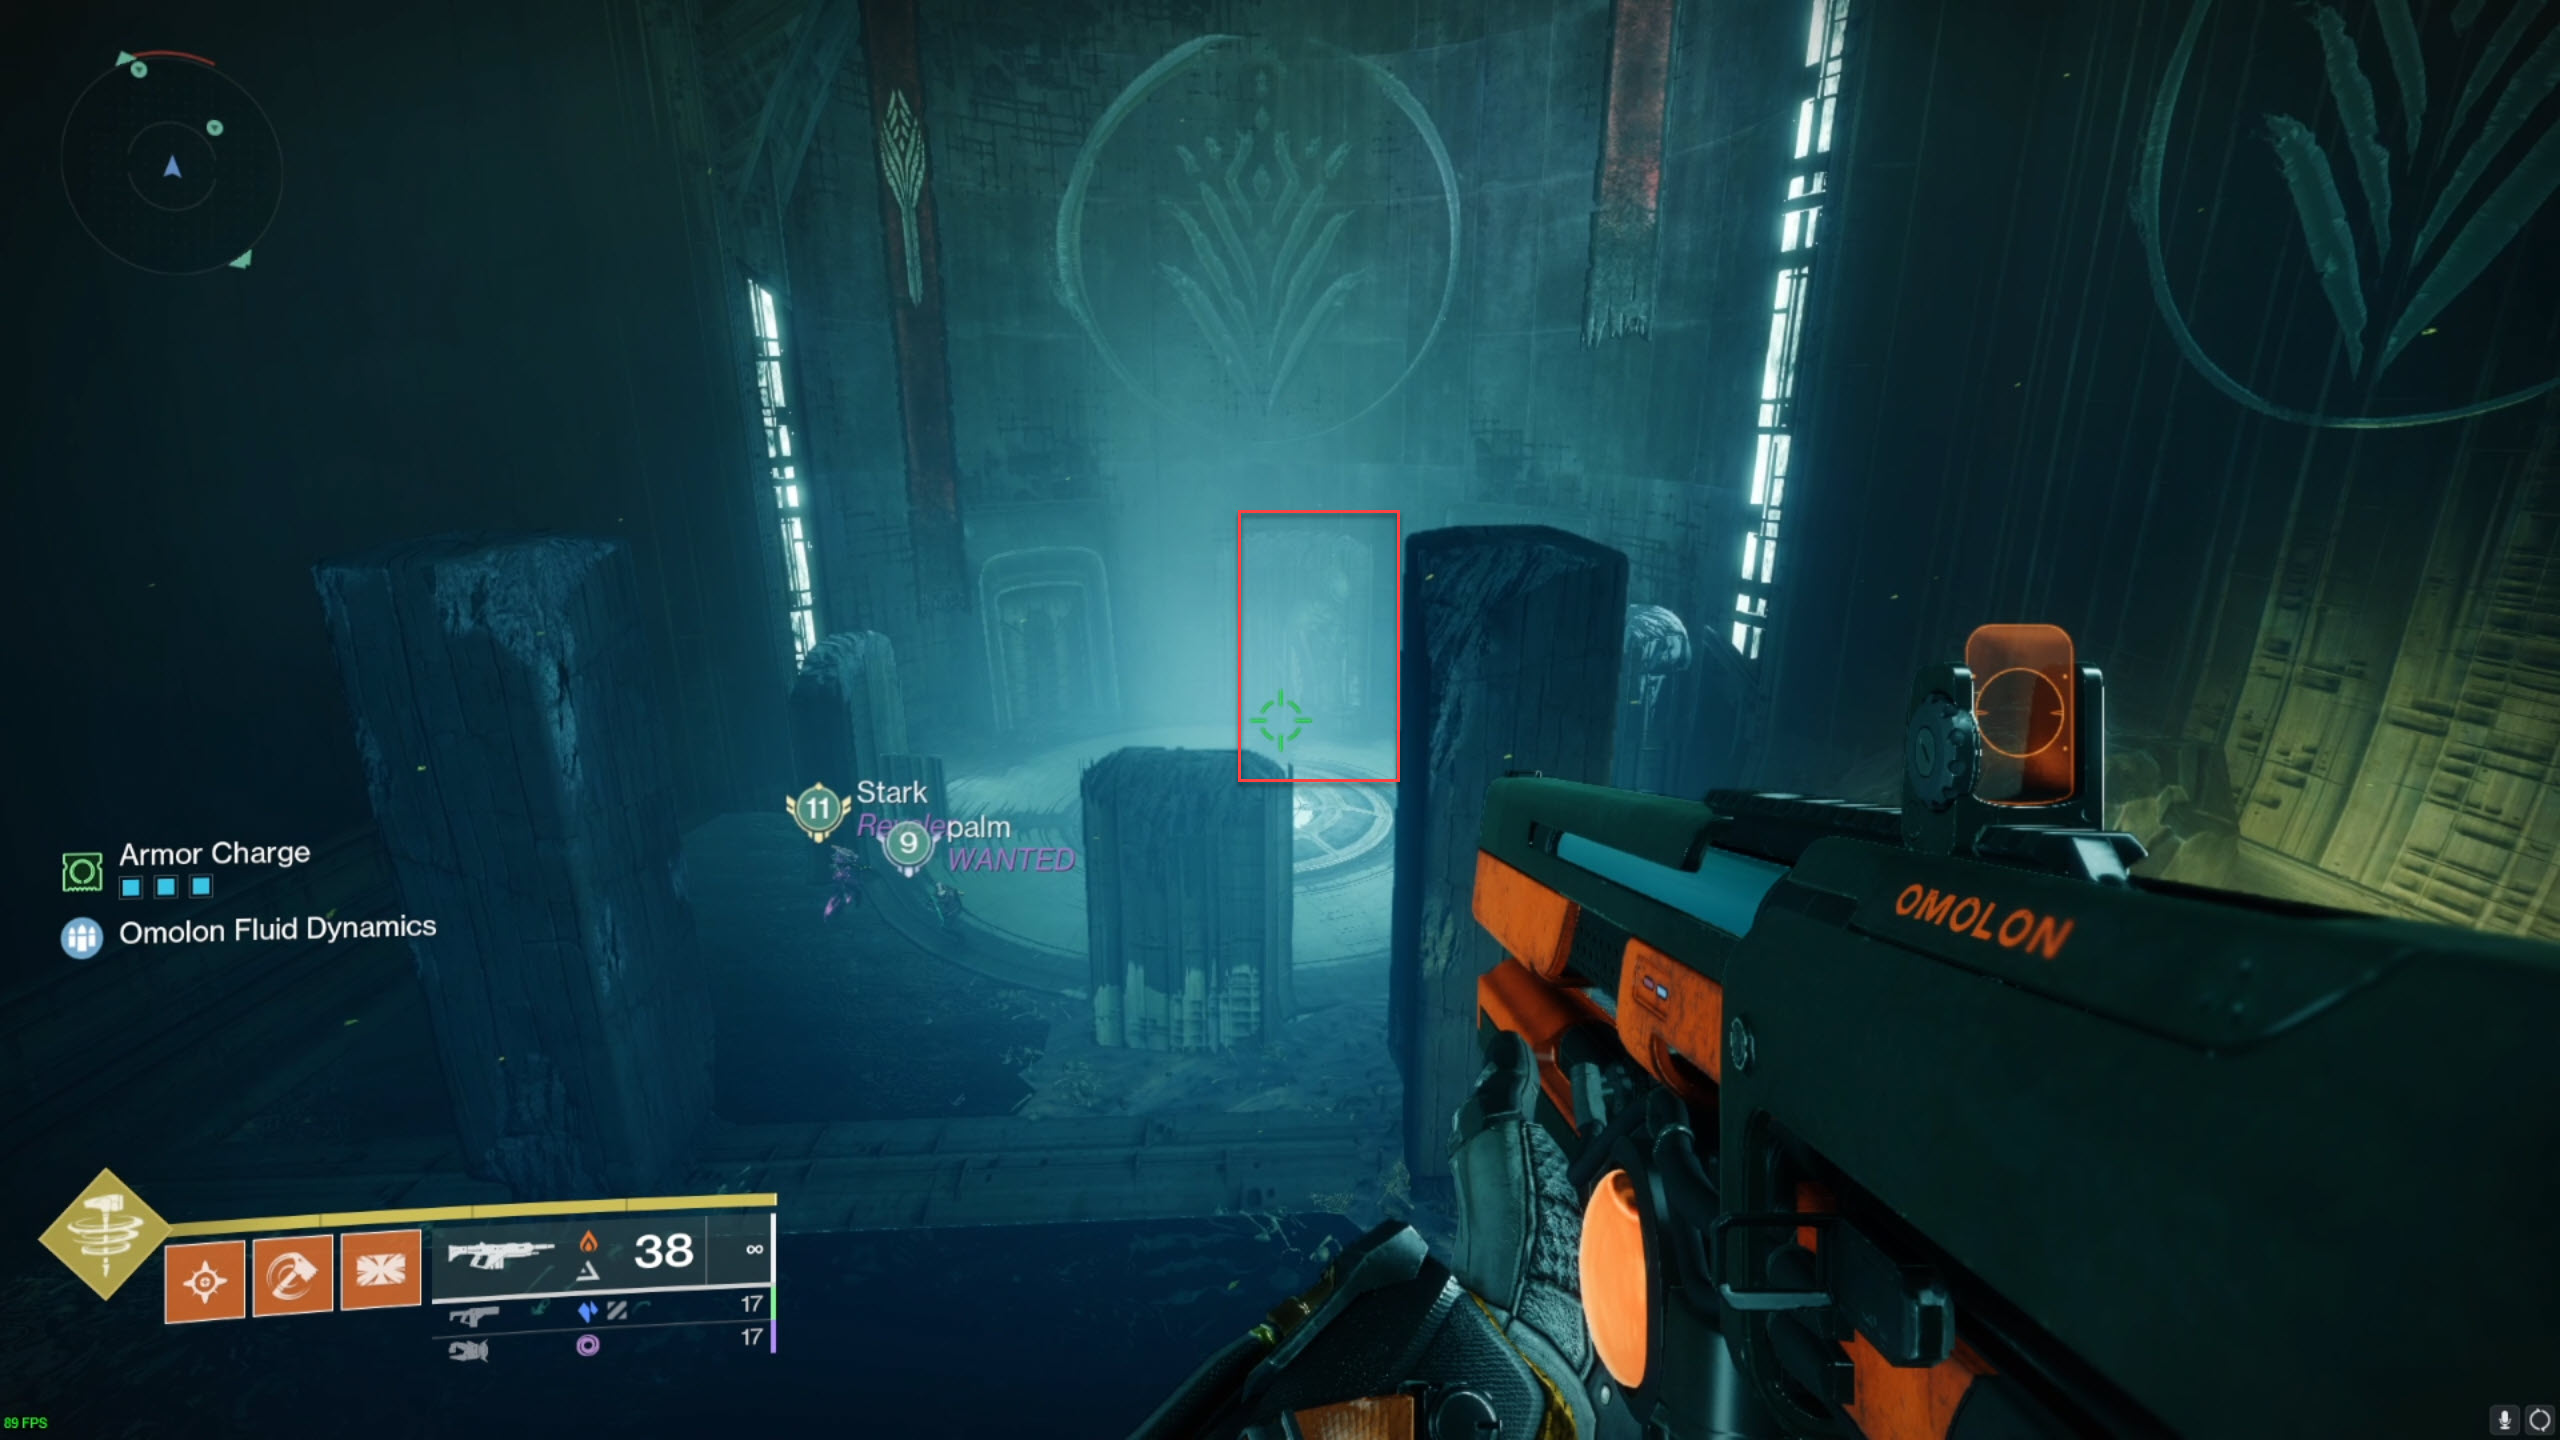
As you get to the bridge encounter, stand on the rally flag and look across the gap. Go down the stairs and move in the direction of the statue that was lighted up on the first set. In our example, we would move to the right. Embrace the wall until you get to an empty space; this is where the encounter's adds spawn. There is a statue in the area. Approach and interact with it. The flavour text "A choice echoes into the future," will appear, letting you know you made the right option. The flavour text "An irredeemable mistake…" will appear upon interacting with the wrong statue and you must restart the raid to do it again.
Deepsight Statue Set 2
Look at the steps from the plate that constructs the bridge after you finish the encounter. Each side of the steps has a space. Move to the side that corresponds to the second statue set; in this case, right. Interact with the statue by making your way to the area's rear.
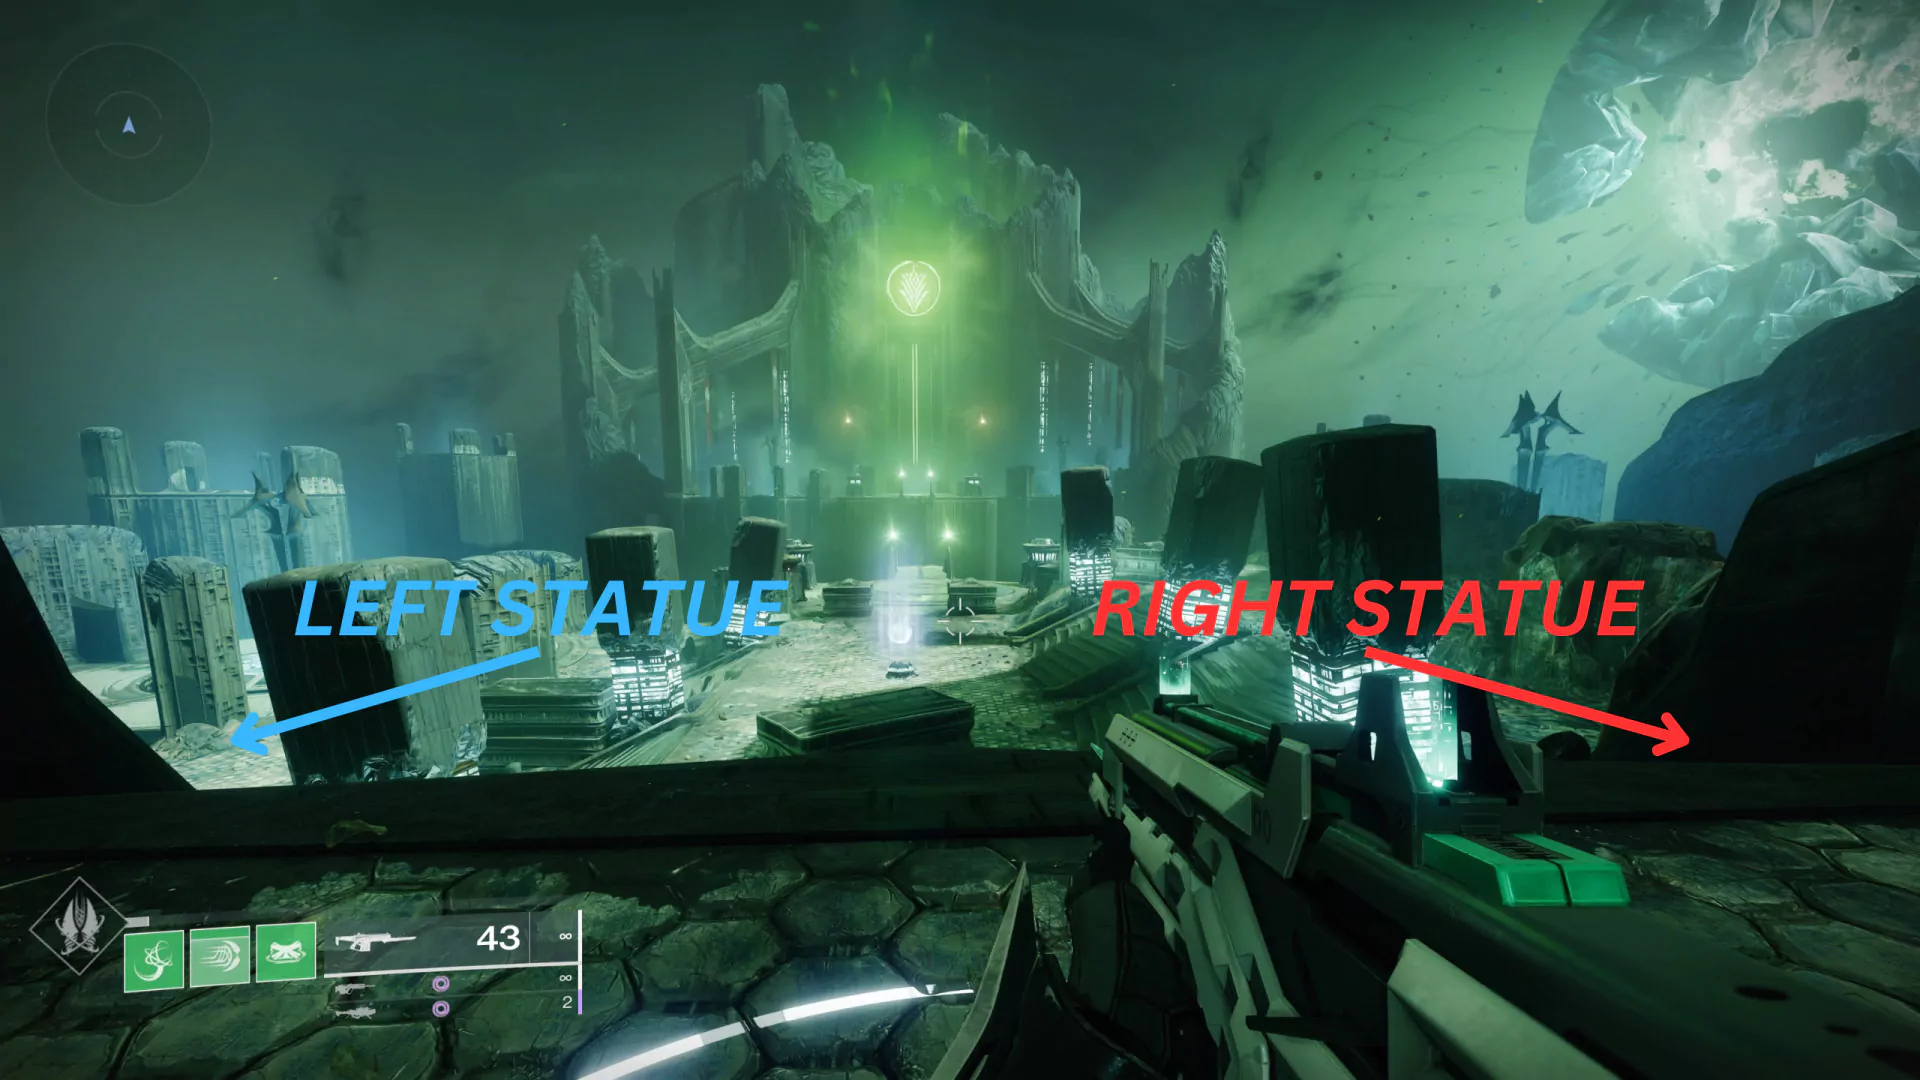
Deepsight Statue Set 3
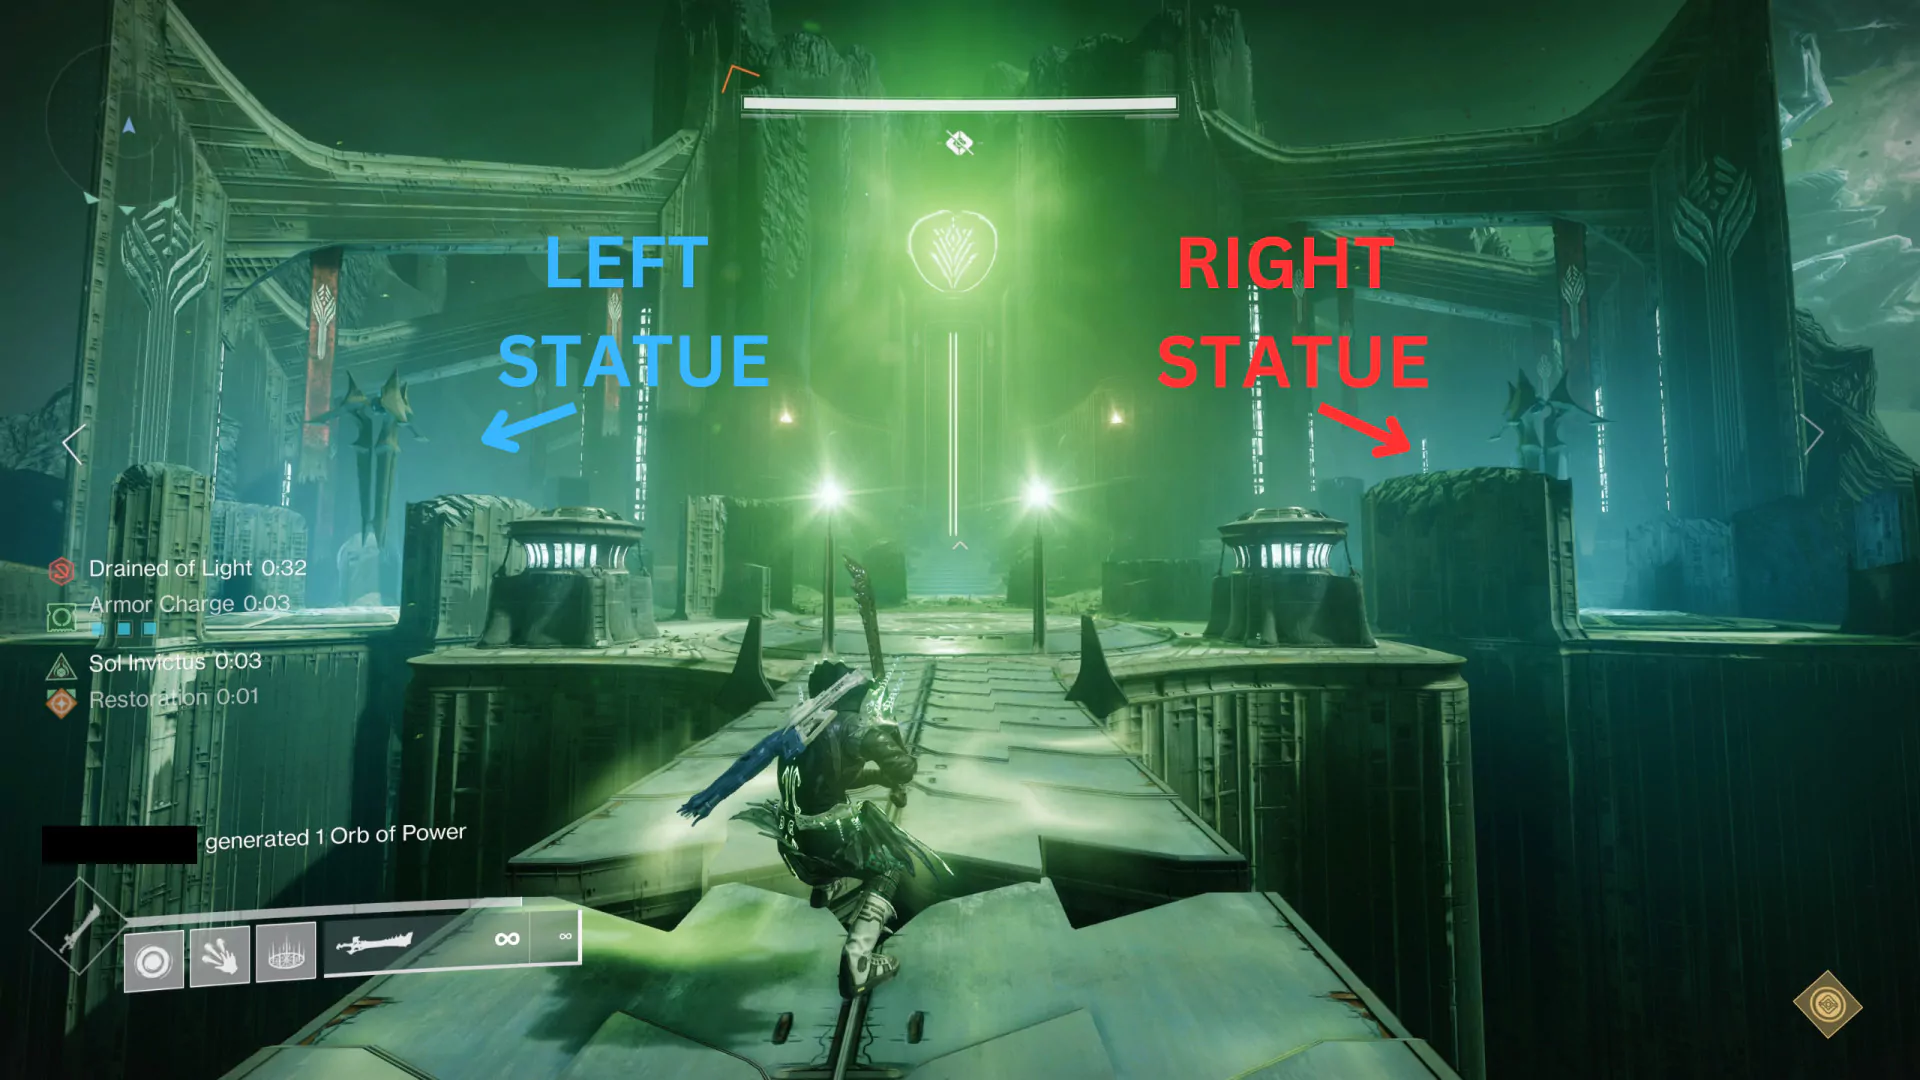
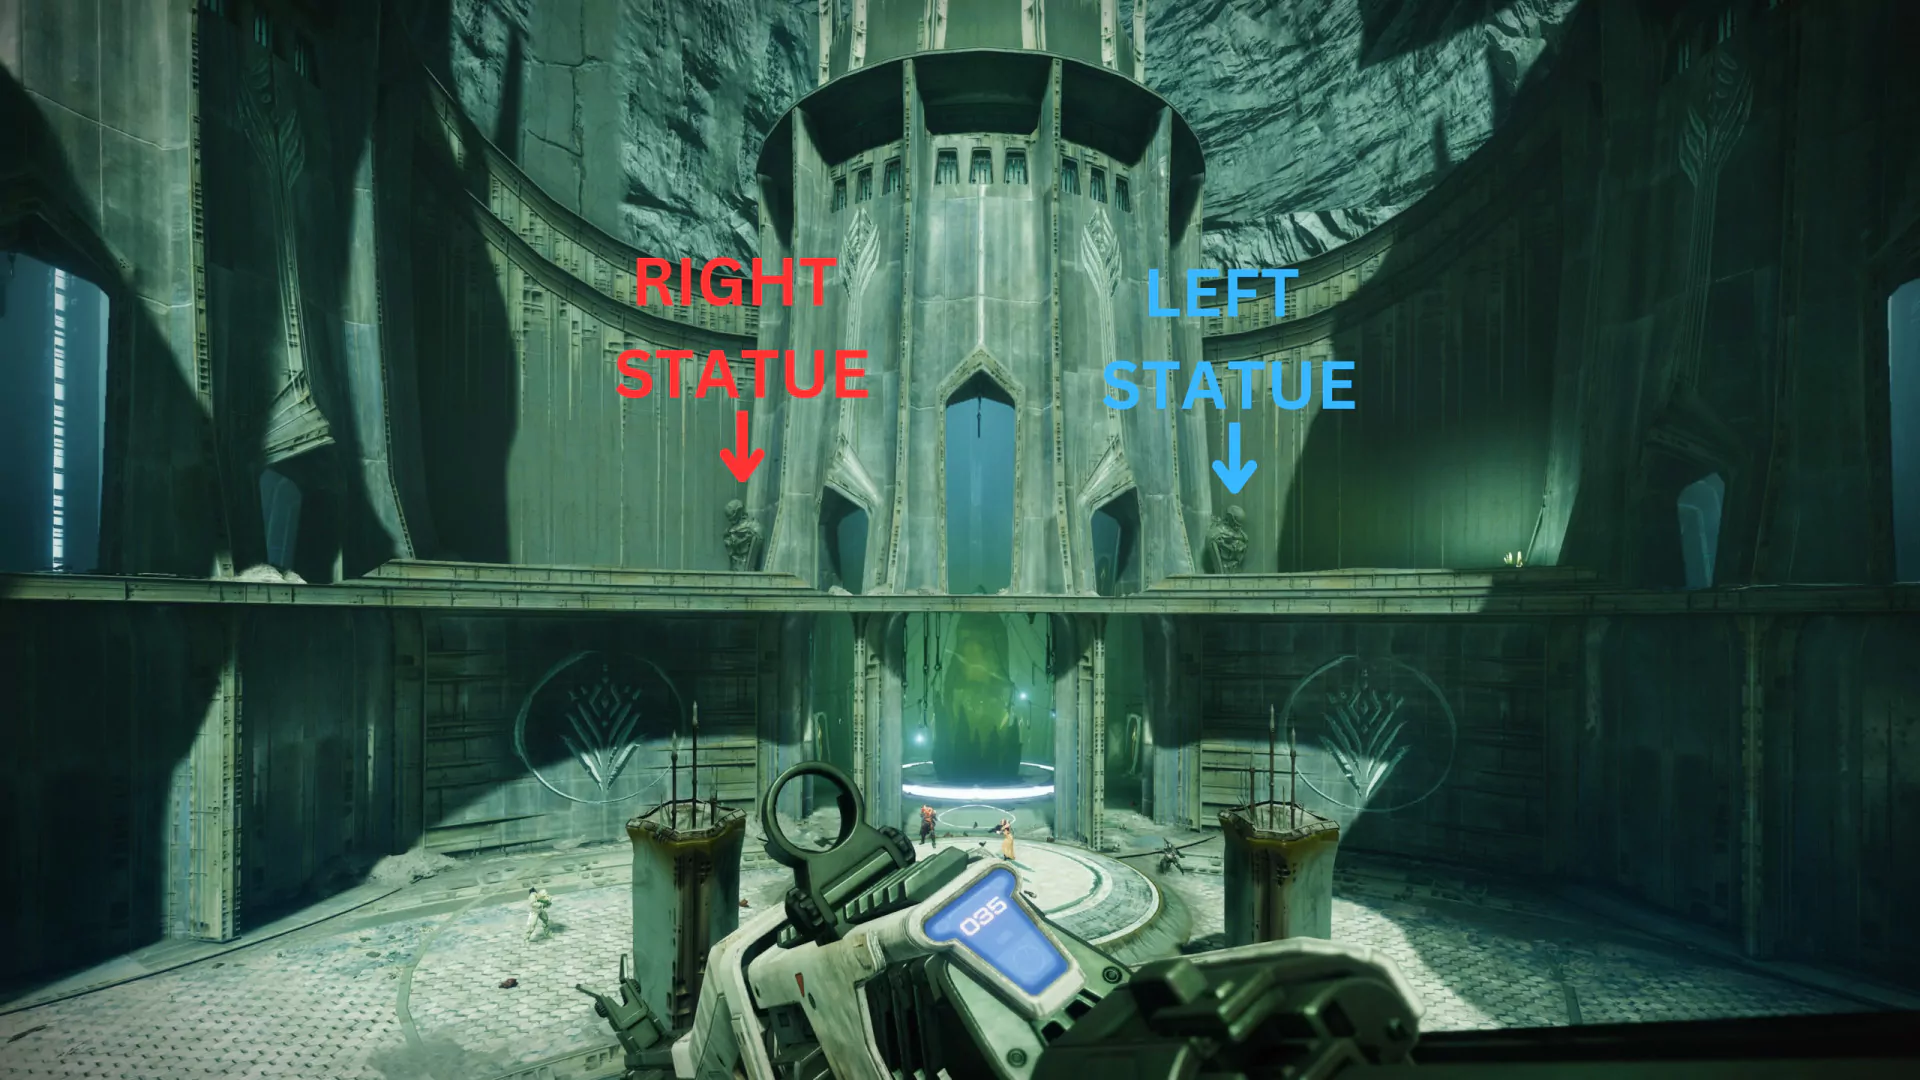
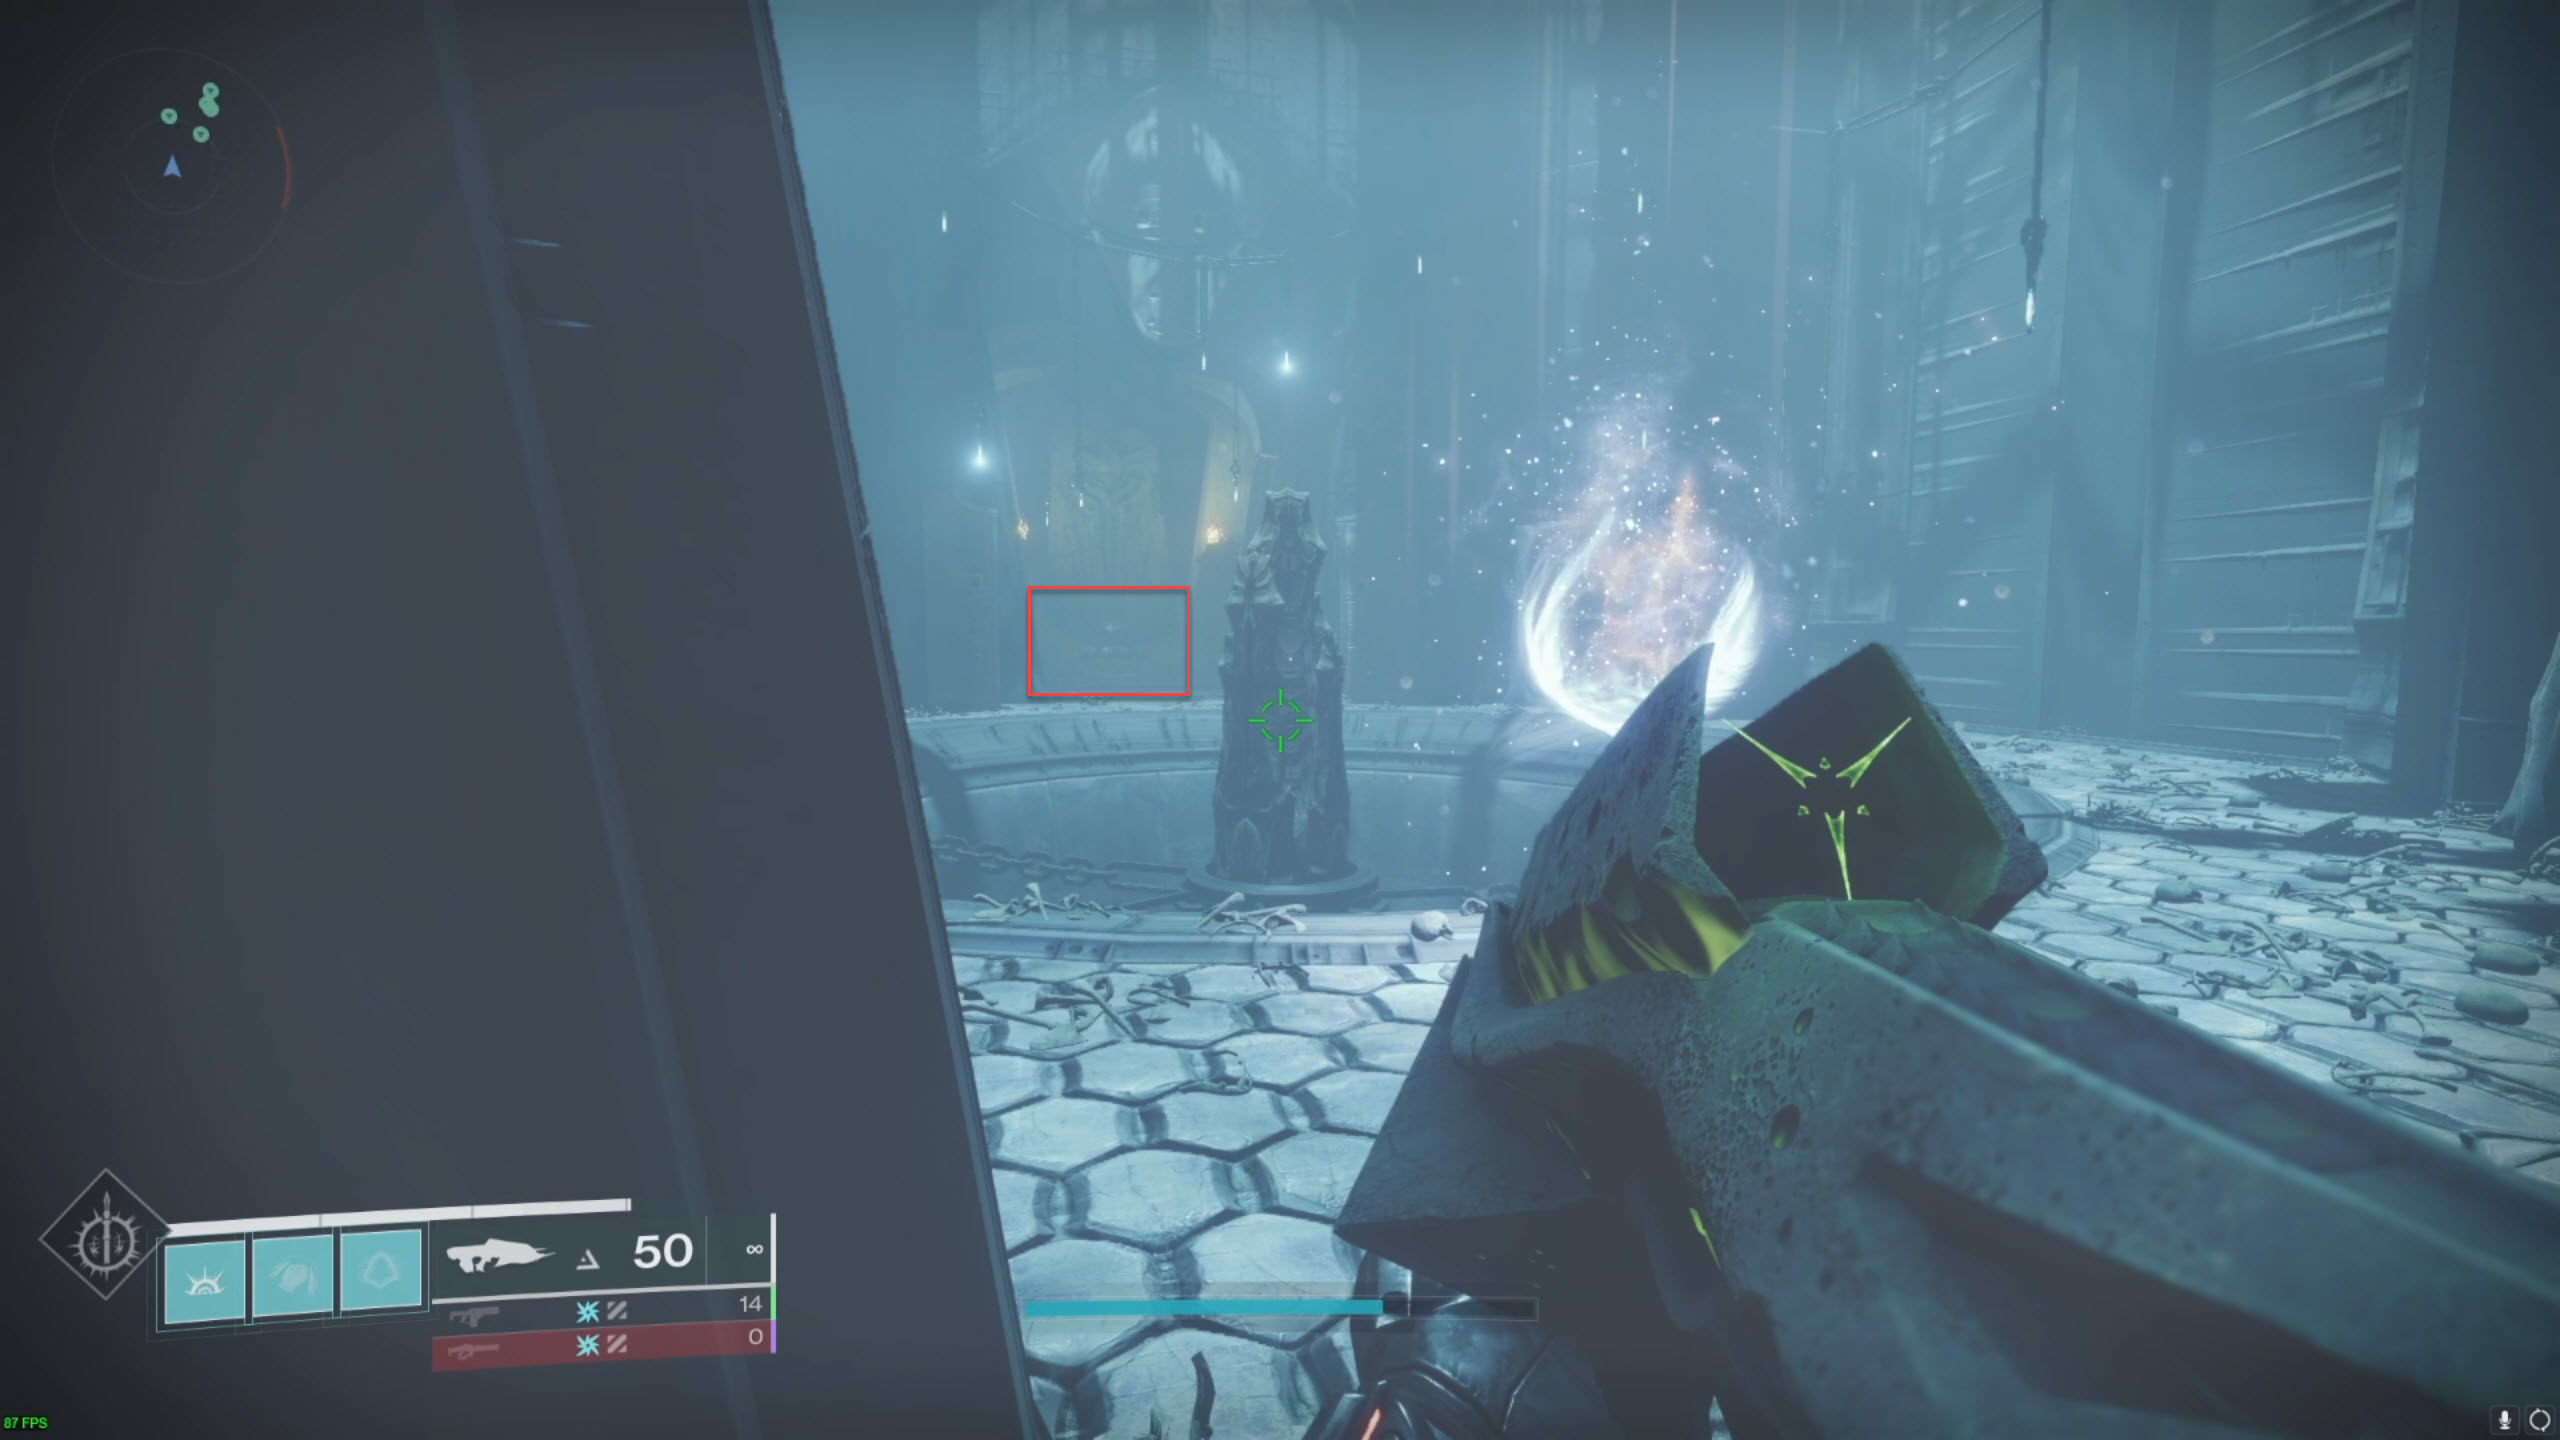
Jump up to the area above the Crota rally flag once the Ir Yut encounter is over. The statue is located on either side of the tiny central room. The statue that matches the third and last set from the start is what you want to interact with. Keep in mind that the left and right are dependent on facing the Oversoul, thus once you turn around to leap up to the statues, it will be backward. We'll use the left statue on the right side of the image as our example.
If all is done correctly, the flavour text "A balance is reached. To the victor go the final spoils." will appear, and the deepsight chest will appear upon Crota's death.
Secret Chests
Secret Chest #1
Run to the left and hug the wall as soon as the Abyss encounter starts. There will be a lit-up door every short while. Up to the point where you may turn left, keep following the doors. There will be two additional doors: one in front of you and one on the left. The chest will be in front of you, behind the door.

Secret Chest #2
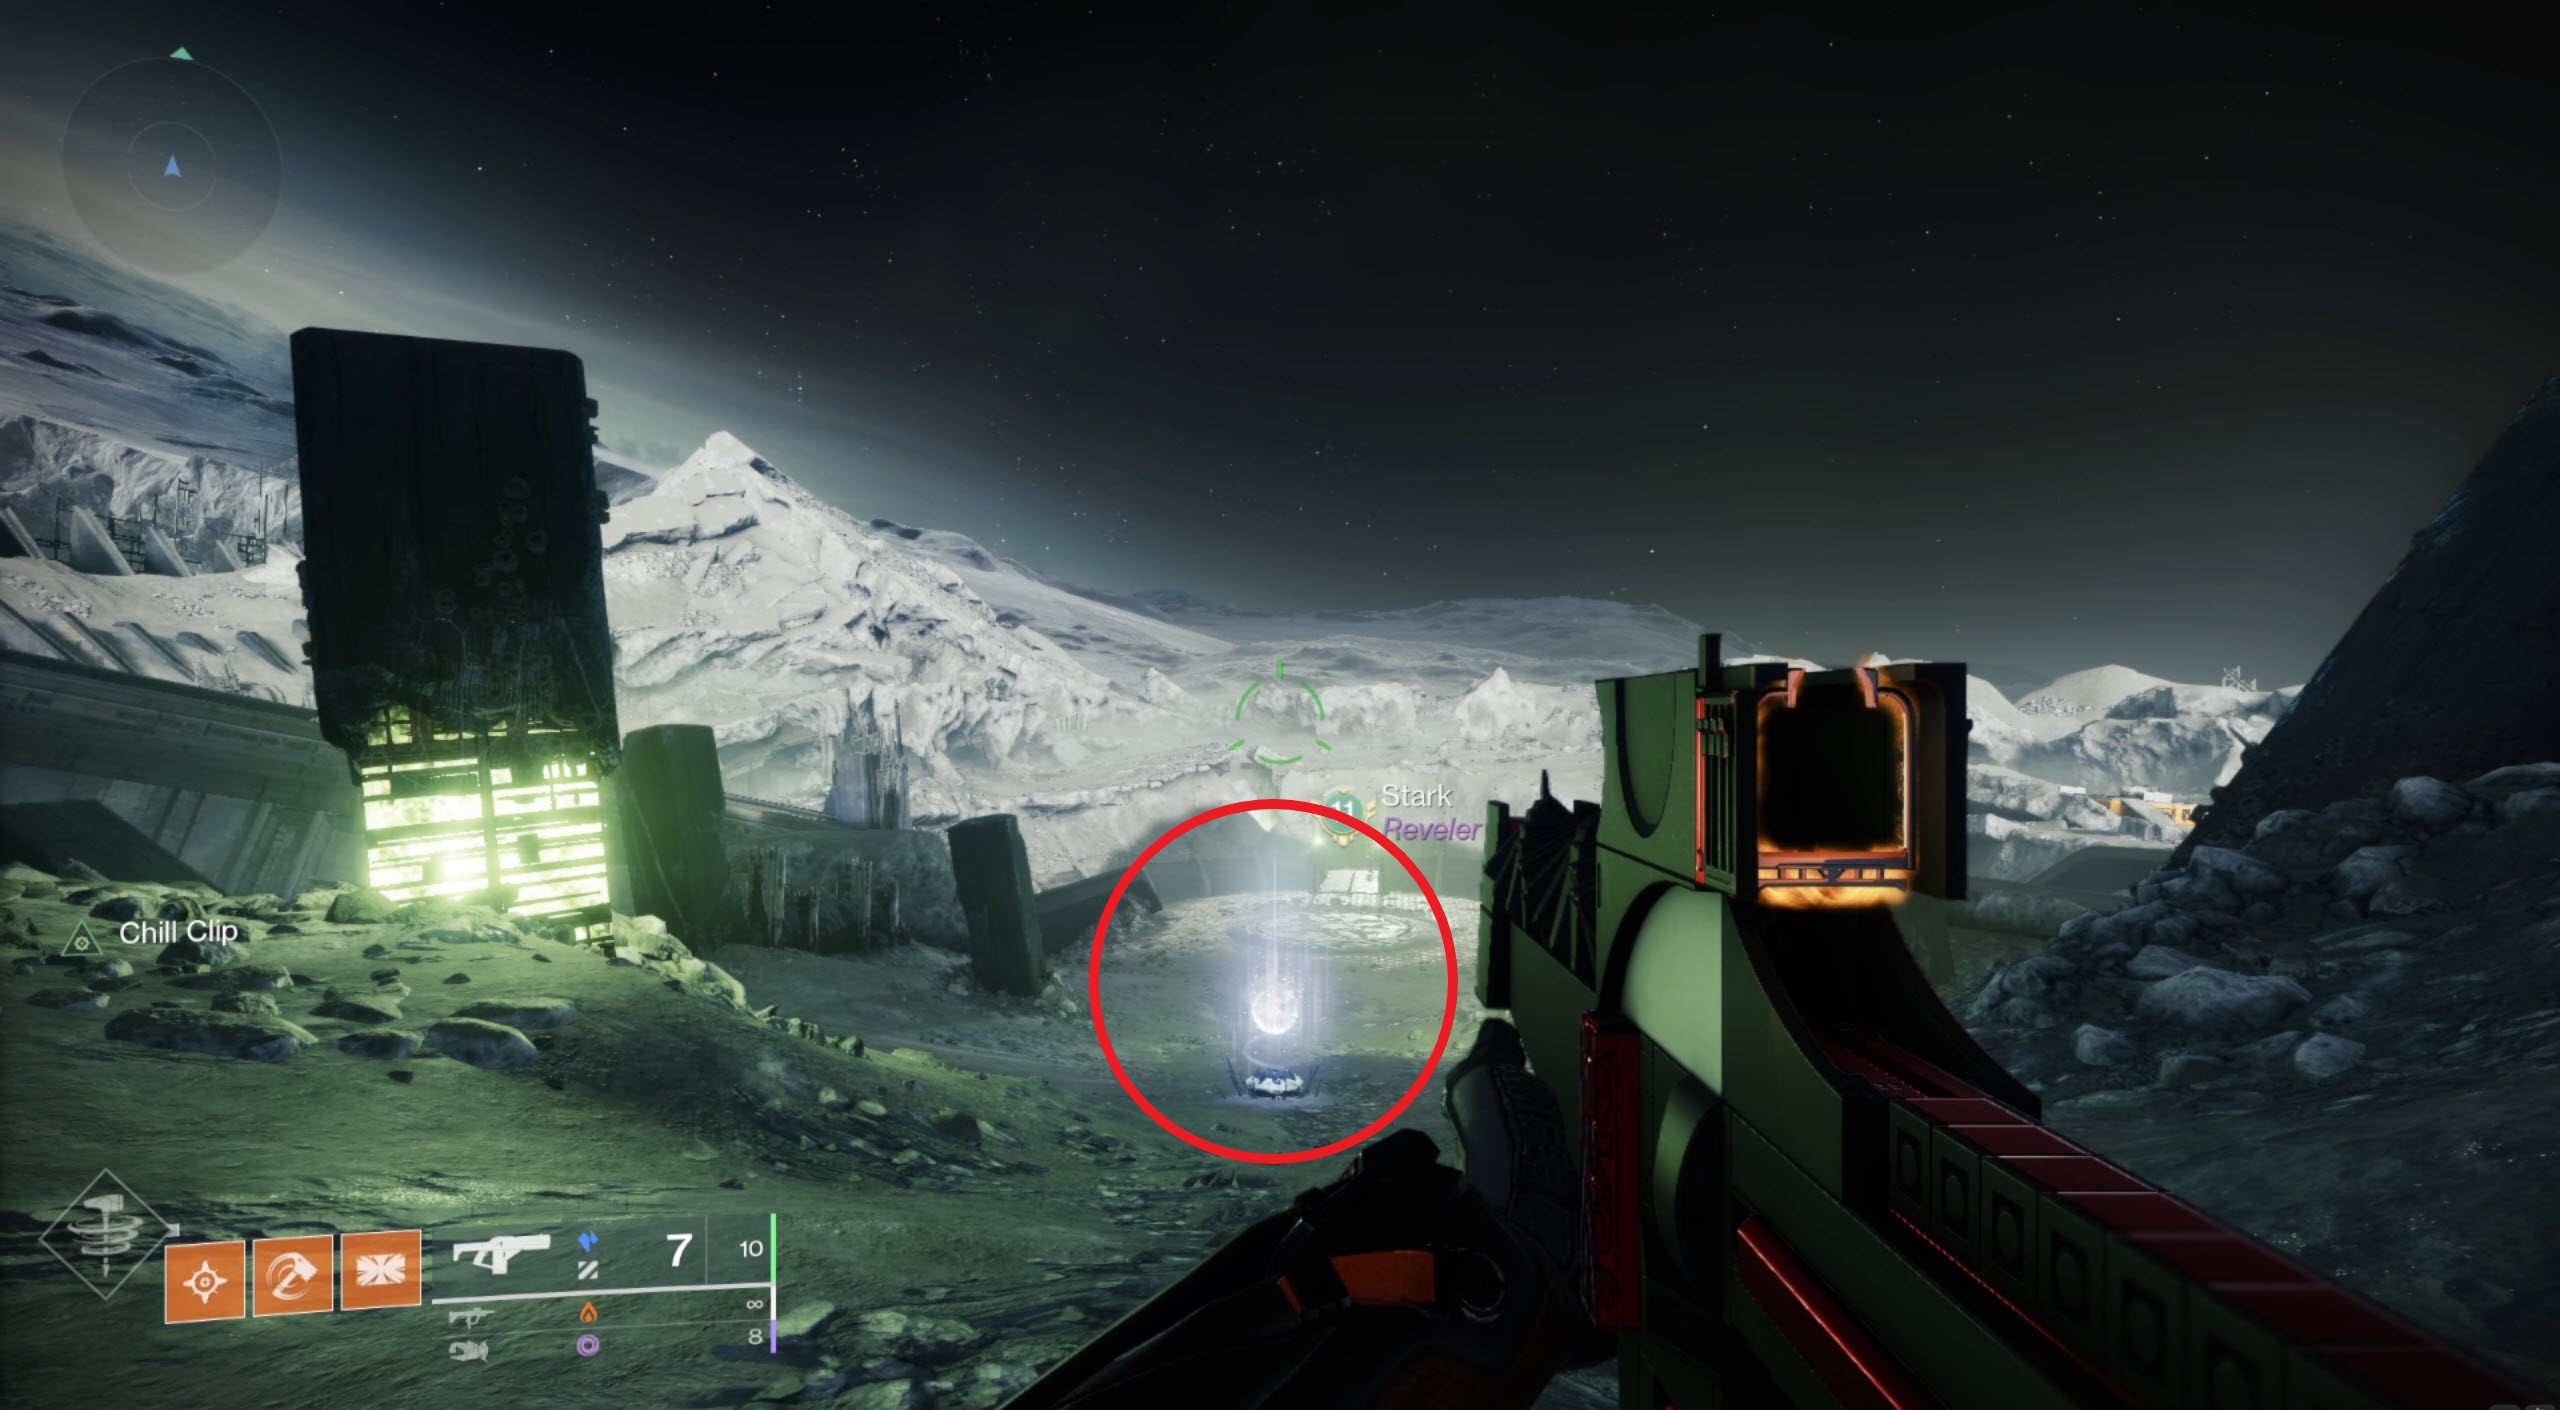
At the end of the Shrieker Sprint, there is a timed secret chest. The player holding the Chalice must run forward as soon as the second field lowers and plunge it into the preservation node at the front of the hole before the door closes. If done correctly, the door will eventually mostly close, but the chest will spawn and it won't take long for the door to reopen.
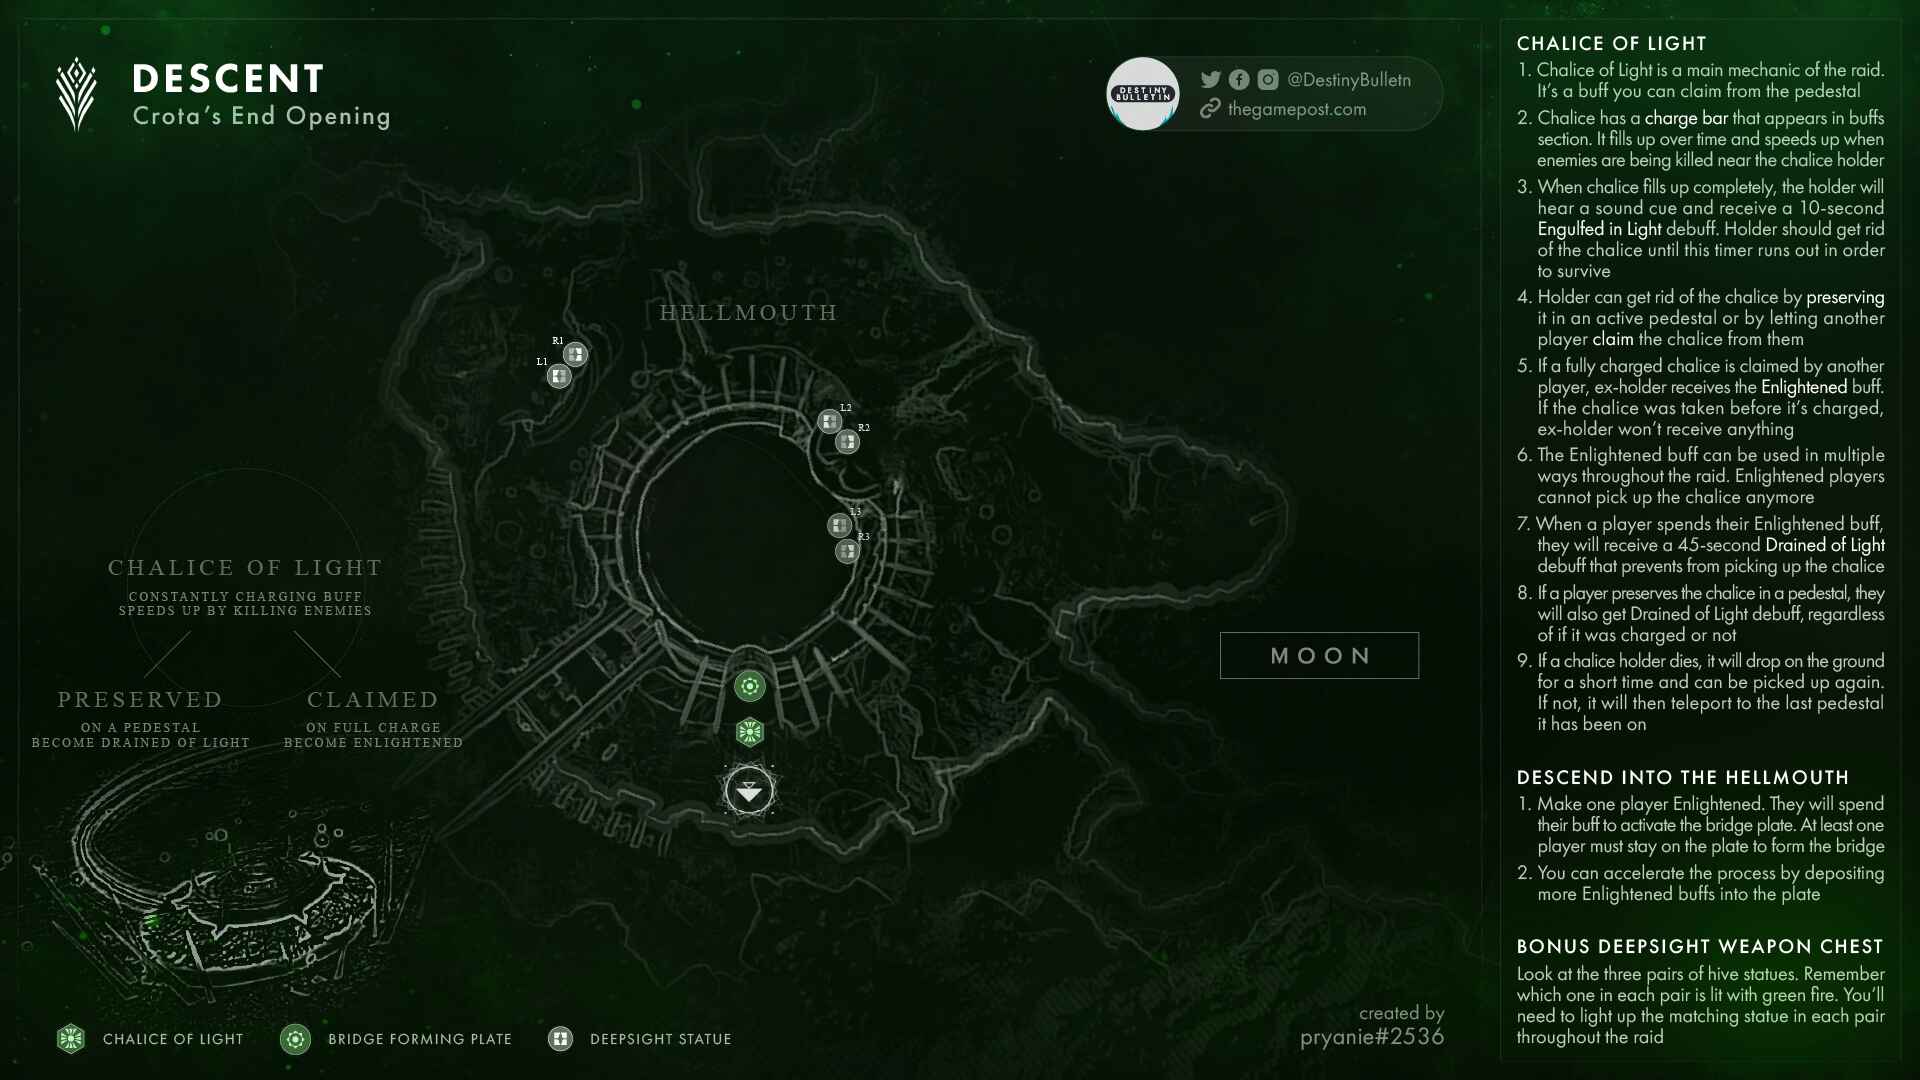
The Chalice of Light
Understanding the Chalice of Light
Before getting into encounter guides, it is important to understand the core mechanic that appears throughout the raid: the Chalice of Light. When the bar is filled, a debuff called “Engulfed in Light” appears with a 9 second timer. If this timer hits 0, the player dies.
In order to rid one of this debuff, or the Chalice in general, the team can:
- Have another player pick up the chalice from the player currently wielding it.
- Doing so when the Chalice wielder's buff is maxed will leave the chalice wielder with a buff called “Enlightened”. This buff is used in various ways in the various encounters.
- Deposit the Chalice in a Chalice holder. The Chalice can then be claimed by another player. This will NOT grant you enlightened even if your bar is full.
When one loses their Enlightenment by using it for a mechanic, they gain a debuff called “Drained of Light” that prevents them from picking up the Chalice for 45 seconds.
The Abyss
Loadouts:
- Ad-Clear Weapons
- Anti Unstoppable Weapons
- Eager Edge Sword
- NOT recommended because you may push your team mates or yourself into the holes or lanterns.
- Strand grapple
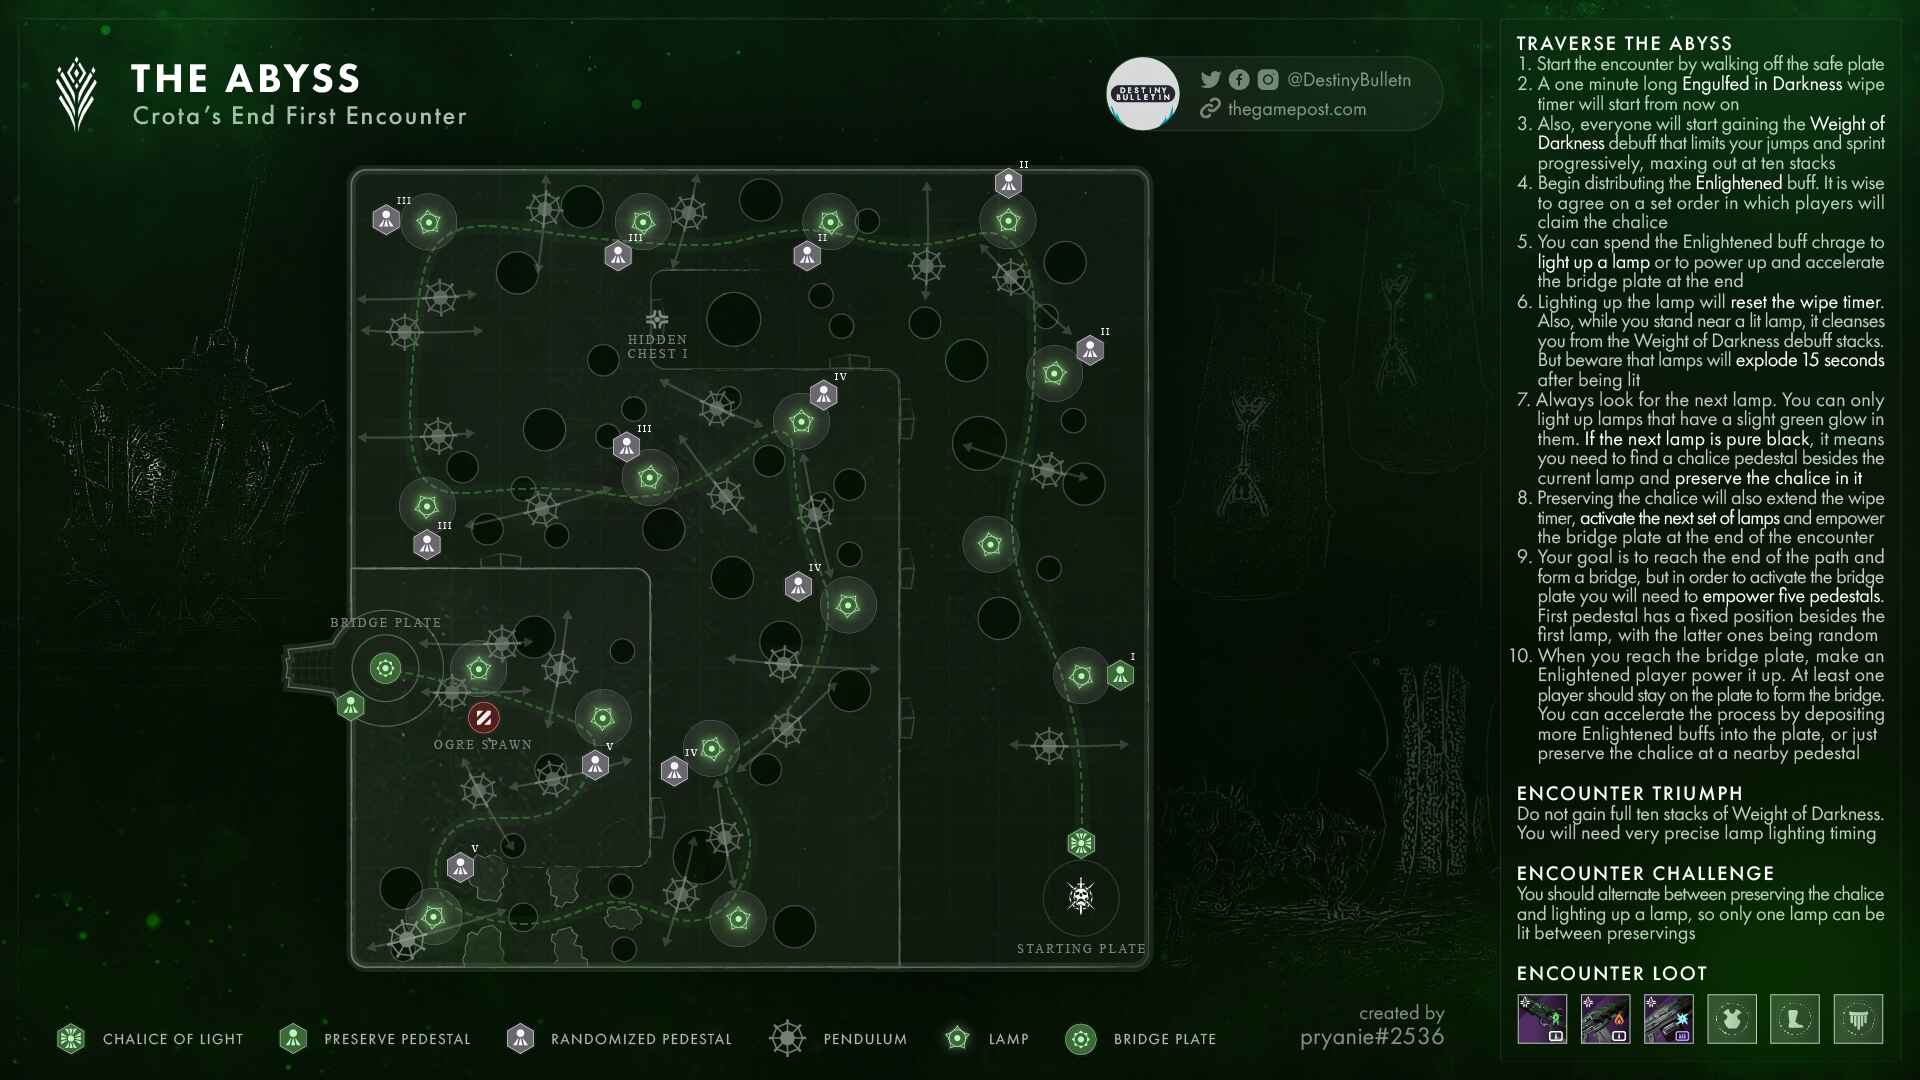
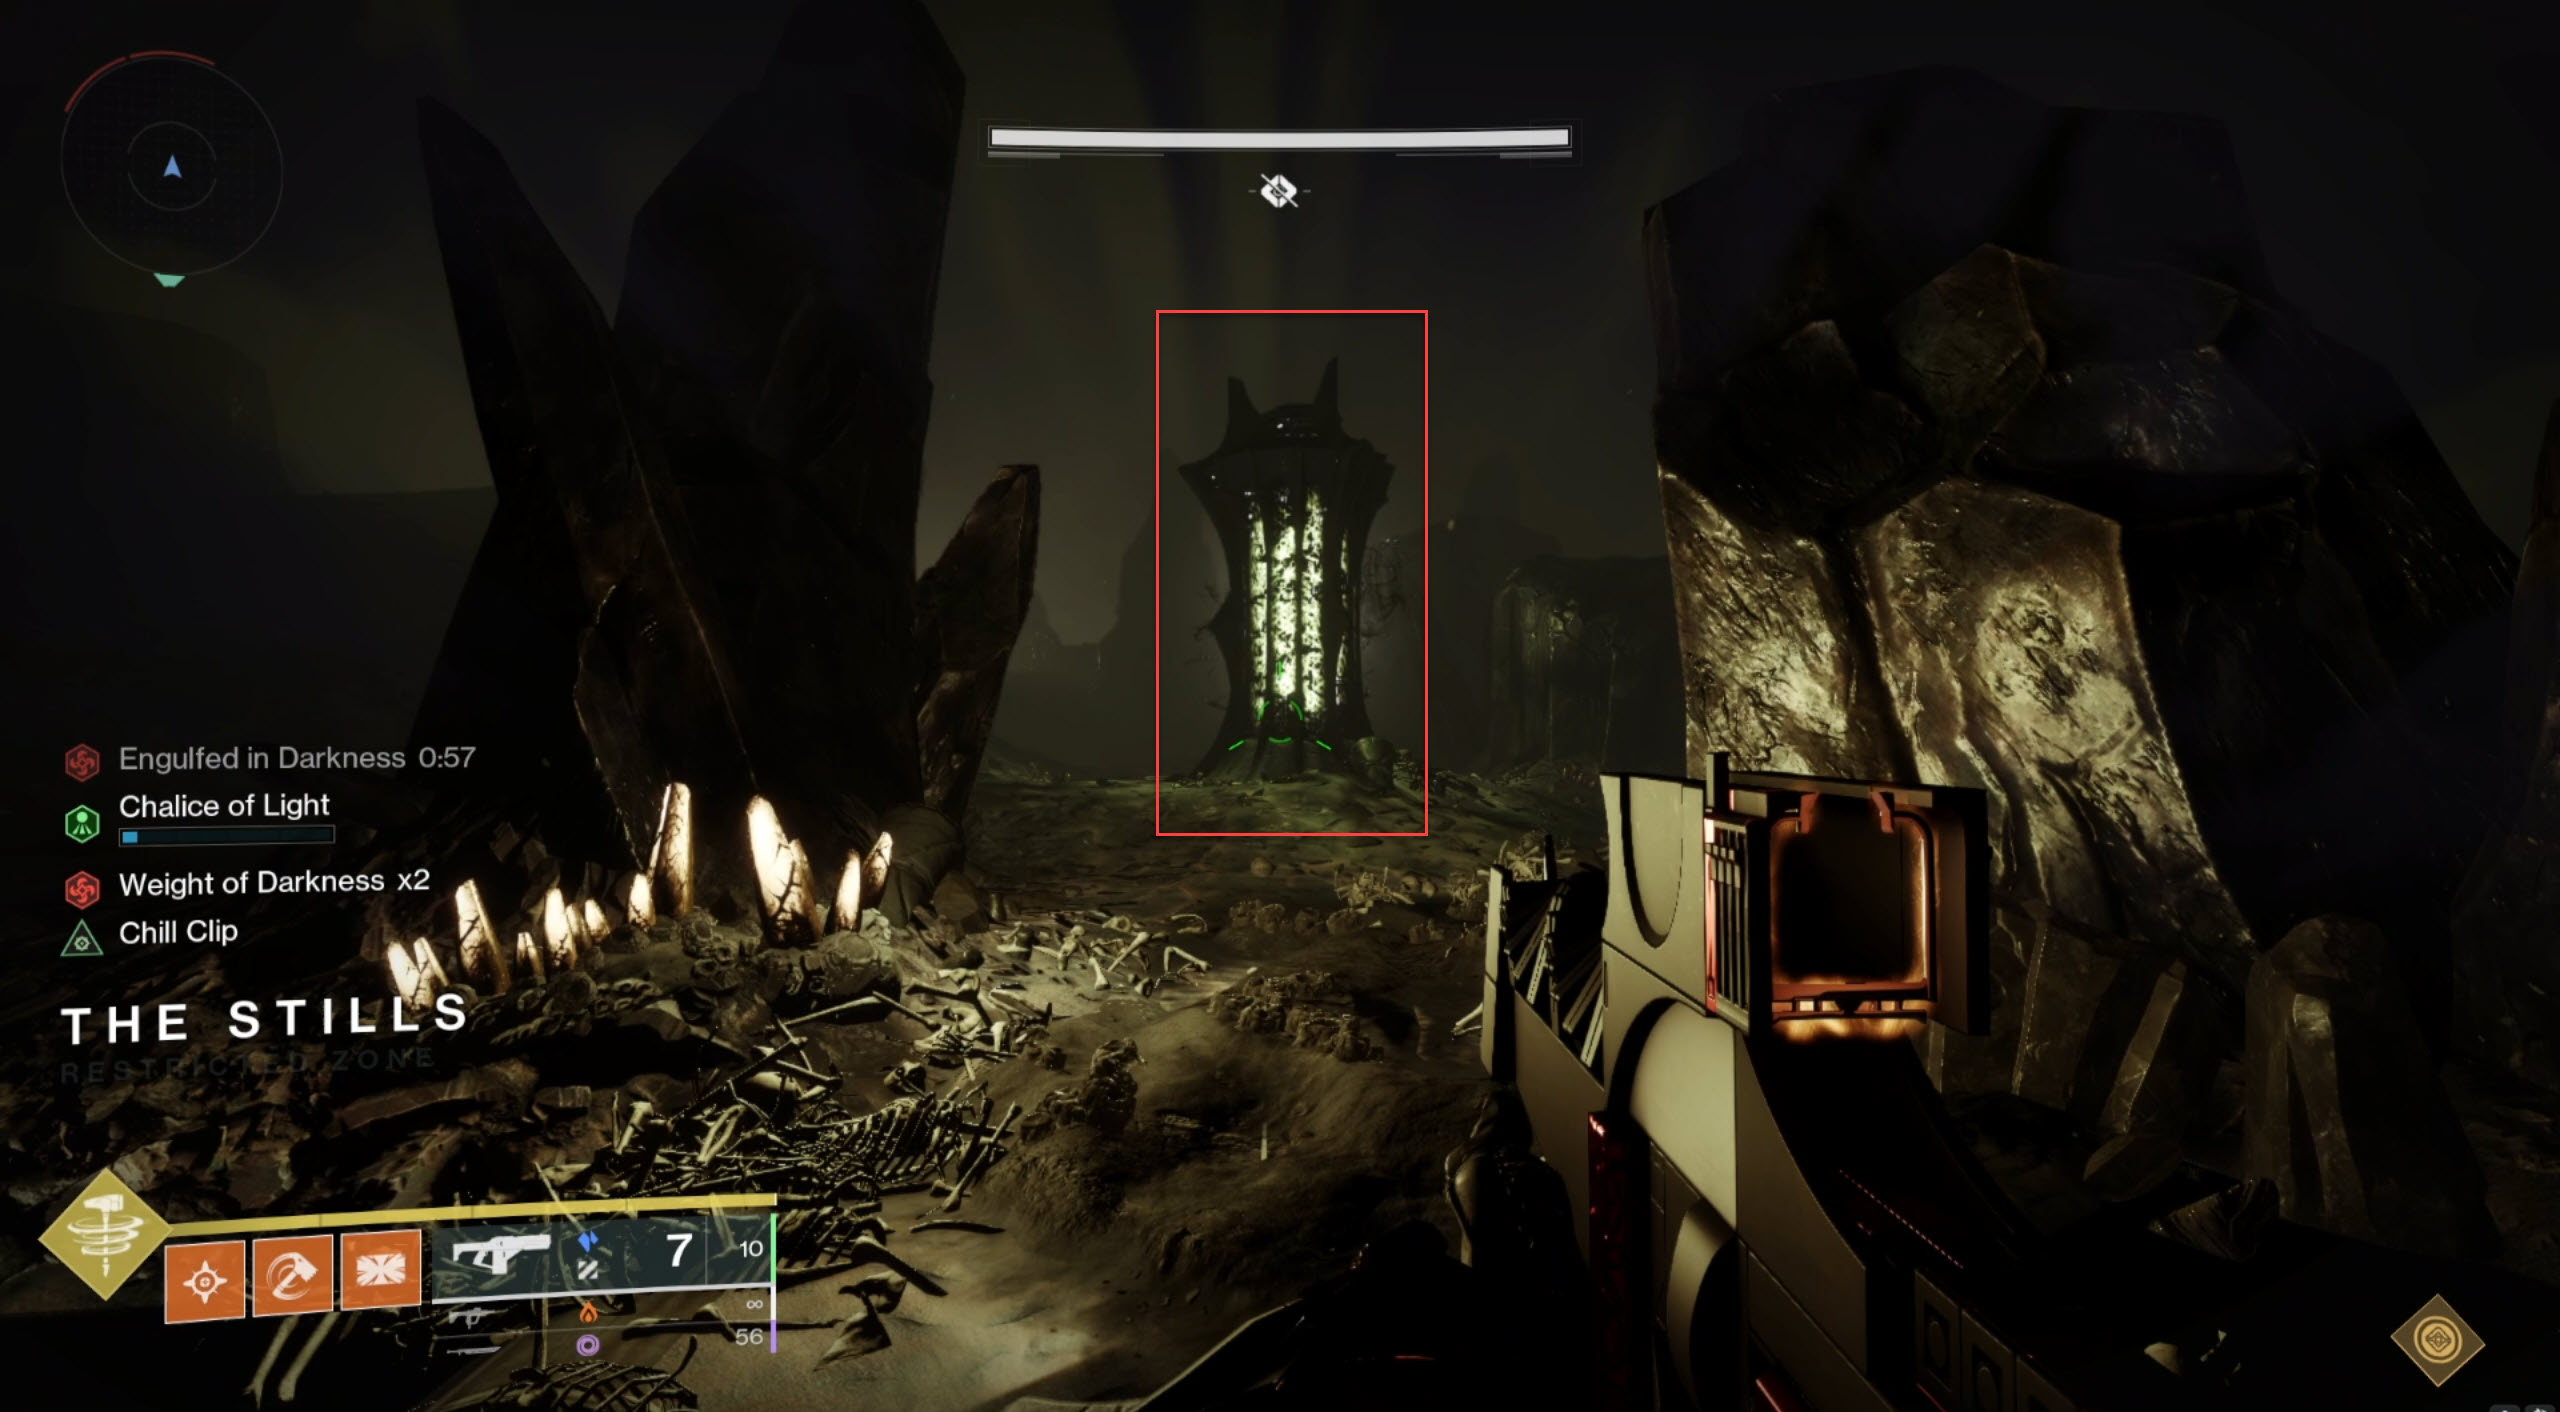
There will be two debuffs constantly present during the encounter, namely Weight of Darkness and Engulfed in Darkness. Weight of Darkness stacks from x1 to x10. From x1 to x9, it prevents the use of double jump. At 10 stacks it restricts sprinting as well. Engulfed in Darkness is a timer that slowly counts down. At 0 seconds, the team wipes. This timer can be extended by activating Podiums of Light (dunking the Chalice).
Number the team from 1 to 6. The encounter begins when a player (Player 1) picks up the chalice. The team then runs to the first lantern. When Player 1's Chalice is full, Player 2 will pick it up from Player 1. The now Enlightened Player 1 is given the option to “Enlighten” the lantern. Doing so activates the lantern, allowing it to take stacks of Weight of Darkness away as well as reset the Engulfed in Darkness timer to 58 seconds. Throughout the path of lanterns, there will be obstacles such as swinging pendulums and pits. Avoid these.
Player 2 will dunk the chalice in a basket that only appears near some lanterns. This gives a message, "Podiums of Light have been activated". This will:
- Reset the timer for Engulfed in Darkness to 58 seconds.
- Allow the next 3 or 4 lanterns to be Enlightened, as the option to Enlighten lanterns will not be present if you do not dunk the chalice there.
Player 3 picks up the chalice from the dunk spot, then the team continues along the path of lanterns, keeping in mind to take the chalice from players when it is full and enlightening lanterns as they see fit. The lanterns with a dunk spot change every time, but it should be every 3-4 lanterns, so keep an eye out, especially since the environment is dark.
Once all dunk spots have had the Chalice dunked and taken back, a message appears, "Somewhere, a plate hums with the power of the Podiums of Light". Navigate your way to this plate, it will be near an unbuilt bridge. Similarly to the first encounter, enlighten the plate until the bridge is built. Cross the bridge and walk into the light to complete the encounter.
In summary: Traverse through the path of lamps, avoiding pitfalls and swinging pendulums. You need to dunk at all the dunk spots, which will be beside some lanterns. Throughout, you will have Engulfed in Darkness and Weight of Darkness. Pass the chalice around, enlightening lanterns when the timer gets low.
Encounter Triumph:
Feather-Light - Complete the Abyss encounter in the Stills without letting any player reach 10 stacks of Weight of Darkness.
Challenge Mode:
Conservation of Energy - You can enlighten one lamp for each time you've preserved the Chalice, starting with the first preserve.
- Note: Only some of the lamps have a preserve next to them.
- Since only some of the lamps have a basket next time them, you will be walking slowly with Weight of Darkness x10. Pattern of the baskets/podiums seems to be random.
Master Difficulty:
- Barrier Champions spawns in addition with Unstoppable Ogres at the final plate.

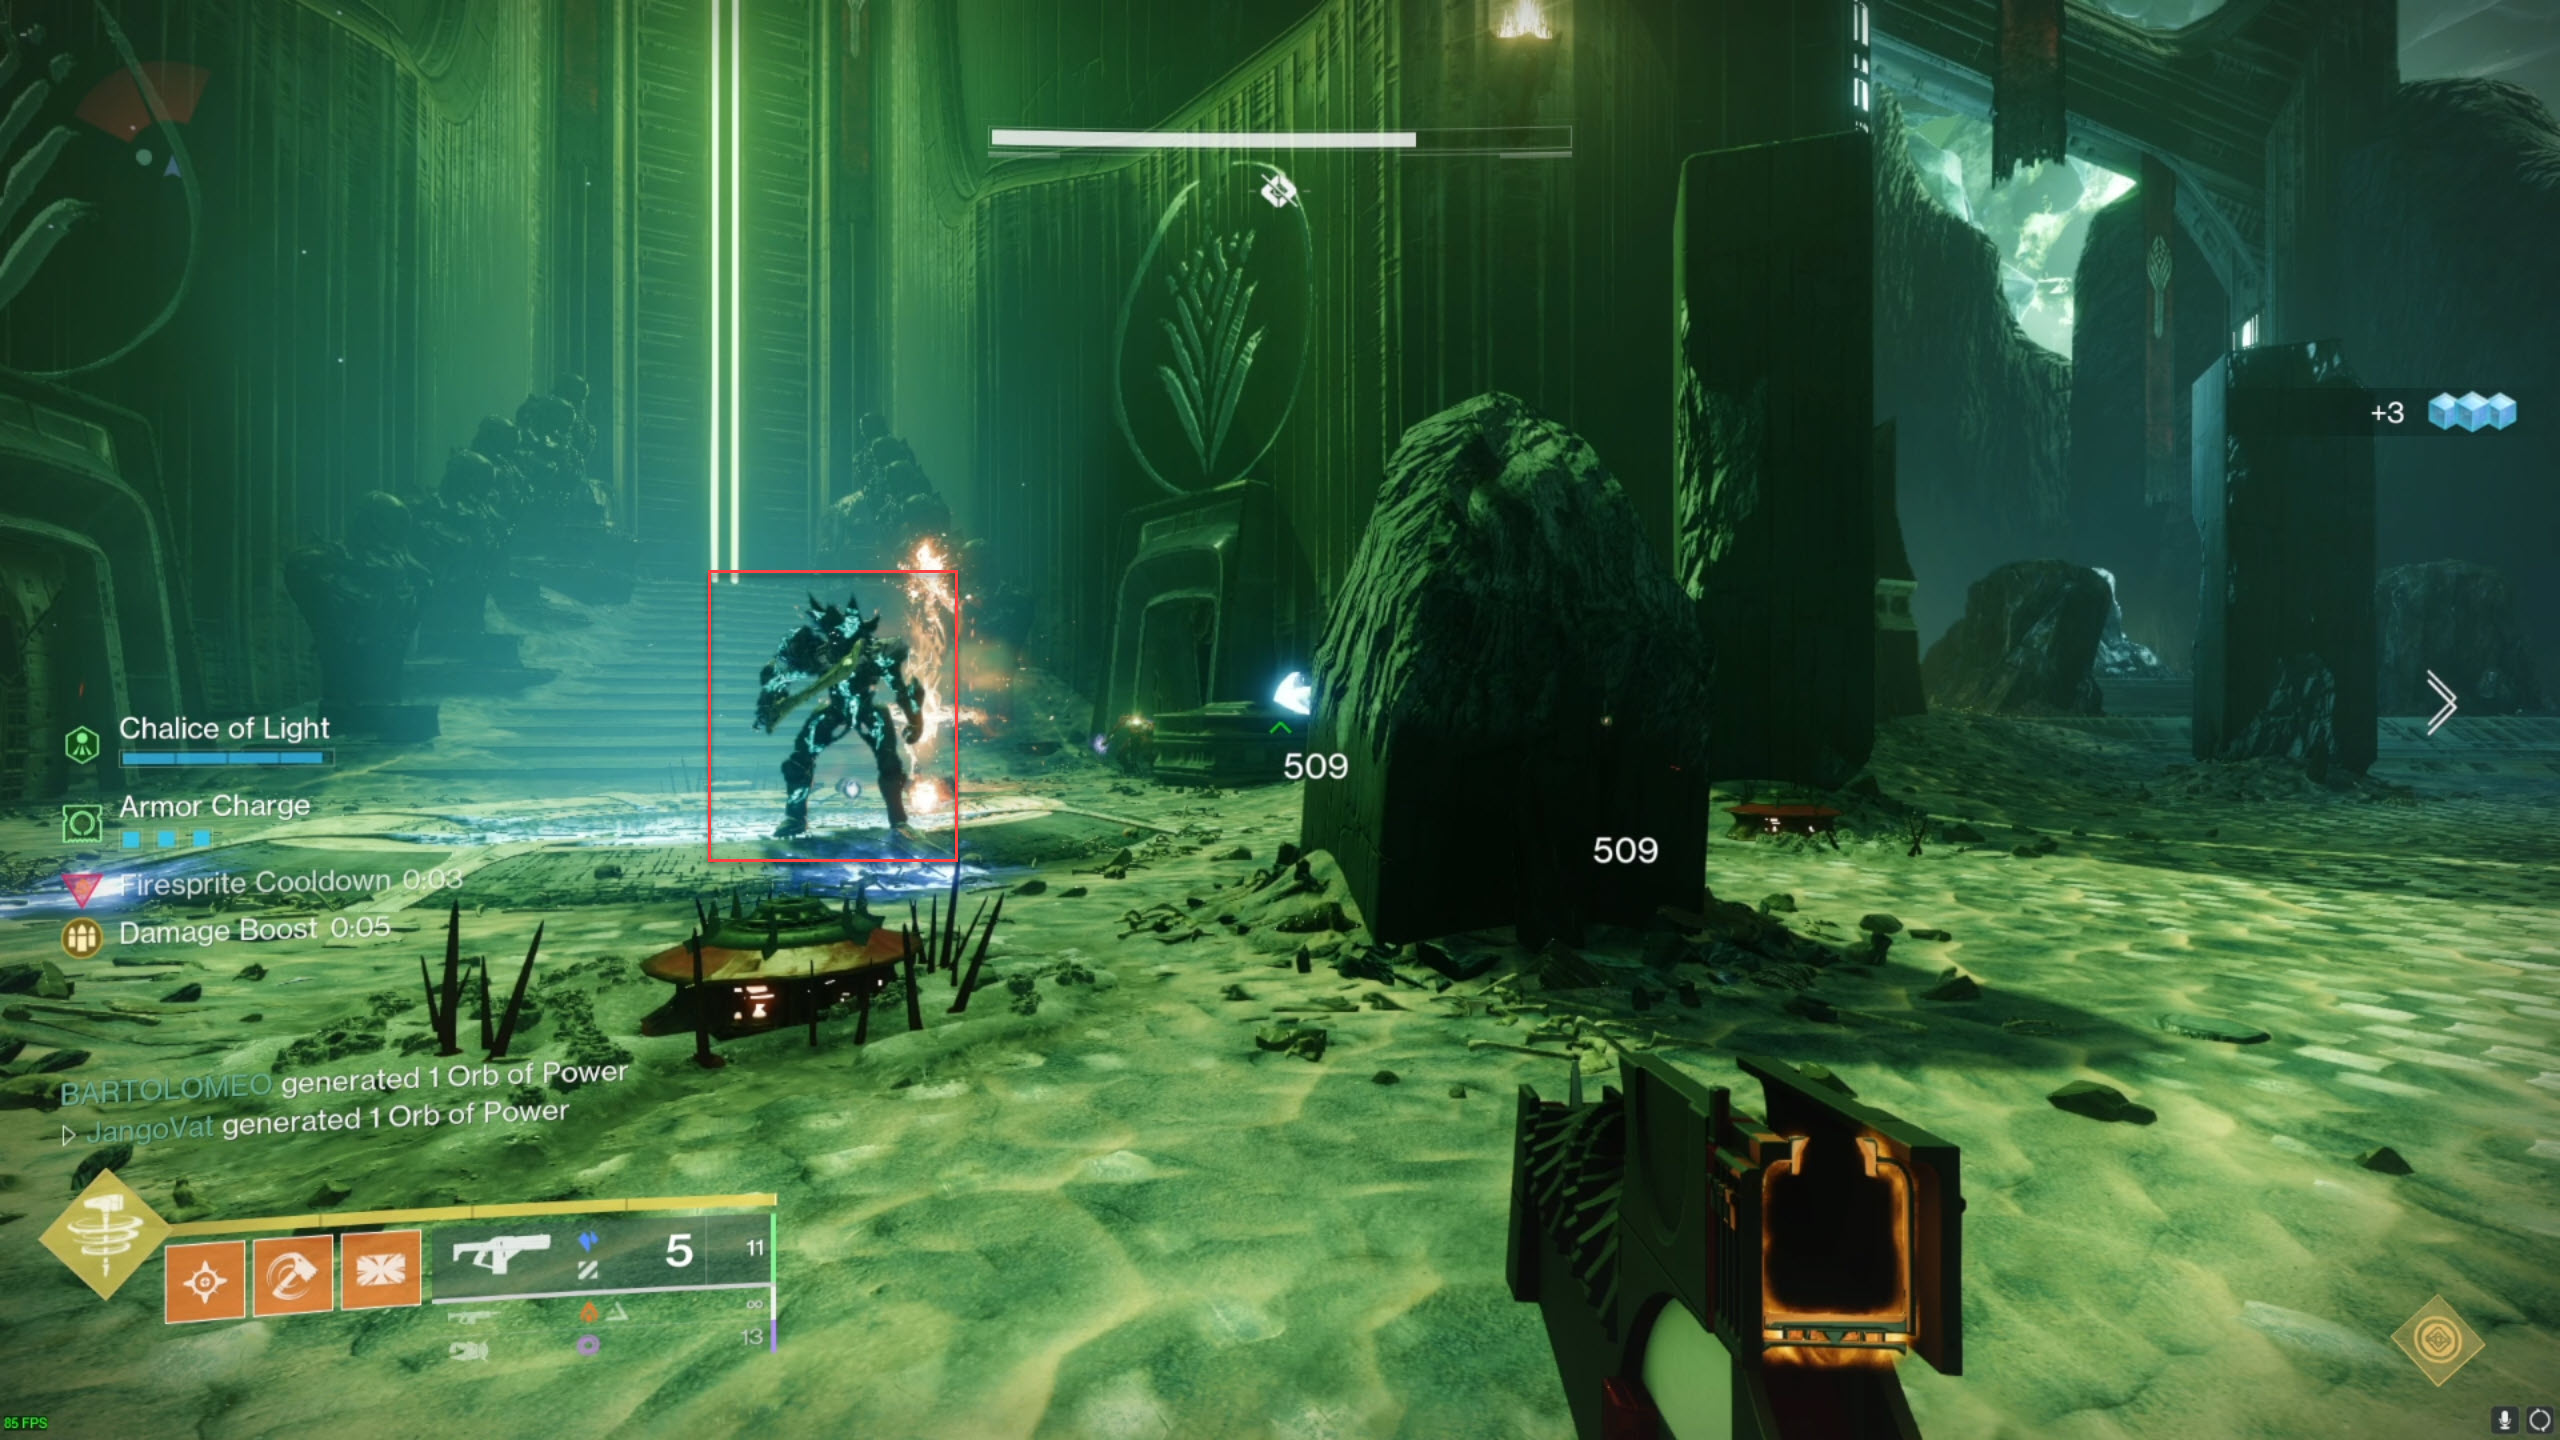
Oversoul Throne - The Bridge
Loadouts:
- Ad-Clear Weapons
- Anti-Barrier Weapons
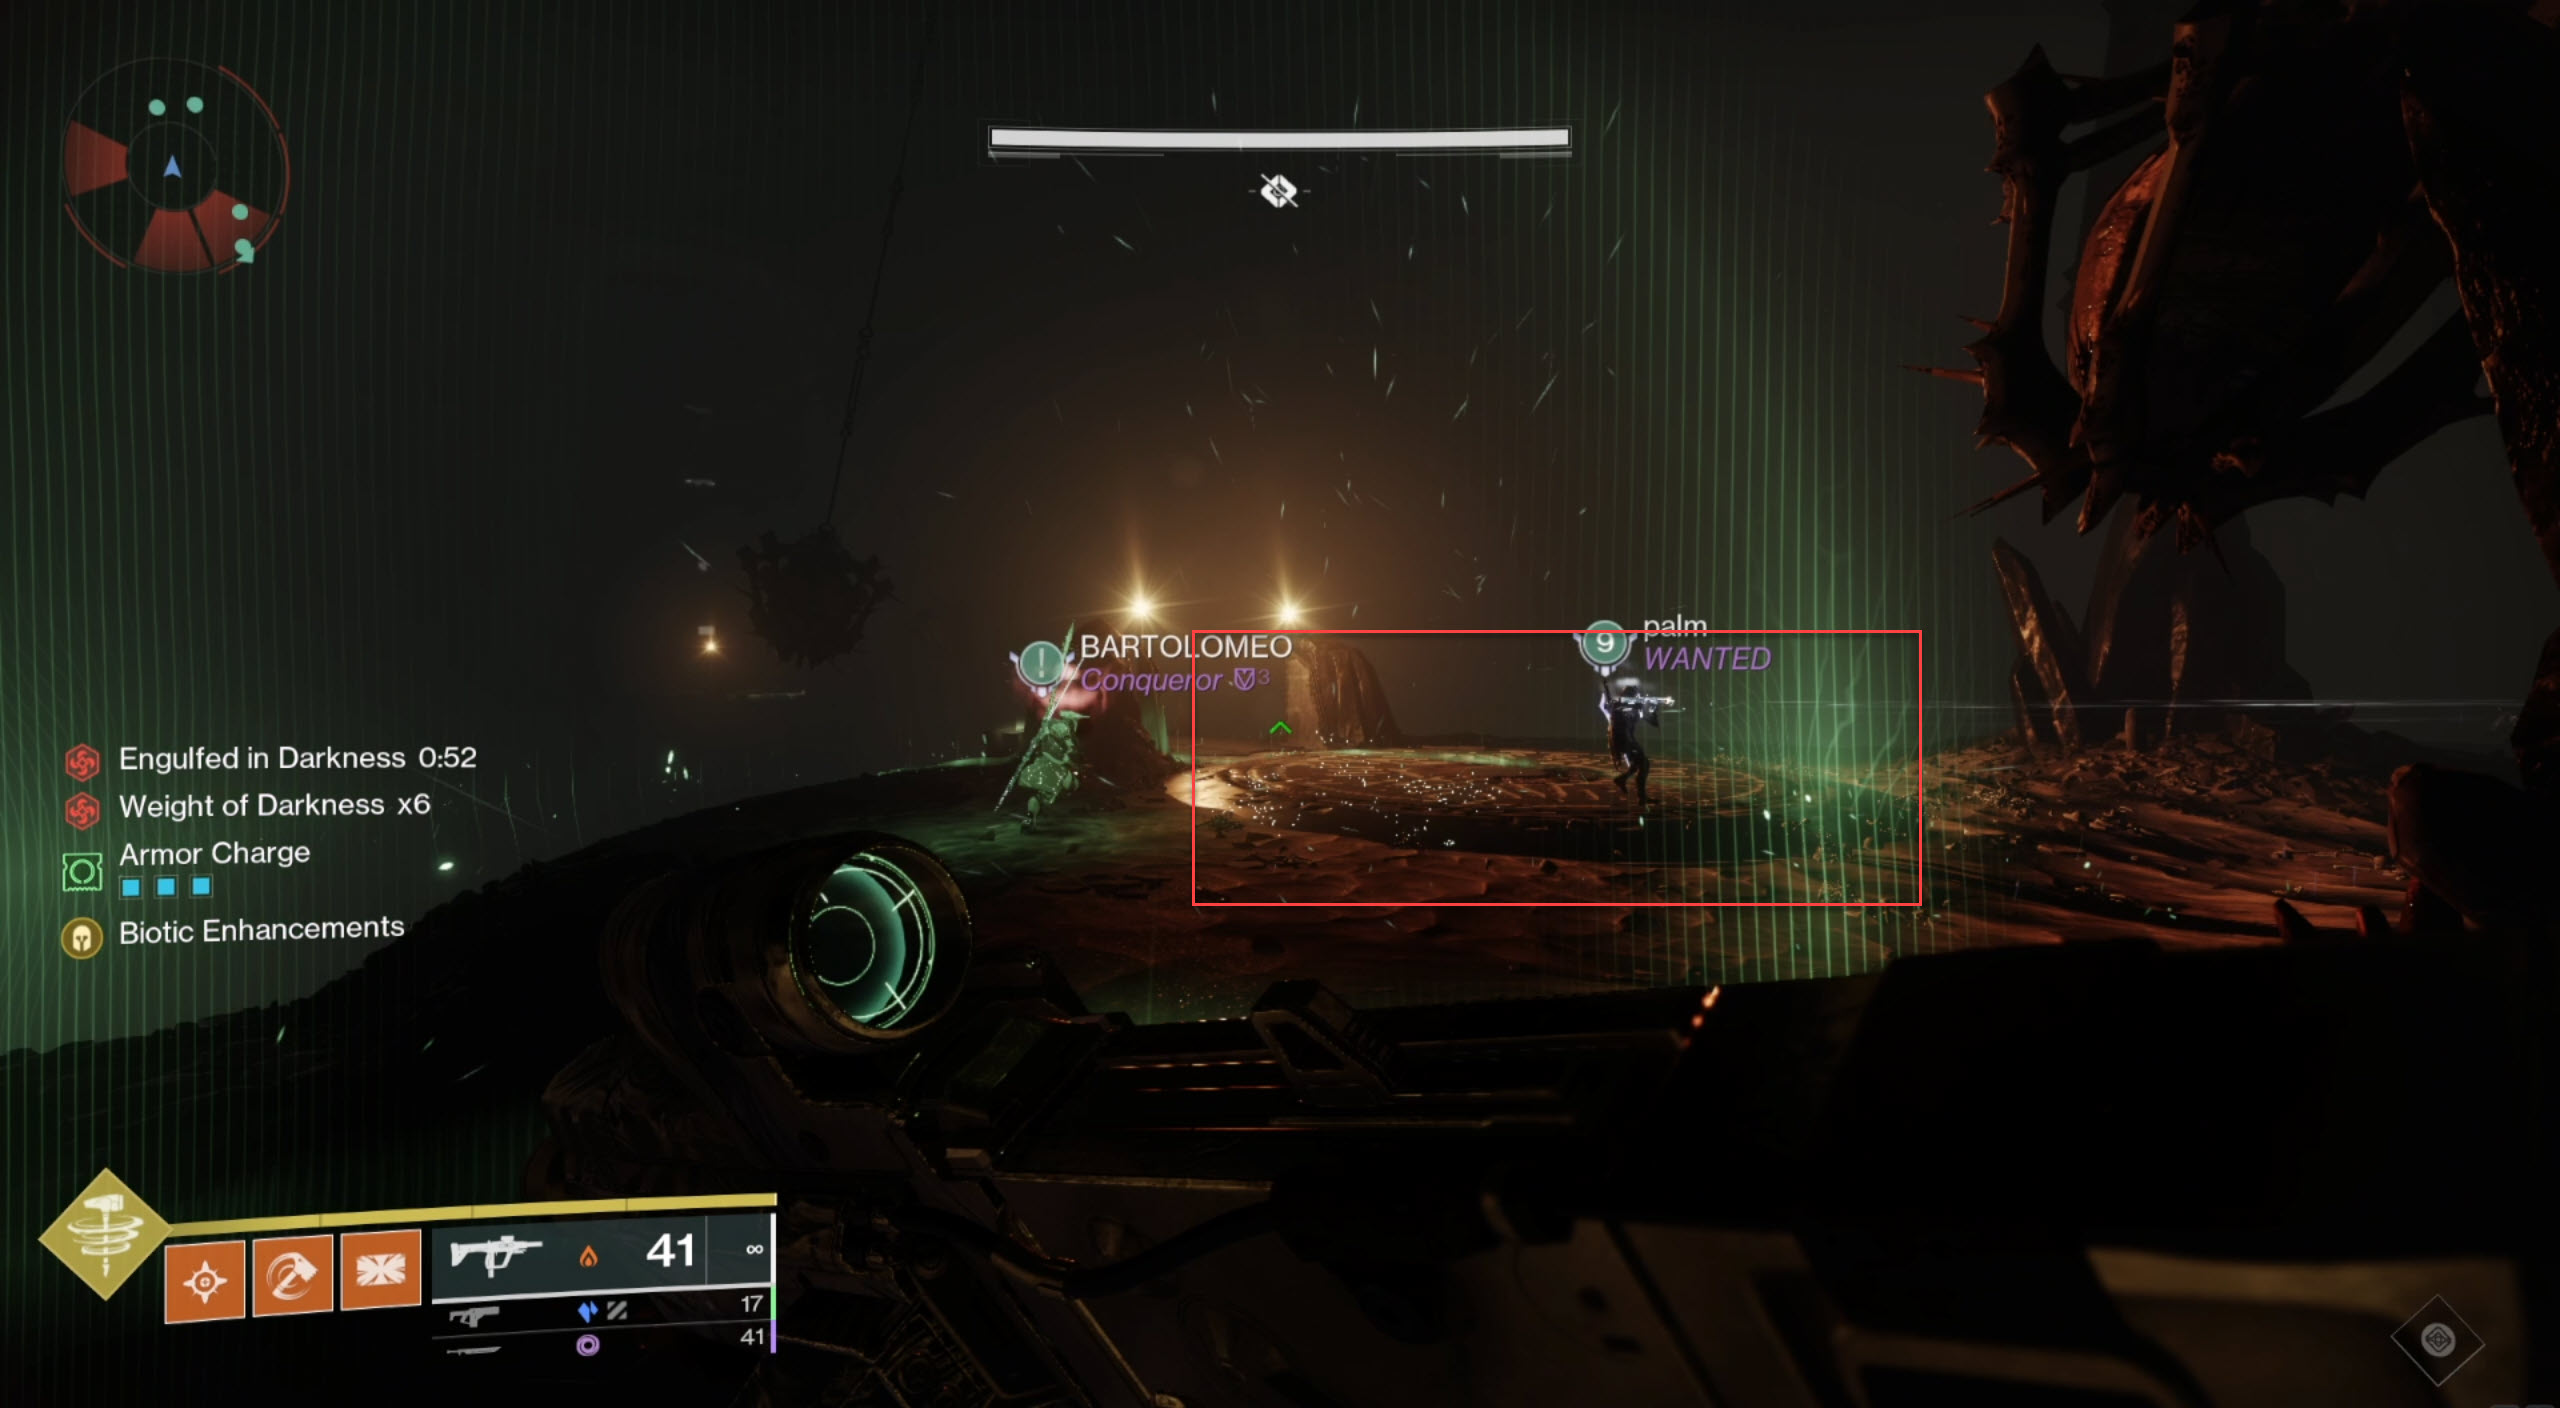
There are two sides to this encounter: the spawn side and the far side. On either side, there will be a plate and two annihilator totems.
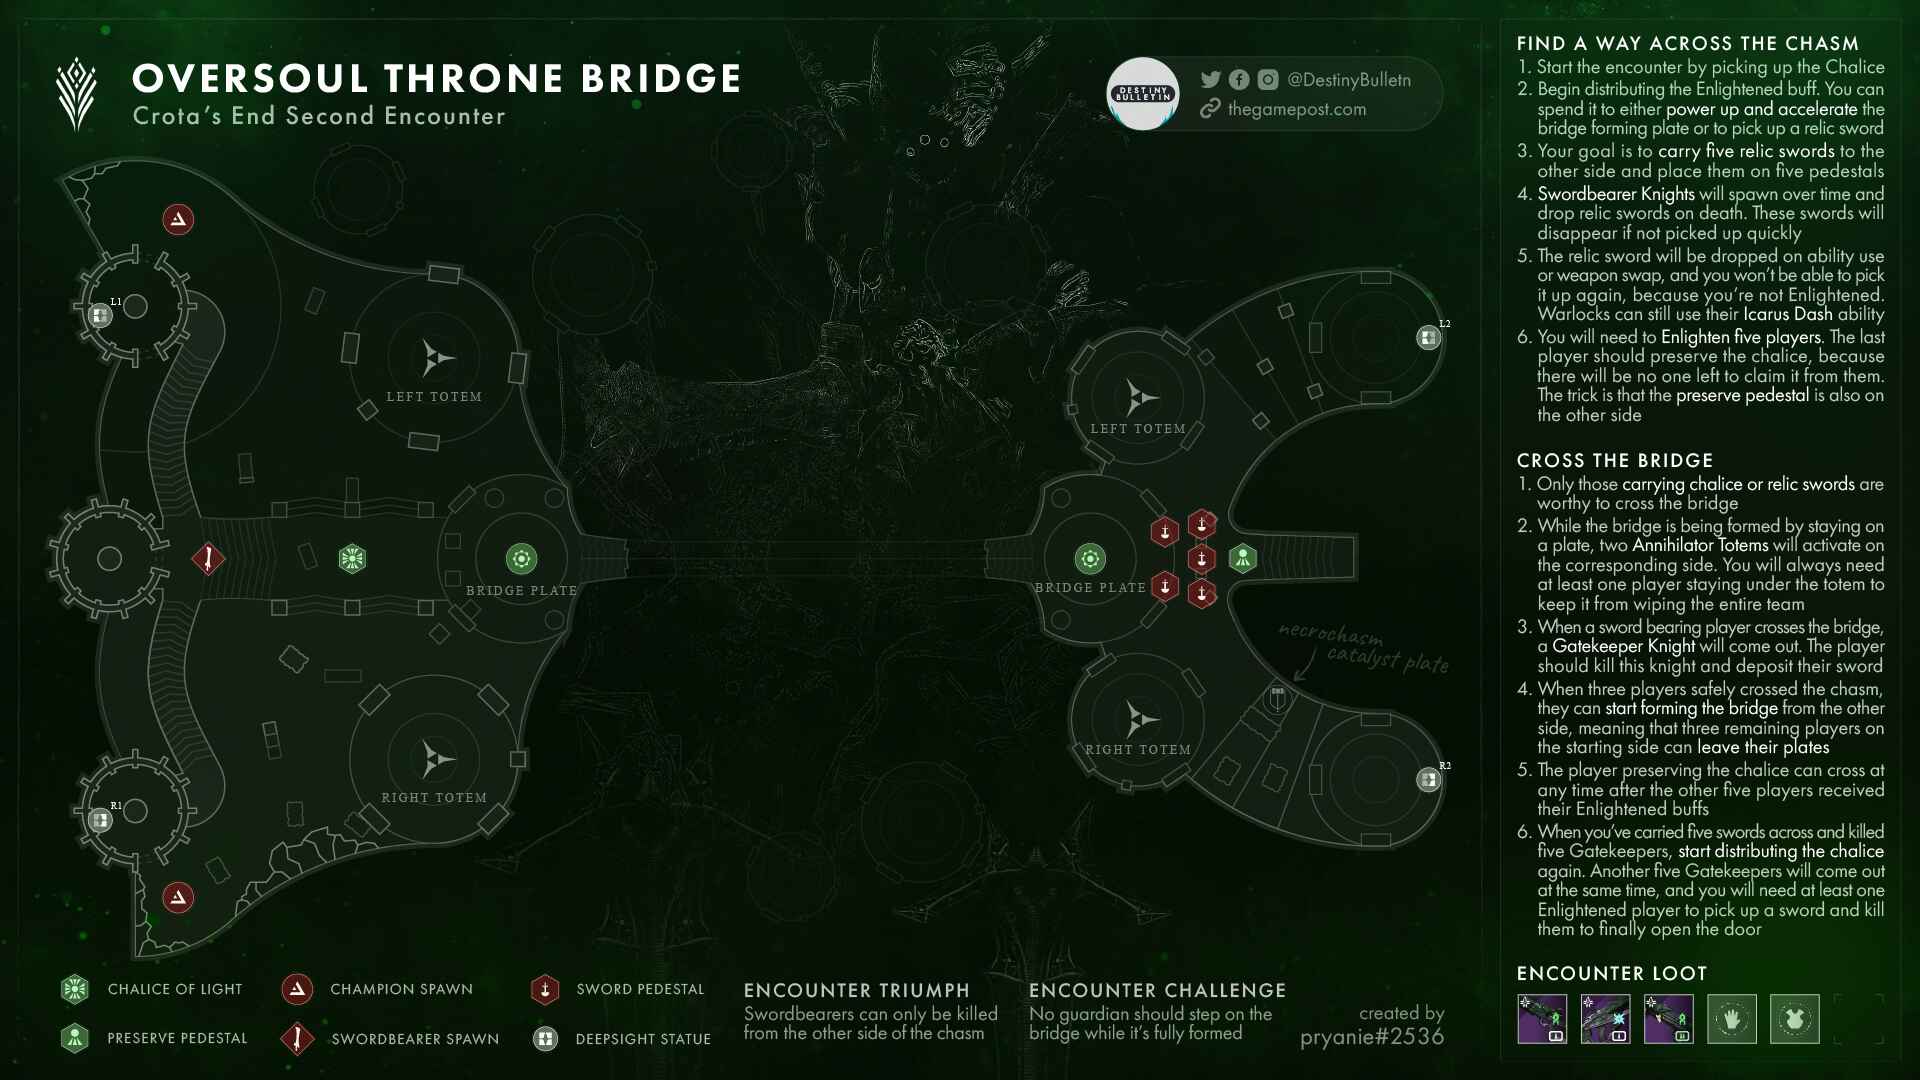
Annihilator Totems
These function identically to the totems found in the King's Fall raid in that they need someone to be standing on them; if left unattended, they will wipe out the team after a short time.
Plates
The plates on either side function identically; they can be stood on to build the bridge and keep it built. They will start building once enlightened and can have their building accelerated with additional enlightenment. Standing on a plate will activate that side's Annihilator Totems, meaning that if one side's plate is not stood on, the Annihilator Totems there will be inactive.
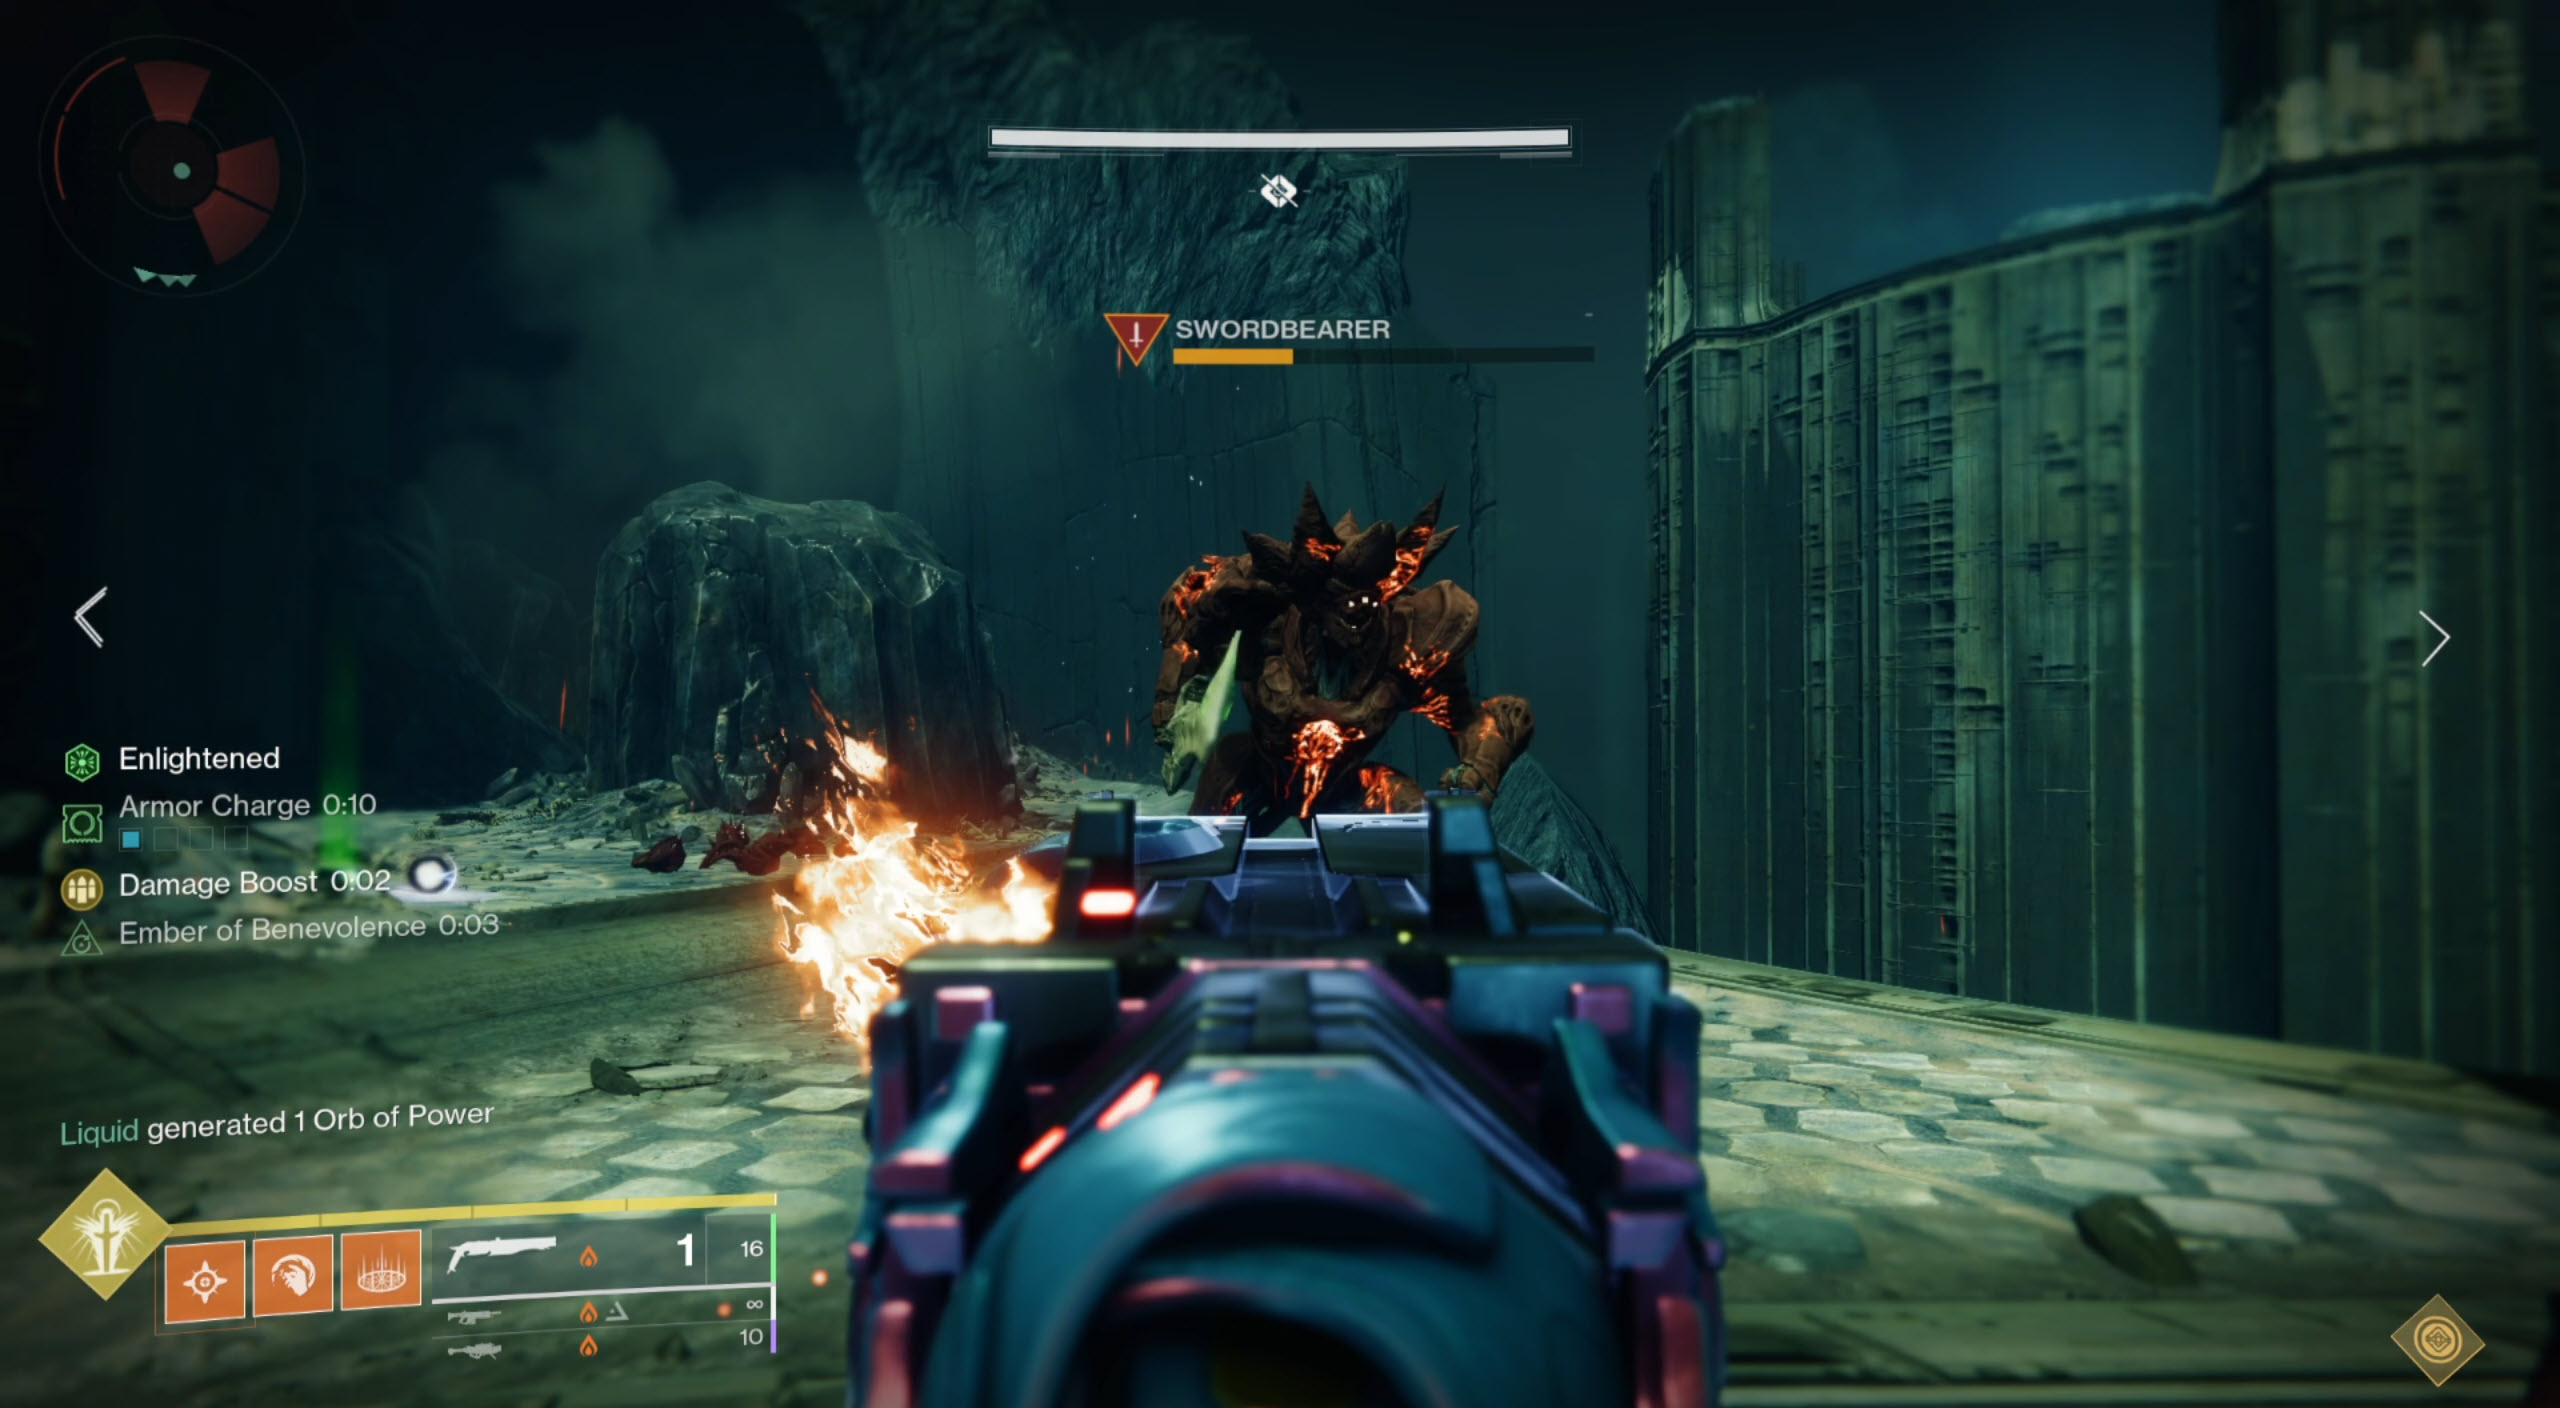
Swordbearers/Gatekeepers
Swordbearers will occasionally spawn on the spawn side of the map. They appear as tanky red Knights with a yellow health bar. Killing a Swordbearer drops a Sword. Swords can only be picked up when Enlightened.
A Gatekeeper will spawn on the far side whenever a guardian wielding a sword crosses the bridge. Gatekeepers are blue knights with a high amount of health who can only be killed using the Sword. Gatekeepers can be weakened with Tractor Cannon, frozen, suspended etc.
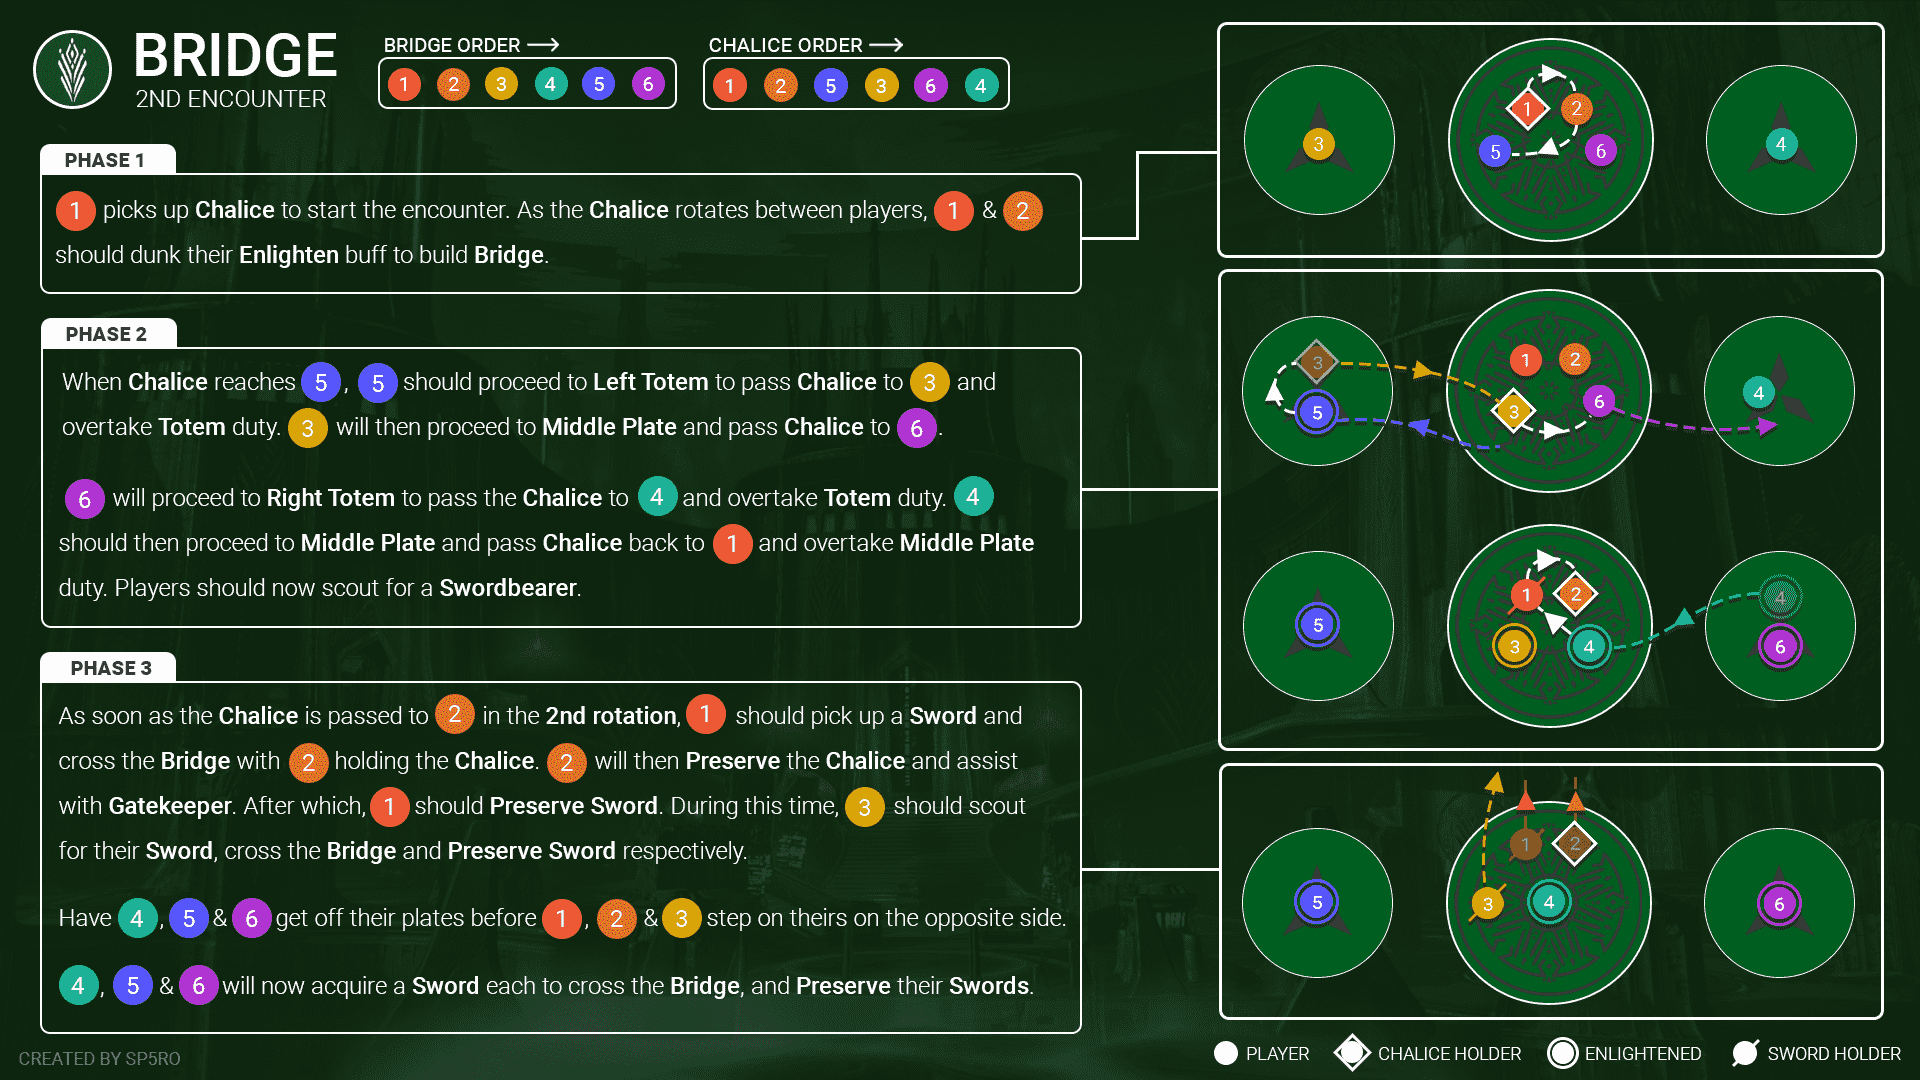
Encounter Strategy
Divide the team into 3 sets of 2, with 2 on the central plate, 2 on the left plate, and 2 on the right plate. These players can be numbered from 1 to 6, with 1 and 2 on the central plate, 3 and 4 on the left totem, and 5 and 6 on the right totem. This numbering reflects the order in which players pick up the chalice and thus become enlightened. Player 1 picks up the chalice, and when their timer is full, Player 2 picks it up. Continue rotating the chalice among the players. Player 1 will enlighten the plate to activate it; Player 2 will accelerate the plate's enlightenment. Players 3 to 6 will hold on to their enlightenment.
When player 6 receives the chalice, they will pass it back to player 1, whose Drained of light debuff should be gone by then. Player 1, when their chalice is full, will then pass the chalice to player 2. Player 2 will proceed to cross the bridge and dunk the chalice in the dunk spot on the opposite side. Meanwhile, the players will play as per normal, clearing ads and staying on the plate and totems as per normal, albeit this time without a need to pass the Chalice around since it is safely dunked on the other side. However, once a Swordbearer spawns, it should be killed, and a player should pick it up and cross to the other side.
Once one sword wielder is on the other side, they are to kill the gatekeeper and dunk their sword. They can then wait for the third player to cross, kill their gatekeeper, and dunk their sword. From here, the 3 players on the far side can get on the 2 totems and plate, keeping the bridge built while keeping the team from wiping. The players still on the close side can thus leave the plate and totems if they wish to retreat somewhere safer. The players still on the close side will continue killing swordbearers, picking up the swords, crossing the bridge, killing gatekeepers, and dunking the swords until everyone is on the far side of the map.
Do not under any circumstances drop the sword, or the sword will not be able to be picked up again and will disappear after a few seconds.
The team can thus get off the plates and totems, as there is no need to keep the bridge built, so the plate is no longer needed. The team will now pick up the chalice again, rotating it between the players until there are at least 2 or 3 people enlightened. This is because multiple gatekeepers will spawn at once and need to be killed. Before that, however, two ogres with high health will spawn, so kill them to prevent them from causing trouble. Once all the gatekeepers are killed, dunk the Chalice again to complete the encounter.
Encounter Triumph:
Threatening Reach - Defeat all Swordbearers in the Oversoul Throne Bridge encounter from the opposite side of the chasm.
Challenge Mode:
Precarious Balance - Guardians can only cross the bridge if it's not fully built, requiring players to step away from the middle plate before anyone crosses to the other side.
Master Difficulty:
- Unstoppable Champions Ogres spawn across the bridge.
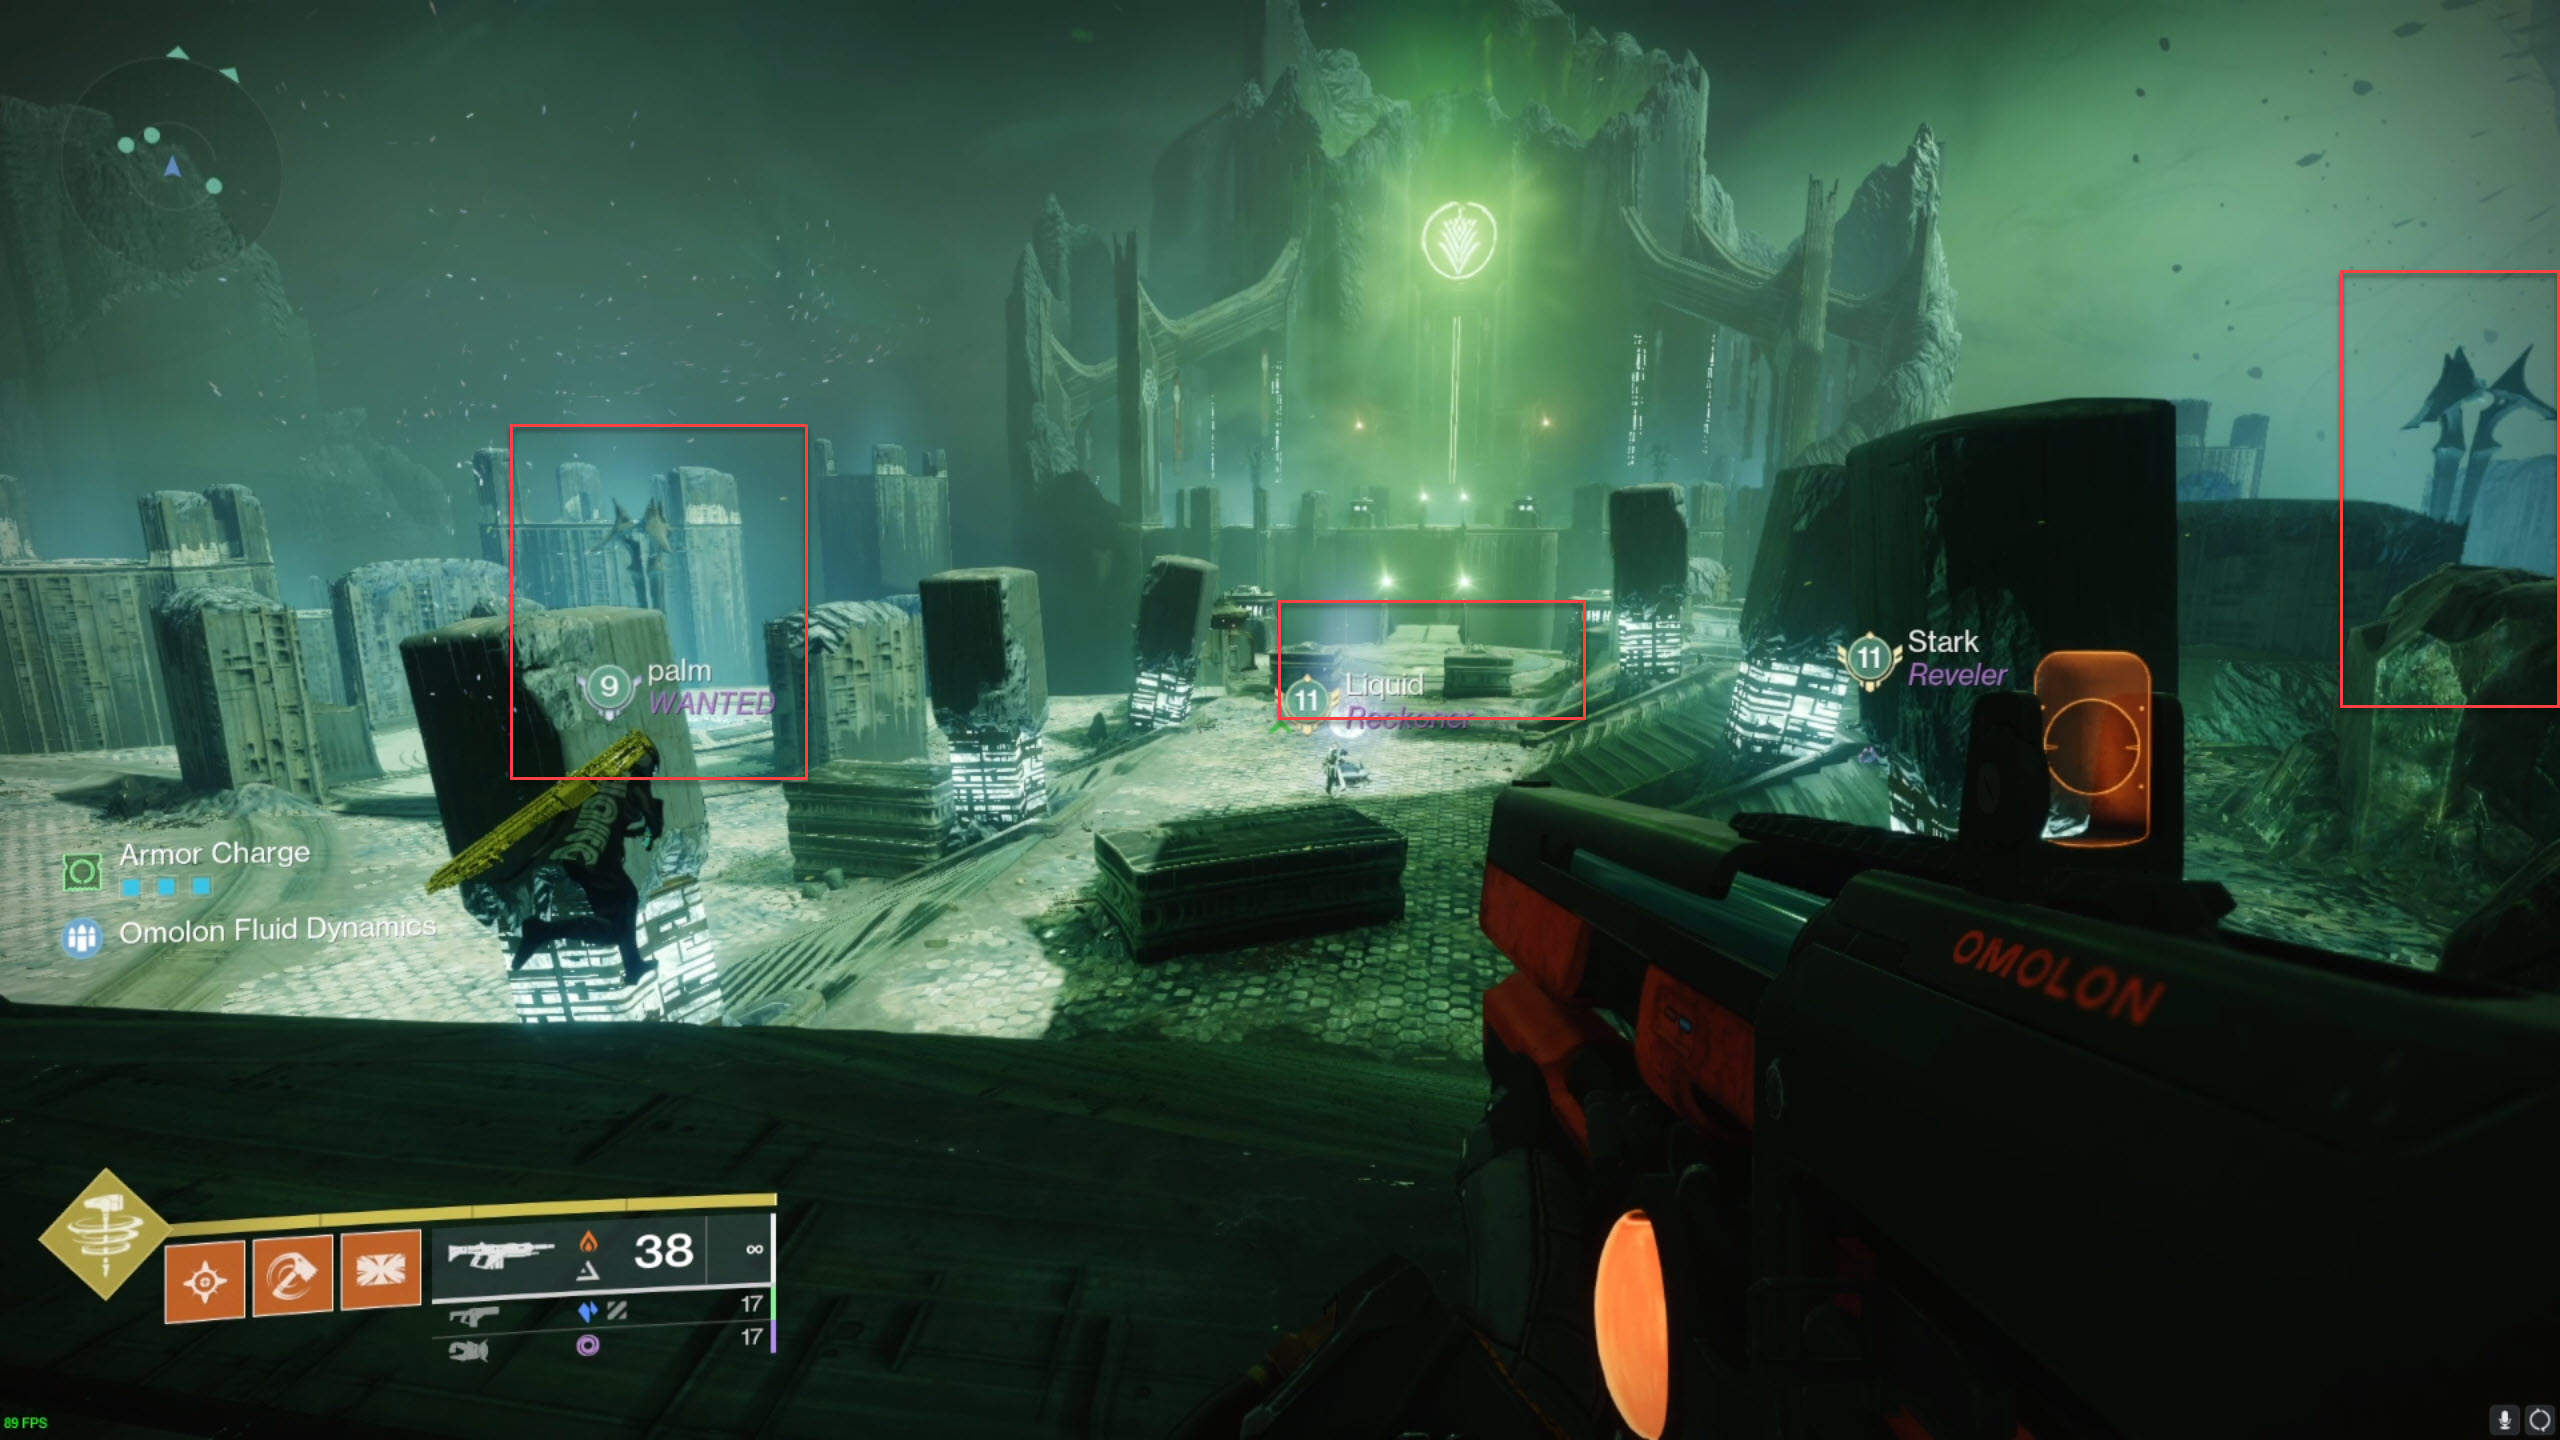
Shrieker Hallway
Though not an actual encounter in that it lacks proper loot, the Shrieker Hallway has revive tokens enabled as well as a secret chest.
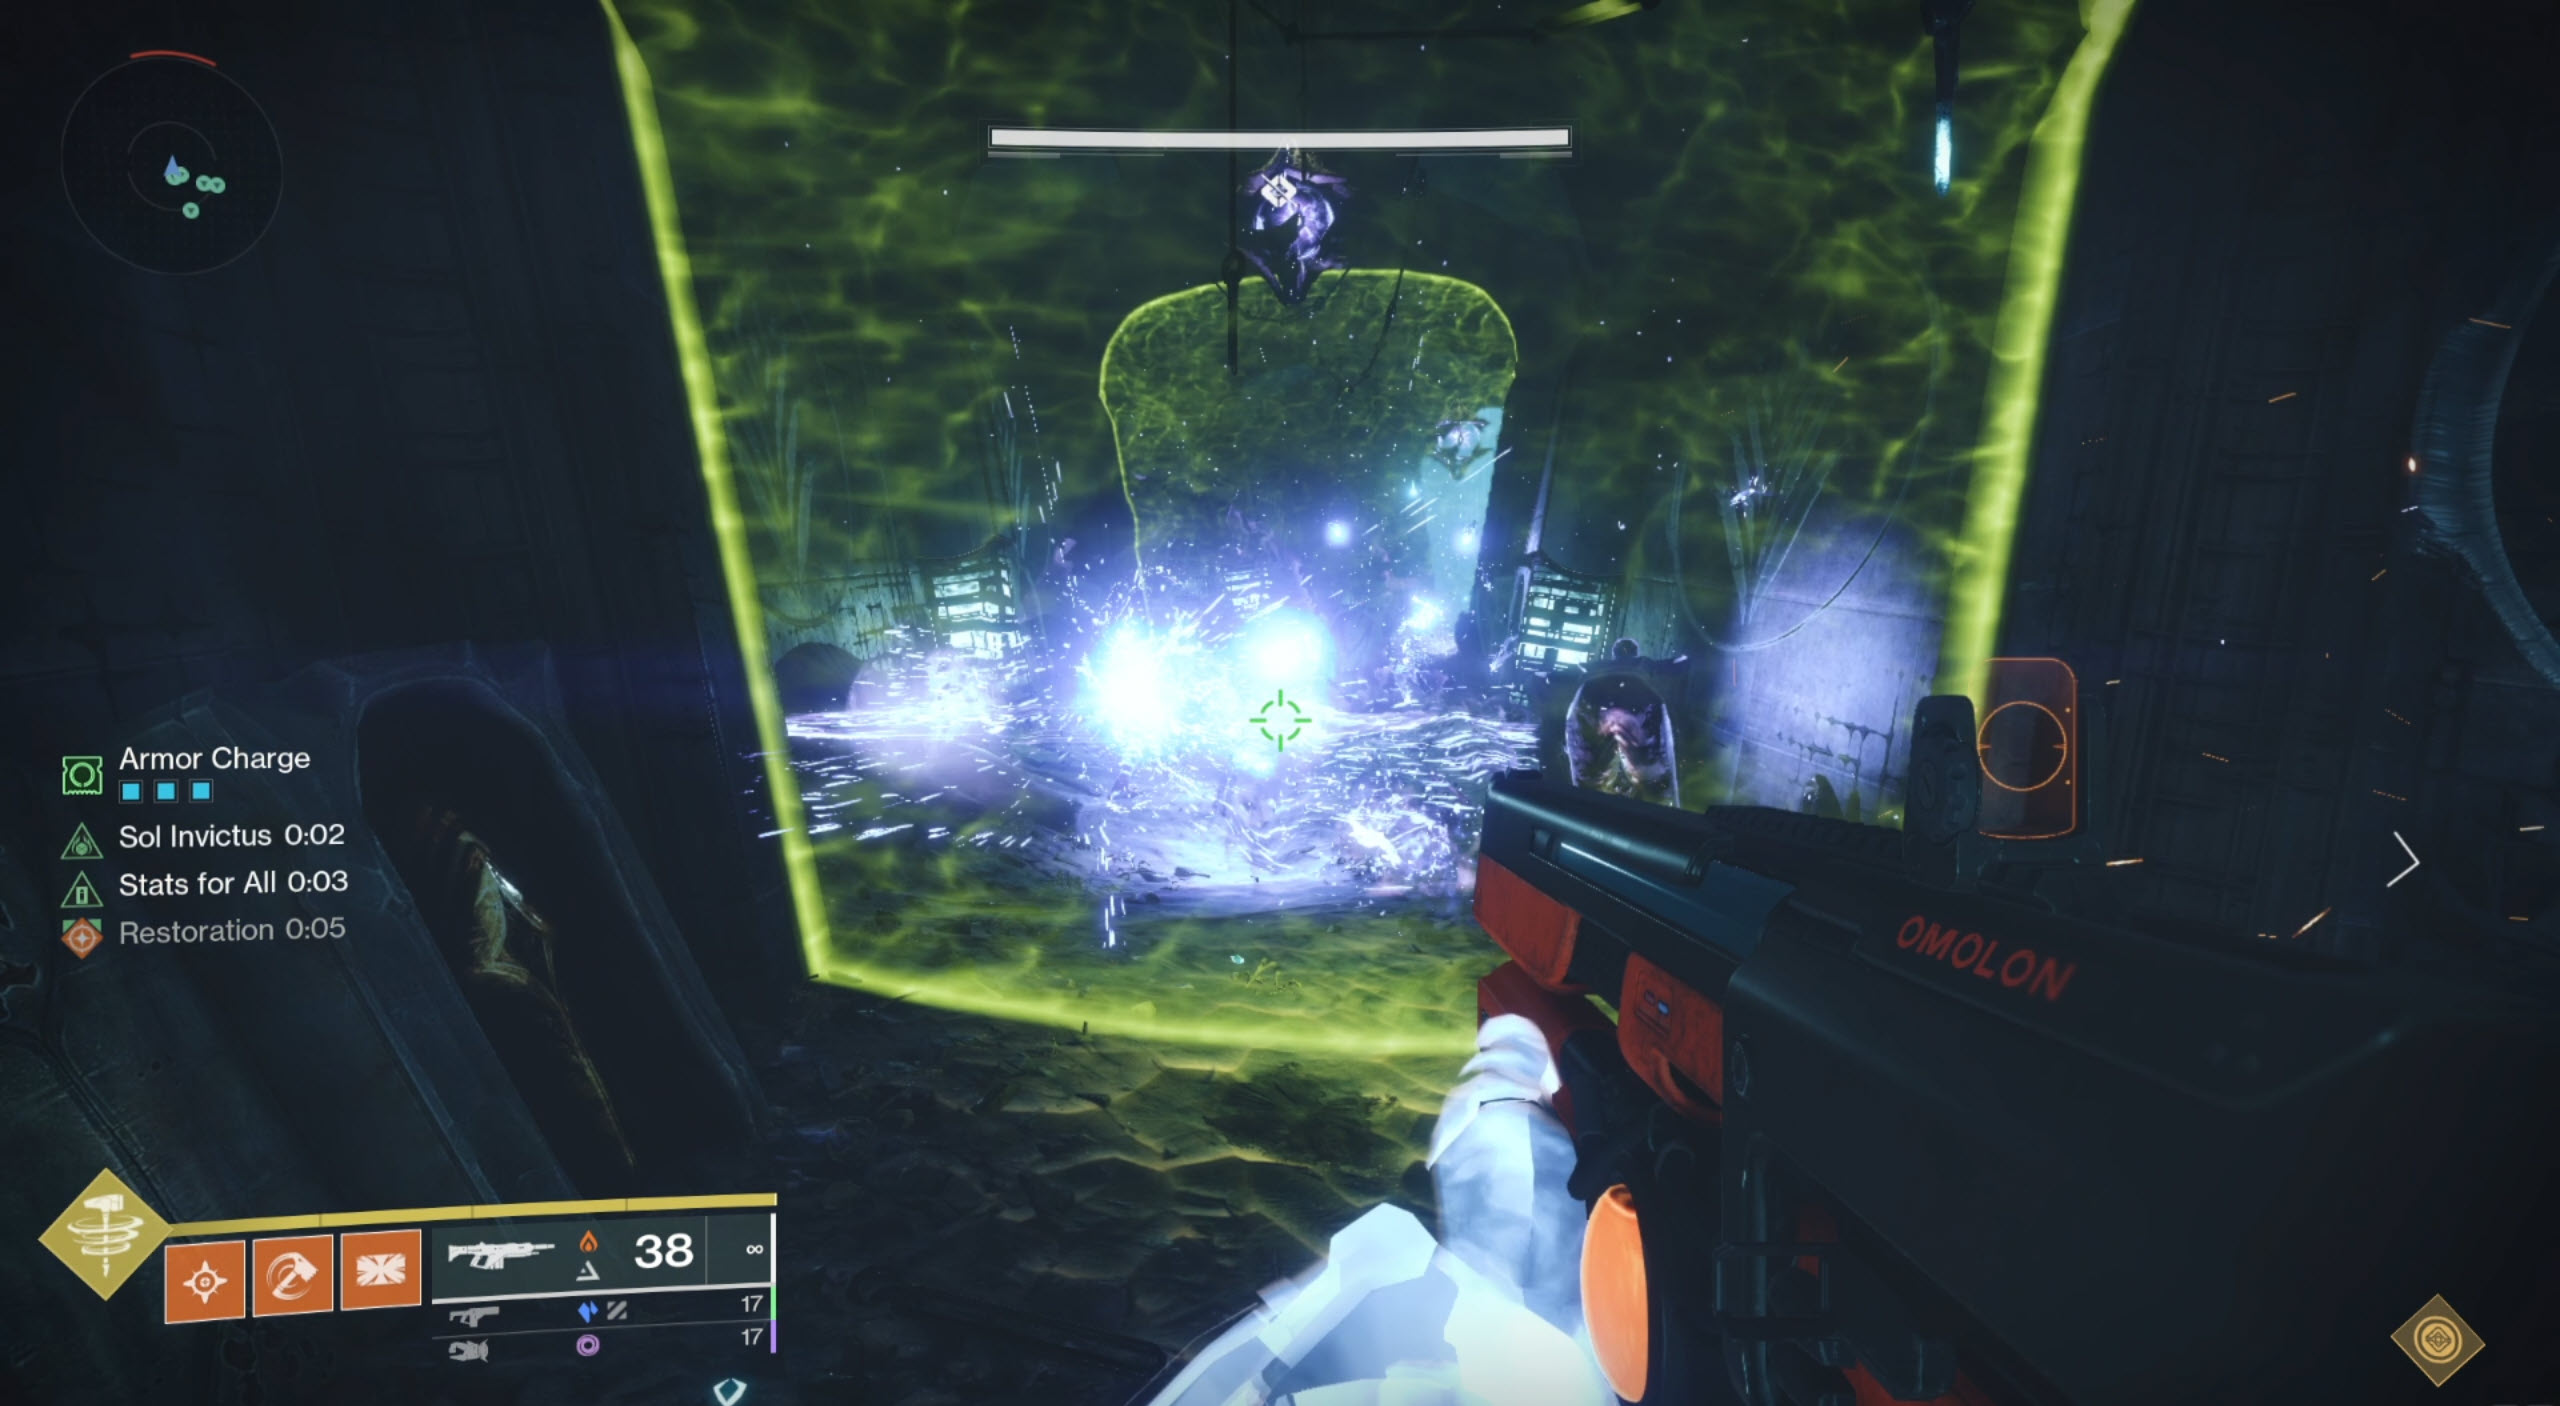
Players will see a green hive barrier. Players can only cross through these hive barriers when they are enlightened. The encounter will start with picking up the chalice. Notice a shrieker behind the green walls. Killing a shrieker brings the wall in front of it down, allowing the rest of the team to progress. The enlightened player is to kill the shrieker once they pass through. Once the team has reached the next barrier, the next enlightened player can pass through again to kill the shrieker.
When the final green wall is down, a timer appears called “Slipping Opportunity”, with a short ~7 second timer. The team should run to the end of the hallway and dunk the chalice before this timer ends. This will open a door behind a pit that has now opened, allowing the team to access the second secret chest. Drop down the pit to access the third encounter.
Tip:
Warlocks can blink through the barrier without consuming the enlightened buff if they time it right. The enlightened buff is still needed. This results in the Warlock being able to travel through more than one barrier in a try and taking down all the shriekers as well as reaching the secret chest room before the doors close.
Ir Yût, The Deathsinger
Loadouts:
- DPS Weapons (Rockets, LFRs, Sleeper Simulant, Leviathan's Breath)
- Divinity
- Eager Edge Sword
- Cenotaph Mask warlock, preferably on Divinity (many boss enemies present; can be marked and killed for a constant supply of heavy ammo)
This is a DPS encounter. Most teams tend to use a Divinity with Leviathan's Breath with catalyst, though rockets with Gjallarhorn, Legend of Acrius, and other Linear fusion rifles will work as well. The point of the encounter is to kill a certain number of wizards in order to make the boss vulnerable to damage. The number of wizards to kill depends on which phase you are in.
First phase: 3
Second phase: 4
Third phase: 5
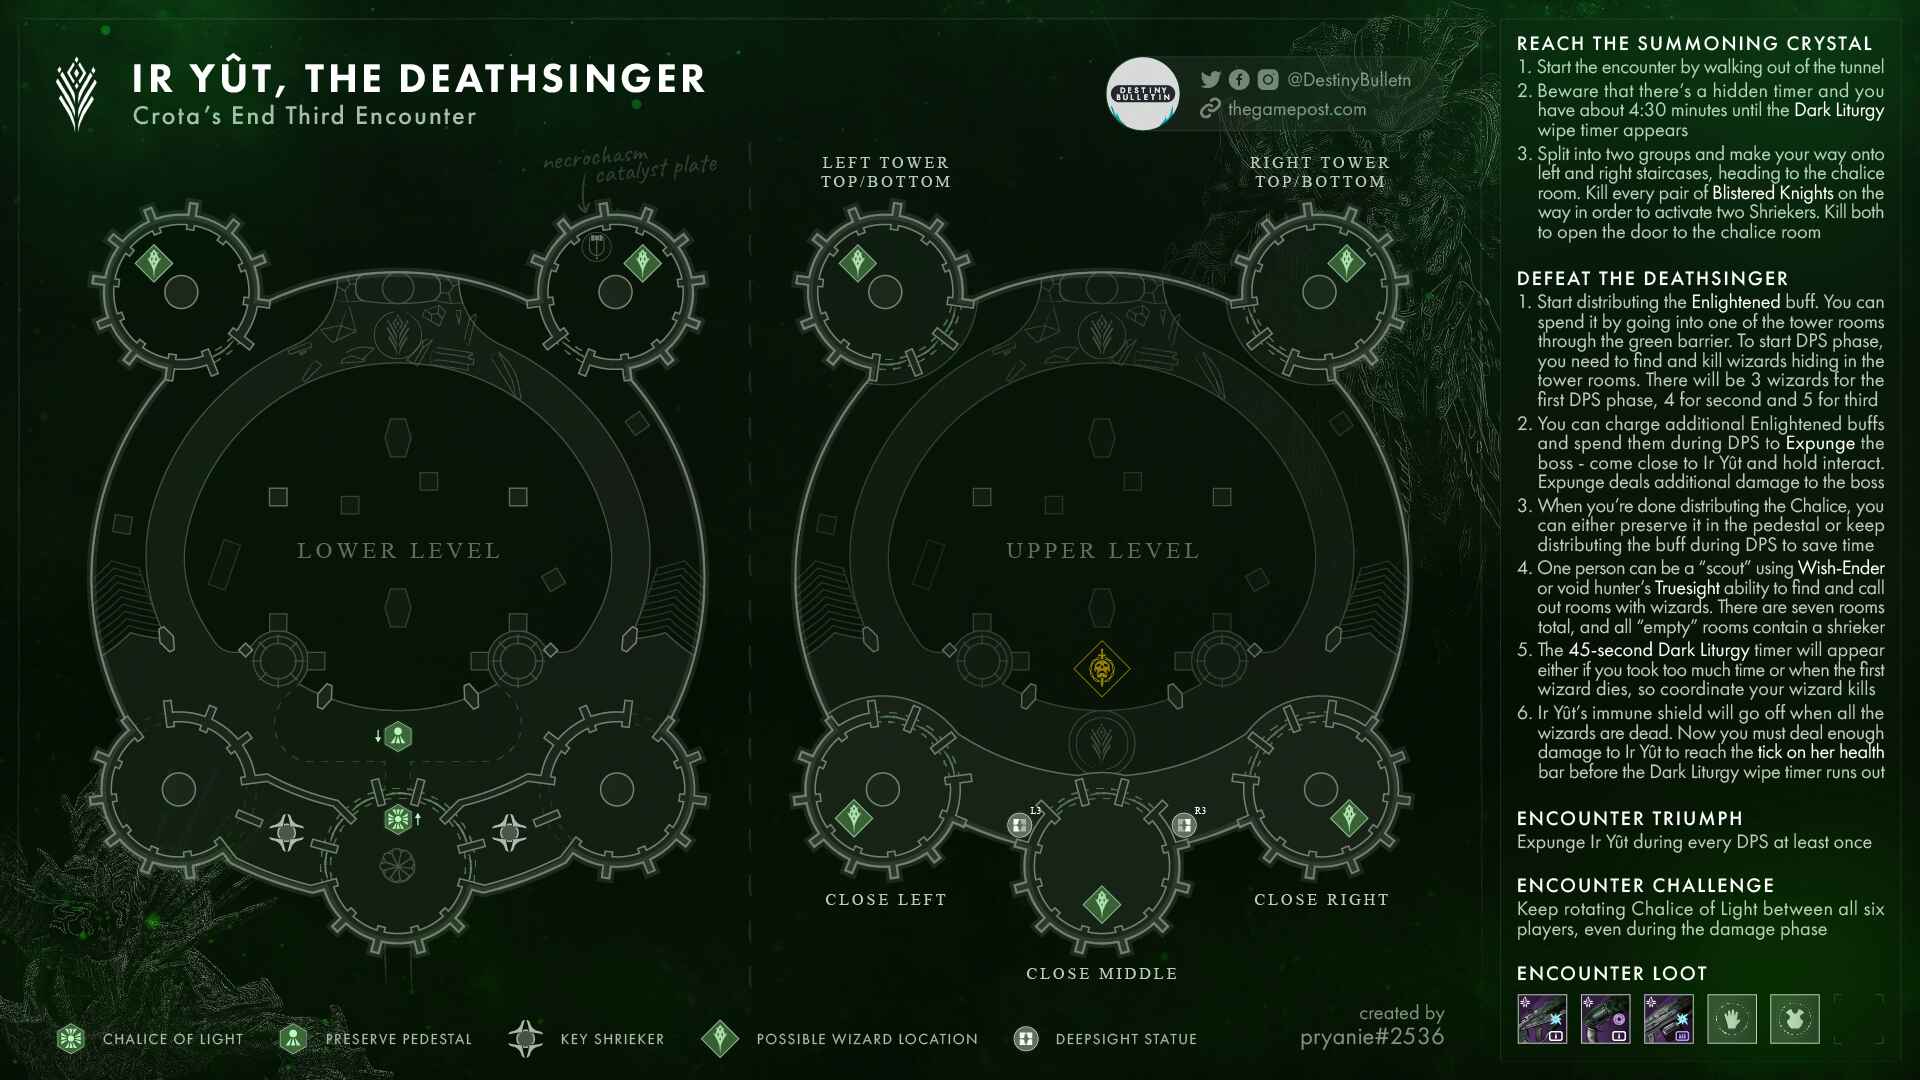
Start the encounter by walking towards the two knights at the end of the hall. Kill all yellow-bar knights, and then in the middle above the spawn, the shriekers will become vulnerable. When shriekers on both the left and right sides of the middle are killed, the green hive wall behind them goes down, allowing the team to access the Chalice of Light. Now that the team has access to the chalice, cycle the chalice until there are enough people enlightened. A table showing the jobs of the players in the order that they pick up the chalice has been provided:
| Player | Phase 1 | Phase 2 | Phase 3 |
|---|---|---|---|
| 1 | Wizard Killer | Wizard Killer | Wizard Killer |
| 2 | Wizard Killer | Wizard Killer | Wizard Killer |
| 3 | Wizard Killer | Wizard Killer | Wizard Killer |
| 4 | Dunker | Wizard Killer | Wizard Killer |
| 5 | Ad-Clear | Dunker | Wizard Killer |
| 6 | Ad-Clear | Ad-Clear | Dunker |
Meanwhile, someone will run around the map, looking at each of the seven rooms with the green hive barriers blocking them off. The objective will be to look for the rooms with wizards, as these wizards are the ones that need to be killed in order to begin the damage phase.
While it is possible to directly observe a wizard if your eyes are sharp, there will be wizards that cannot be seen as they are blocked by a pillar. Hence, in order to differentiate a wizard from a shrieker when you cannot directly observe what is in the room, you can:
- Use a truesight ability (Wish-Ender, Stylish Executioner Void Hunter Aspect).
- (Preferred) Use the radar's symbols.
- If a shrieker is present in the room you are observing, you will see a dot with a white circle around it.
- If you are observing the rooms at the far left or right, as the two rooms are stacked on top of one another, you can use the arrows on the dots to deduce where the shrieker is. If the dot has an arrow pointing upwards, the shrieker is in the room above. Likewise, if the arrow points downward, the shrieker is in the room below.
Enter the rooms with wizards and coordinate with the rest of the wizard killers to kill them at the same time. This is because killing a wizard begins a timer called “Dark Liturgy”. Dark Liturgy is a 45-second timer that wipes the team when it hits 0. This wipe can be prevented if all the wizards are killed in order to bring down the boss's shield.
While the wizards are being killed, whoever has the Chalice can run to a dunk spot outside the hallway where the rally flag was and dunk it there so that it does not interfere during damage (ie passing of the chalice will not be needed during damage).
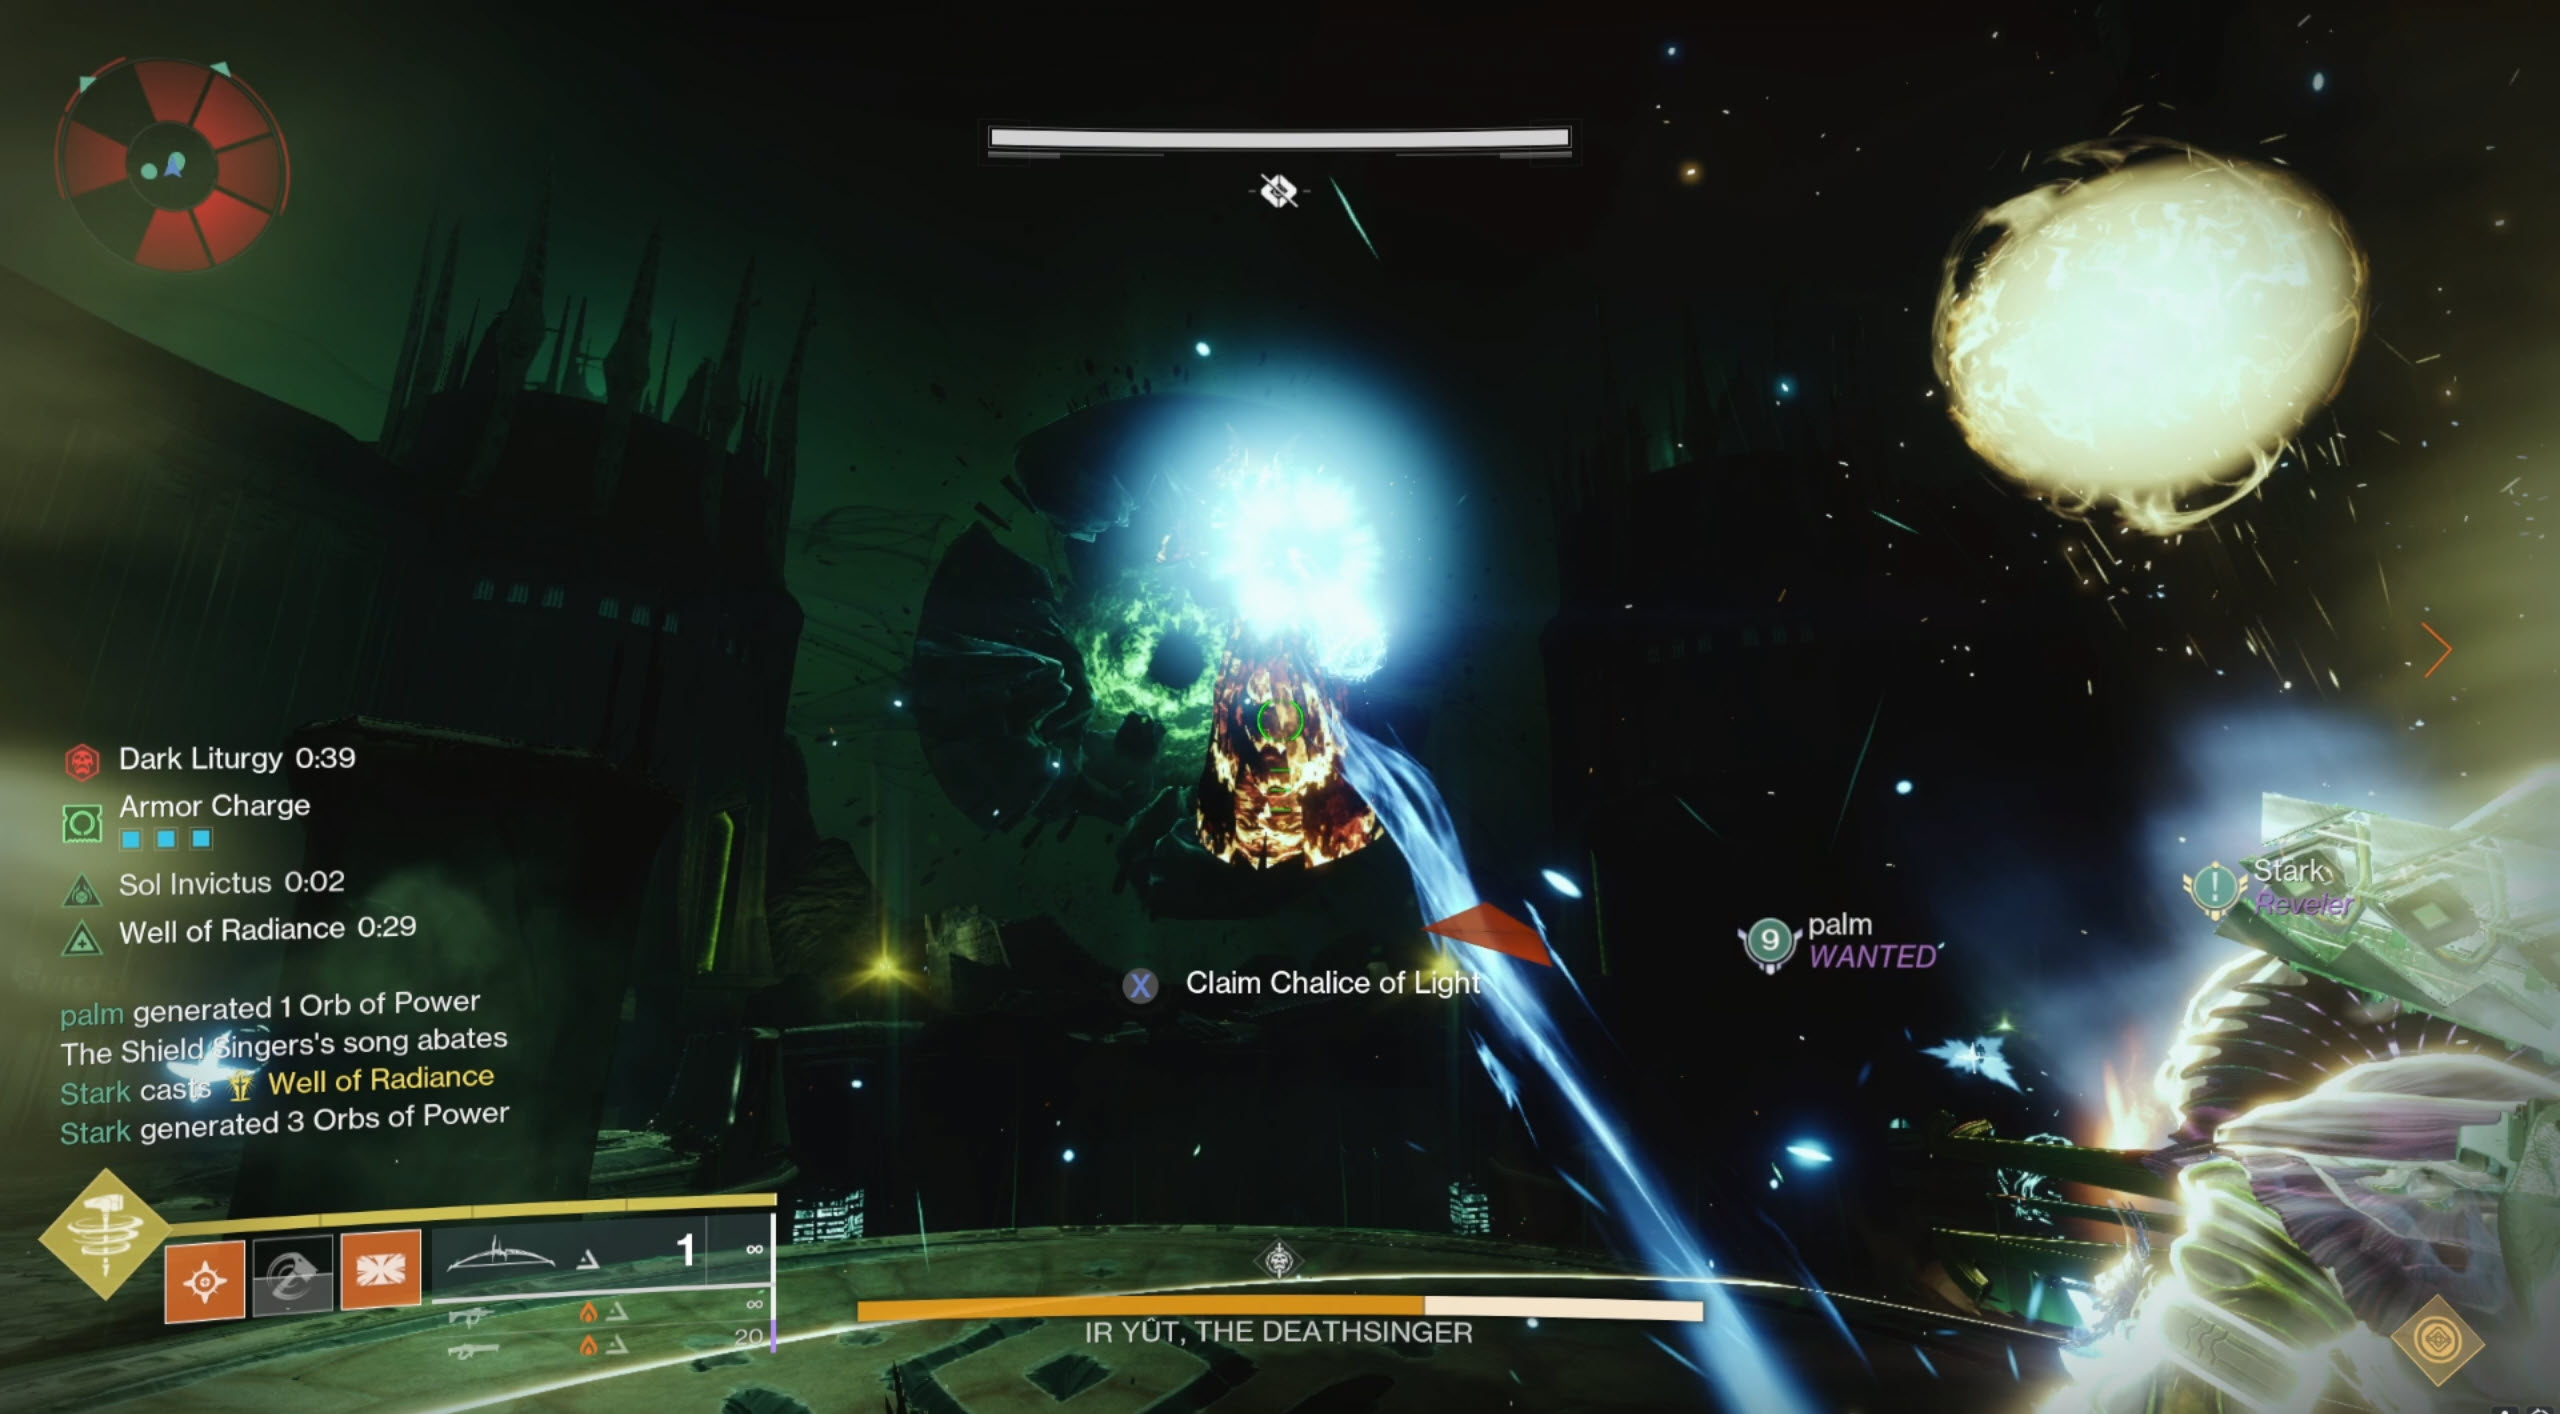
A certain portion of the boss's health is reflected in the health bar. Keep damaging her during the dark liturgy timer, as the timer does not go faster nor does the boss receive less damage once the dps check is fulfilled.
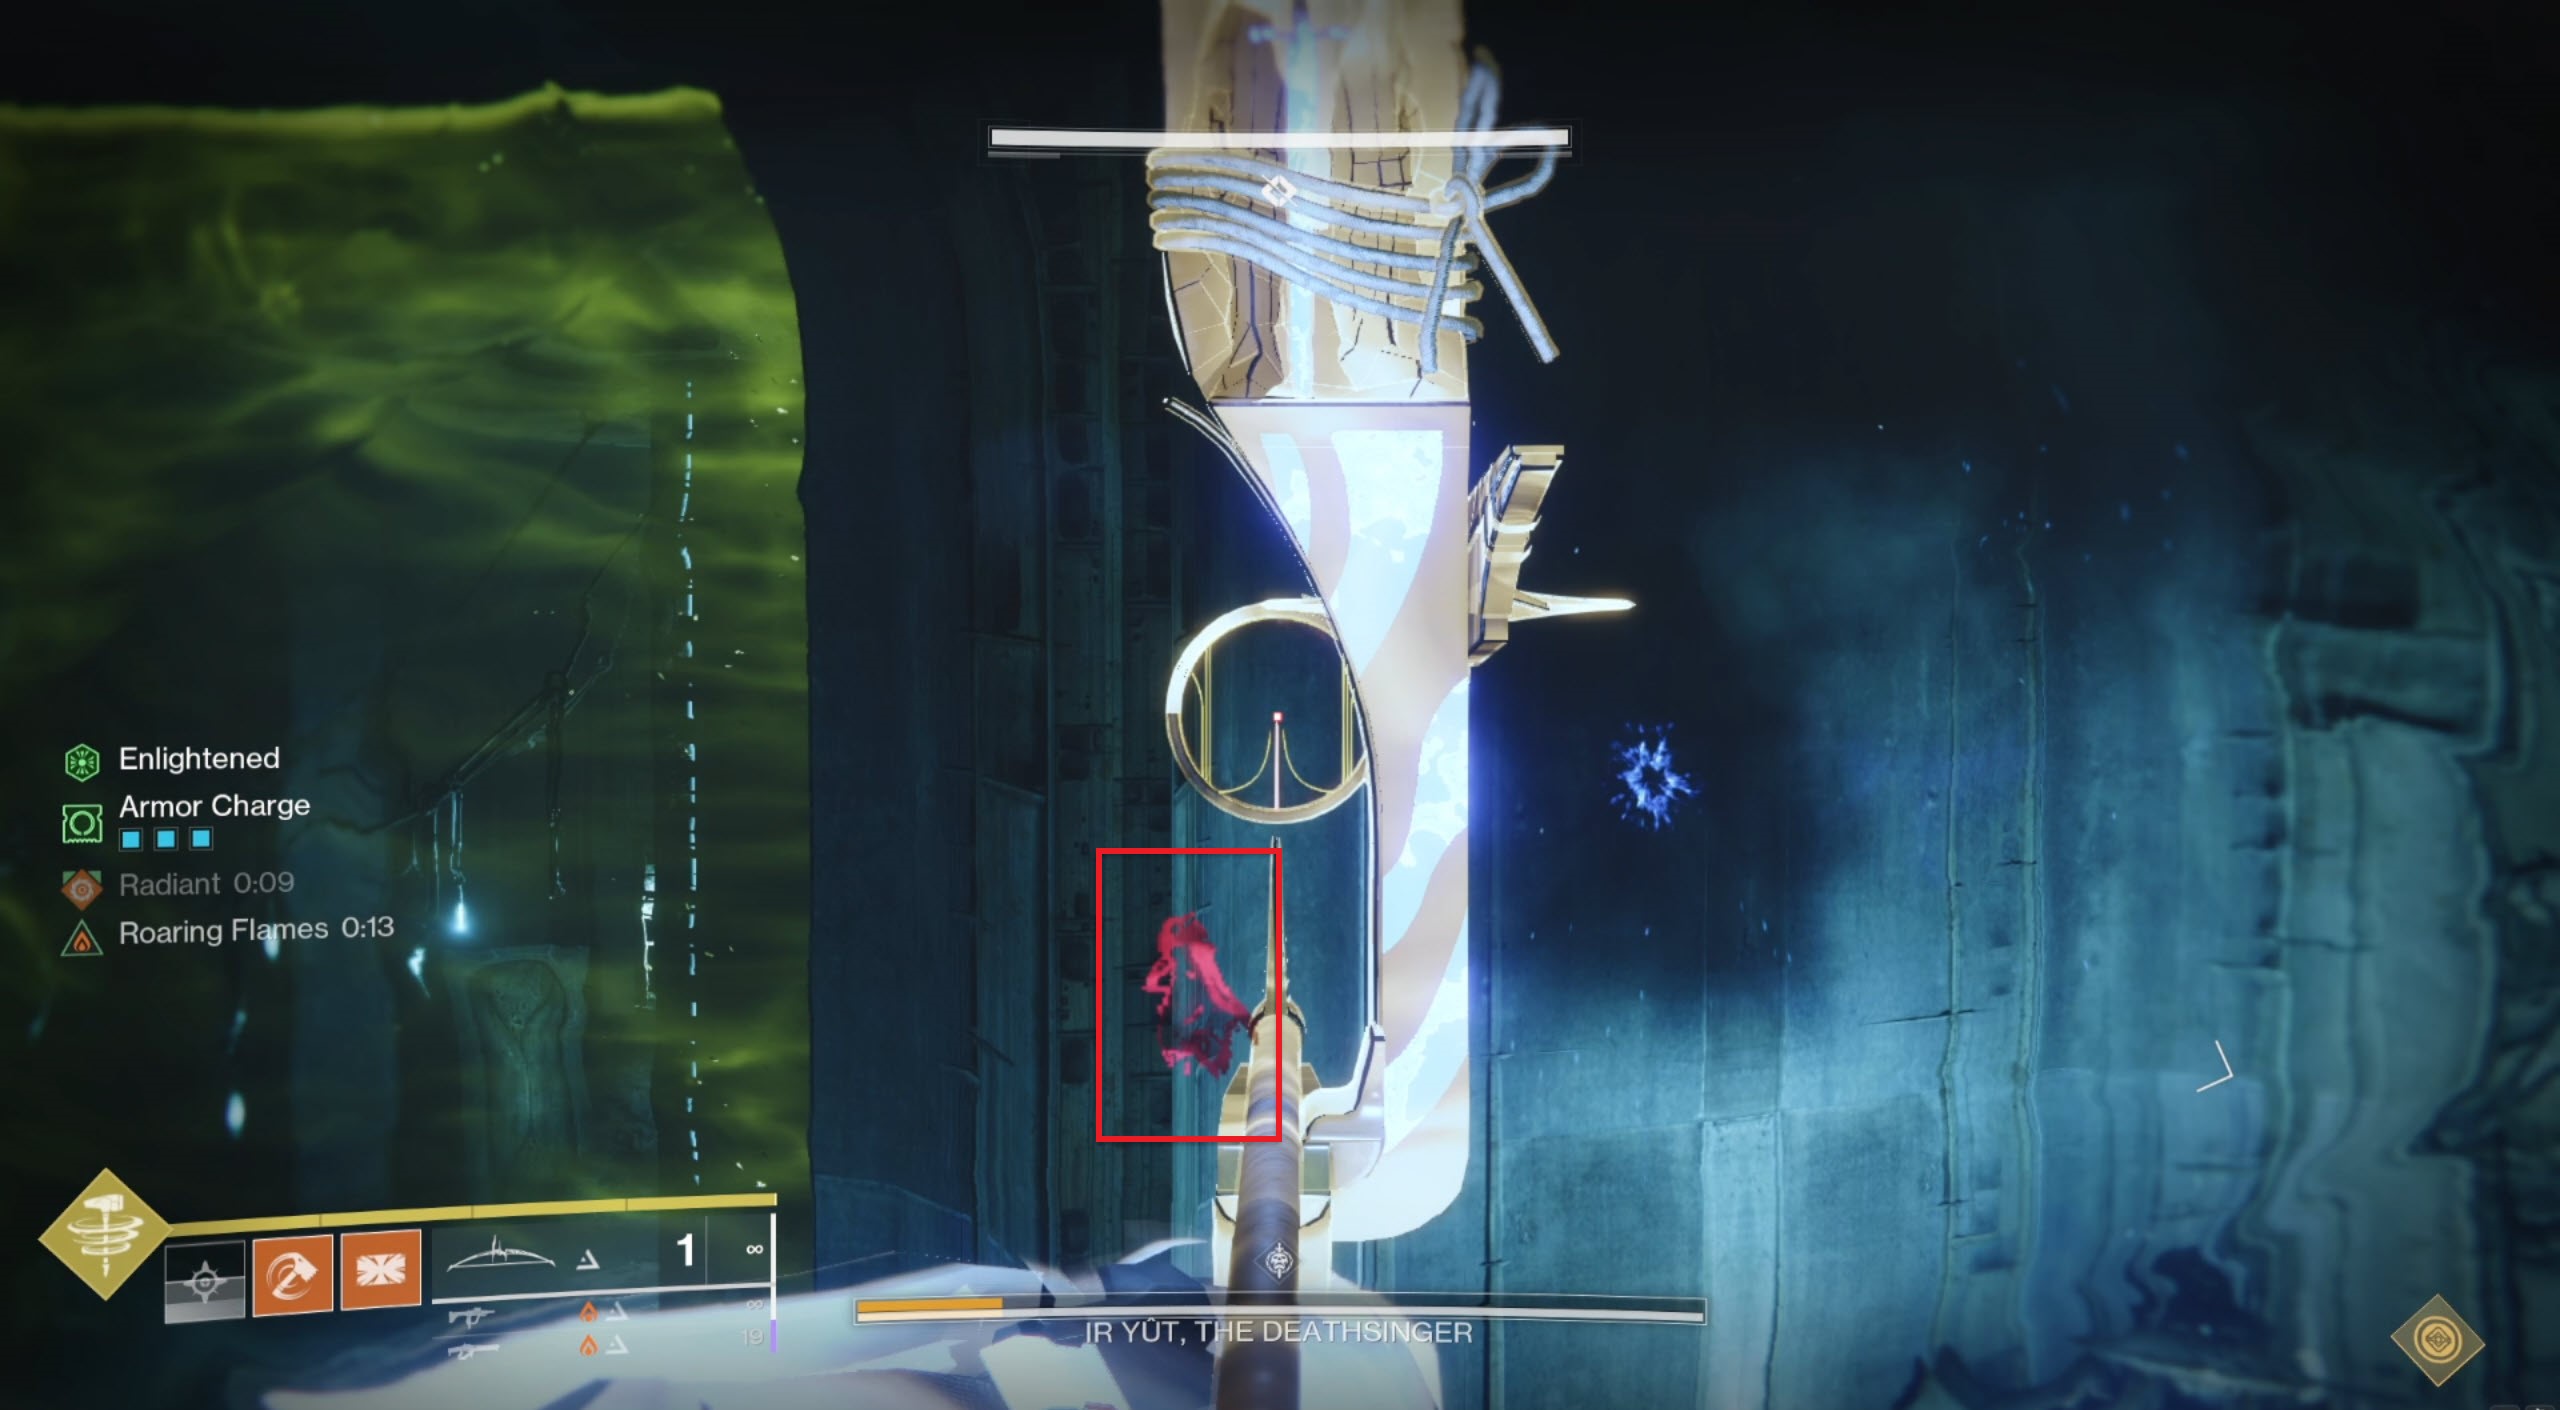
If someone still has Enlightened during damage, they can choose to “Expunge” the boss. Expunge is done by getting close to the boss and interacting with it. It will do a small amount of damage to the boss. Once you have finished the damage phase (which ends when Dark Liturgy hits 0 and you have done at least the minimum amount of damage to the boss's health bar that is highlighted), the second mechanic phase begins. The first player can pick up the chalice again and pass it until at least four players are enlightened. From there, it's about repeating: find the wizards and kill them to start DPS again.
Encounter Triumph:
Communal Rites - During each round of the Ir Yut encounter, at least one player must expunge Ir Yut.
Challenge Mode:
Equal Vessels - Guardians can only pick up the Chalice after everyone else in the team has picked it up.
- In other words, the chalice is rotated, and it's recommended to have a rotation.
- You cannot have the buff twice.
Master Difficulty:
- Barrier Champions Knights spawn at the middle room (one with the crystal).
- All Knights have arc shields.
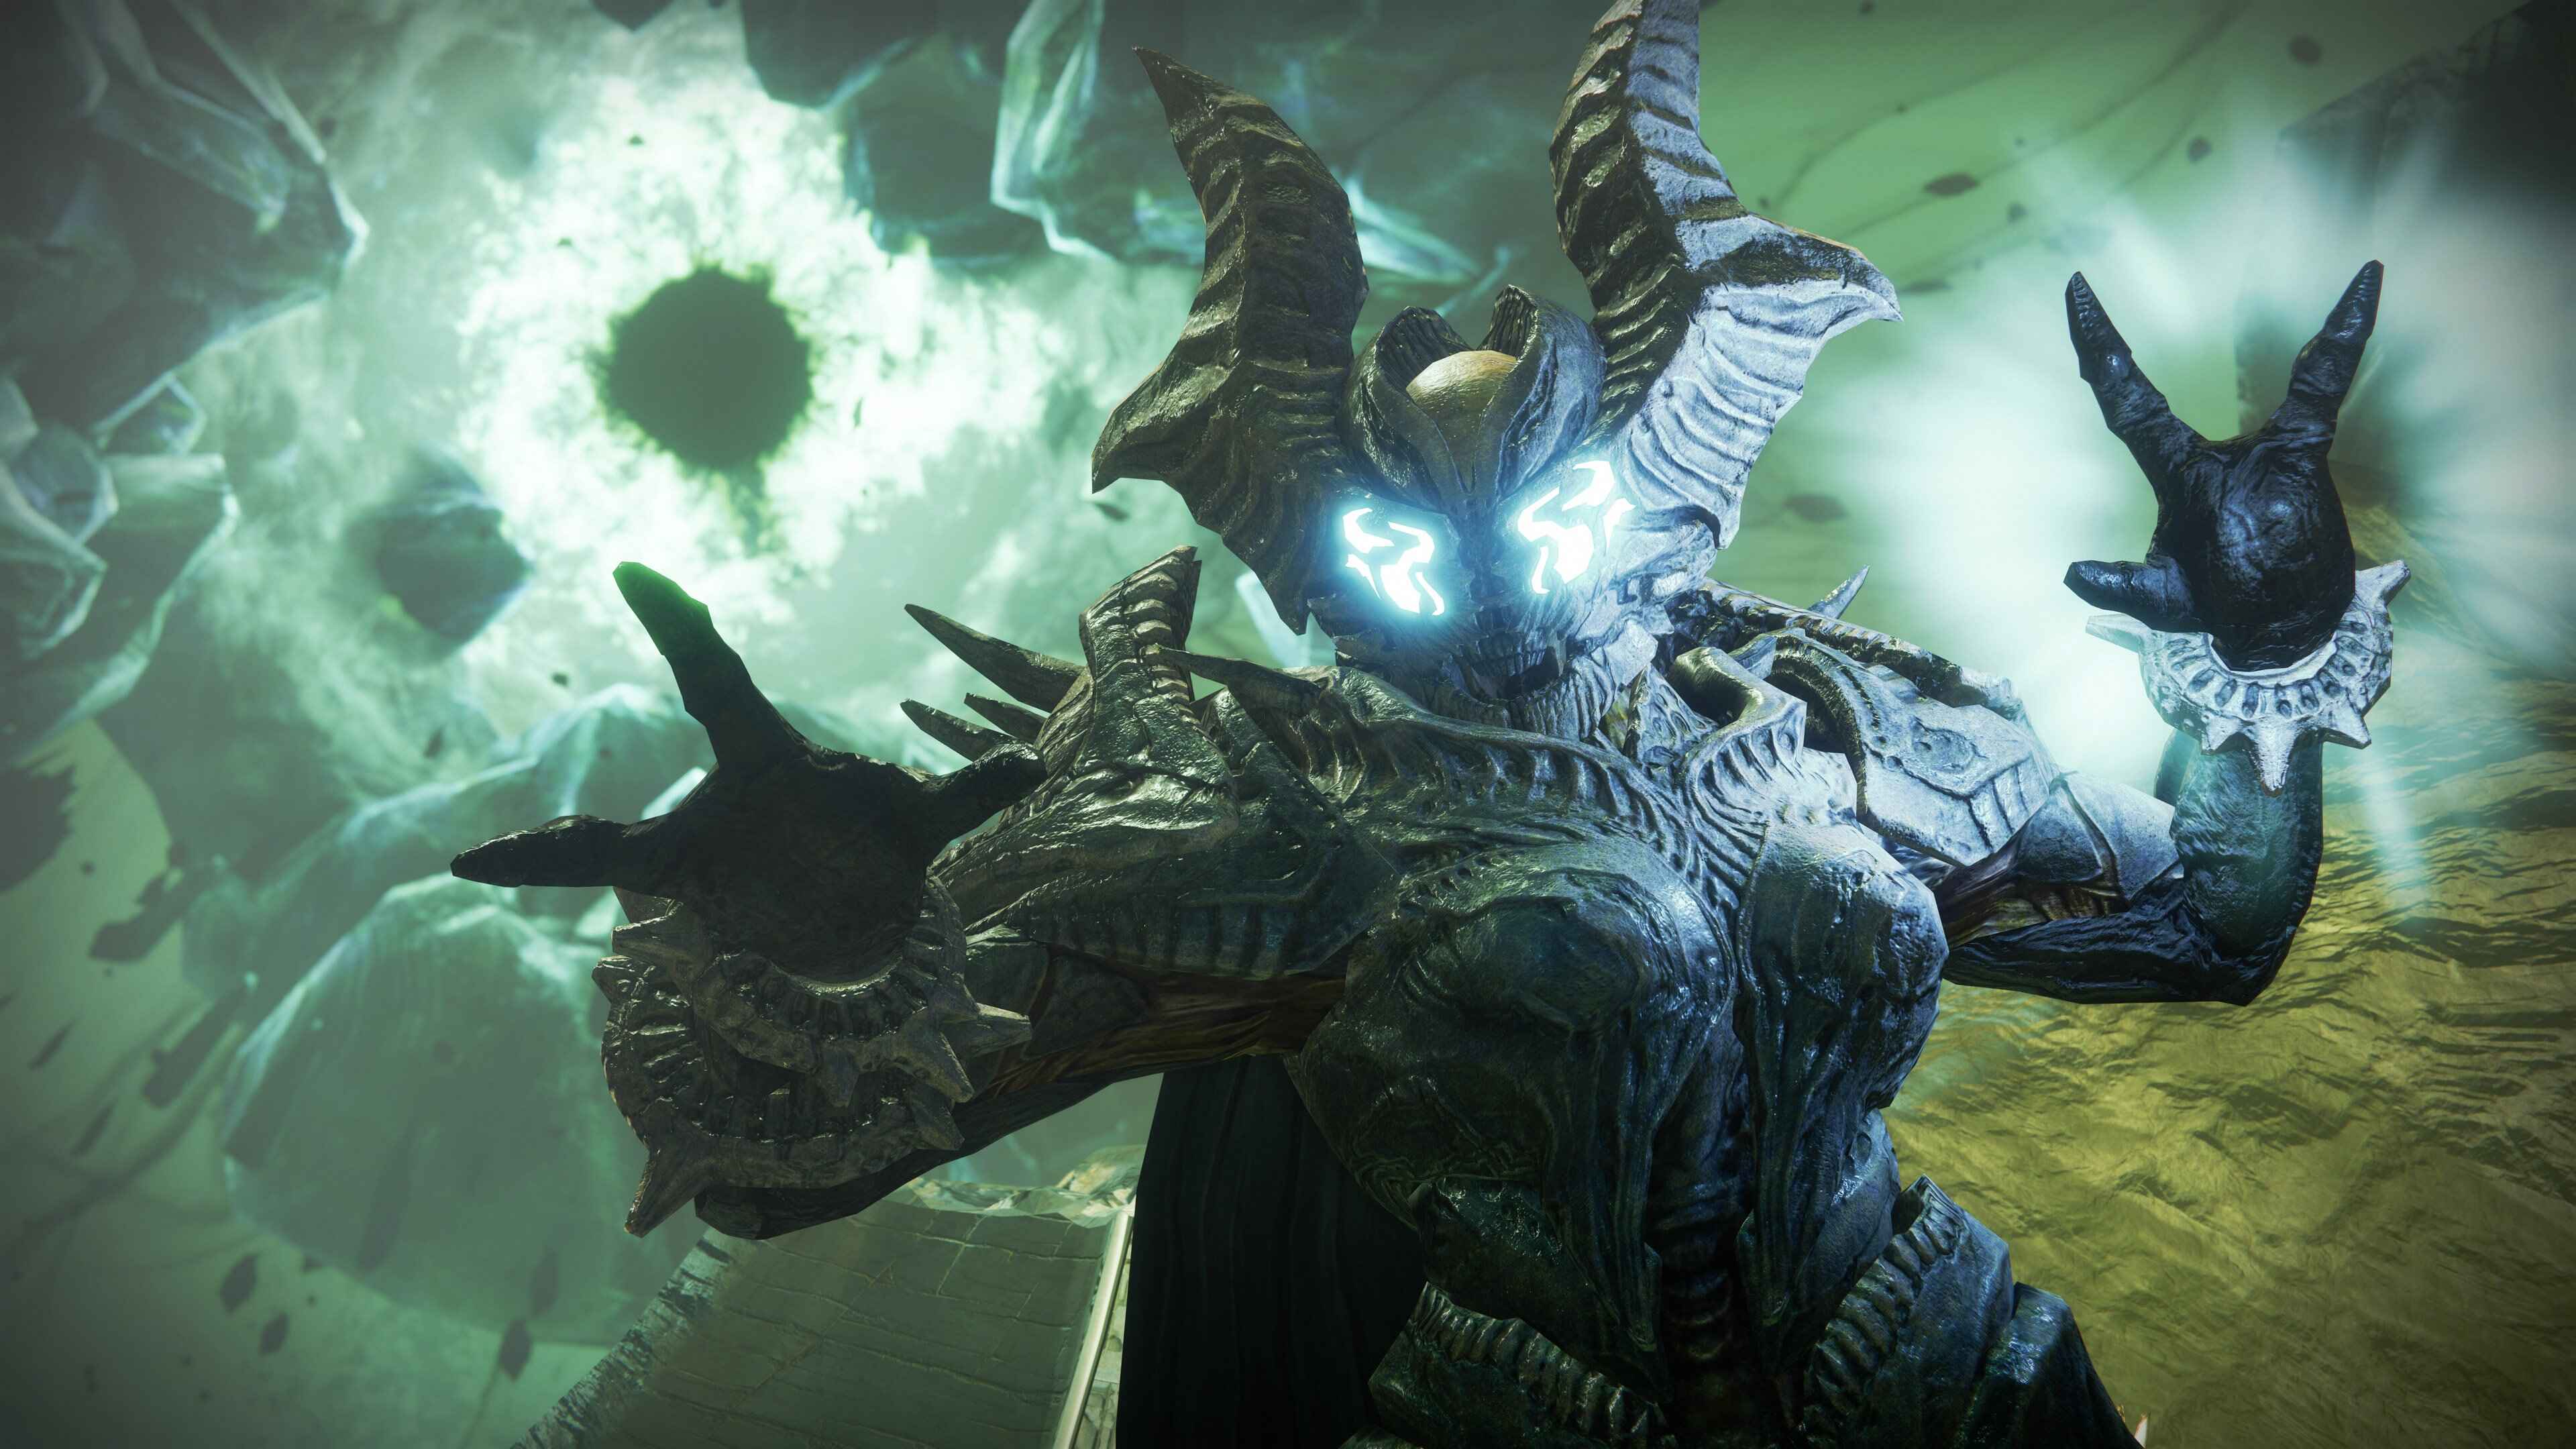
Crota, Son of Oryx
Loadouts:
- Crota seems to take 35% more sword damage, so the Lament is a good damage option, with Falling Guillotine and Bequest being equally good, if not situationally better options. The Lucent Blades mod may help with damage as well.
- Lament combo: Block -> 2 Light 1 Heavy -> 2 uncharged light and repeat Tractor Cannon to debuff the boss; useful for damage phase as well as making it easier to take Crota's shield down.
The point of this encounter is to arm players with swords, using the swords to take Crota's shield down in order to begin dealing damage.
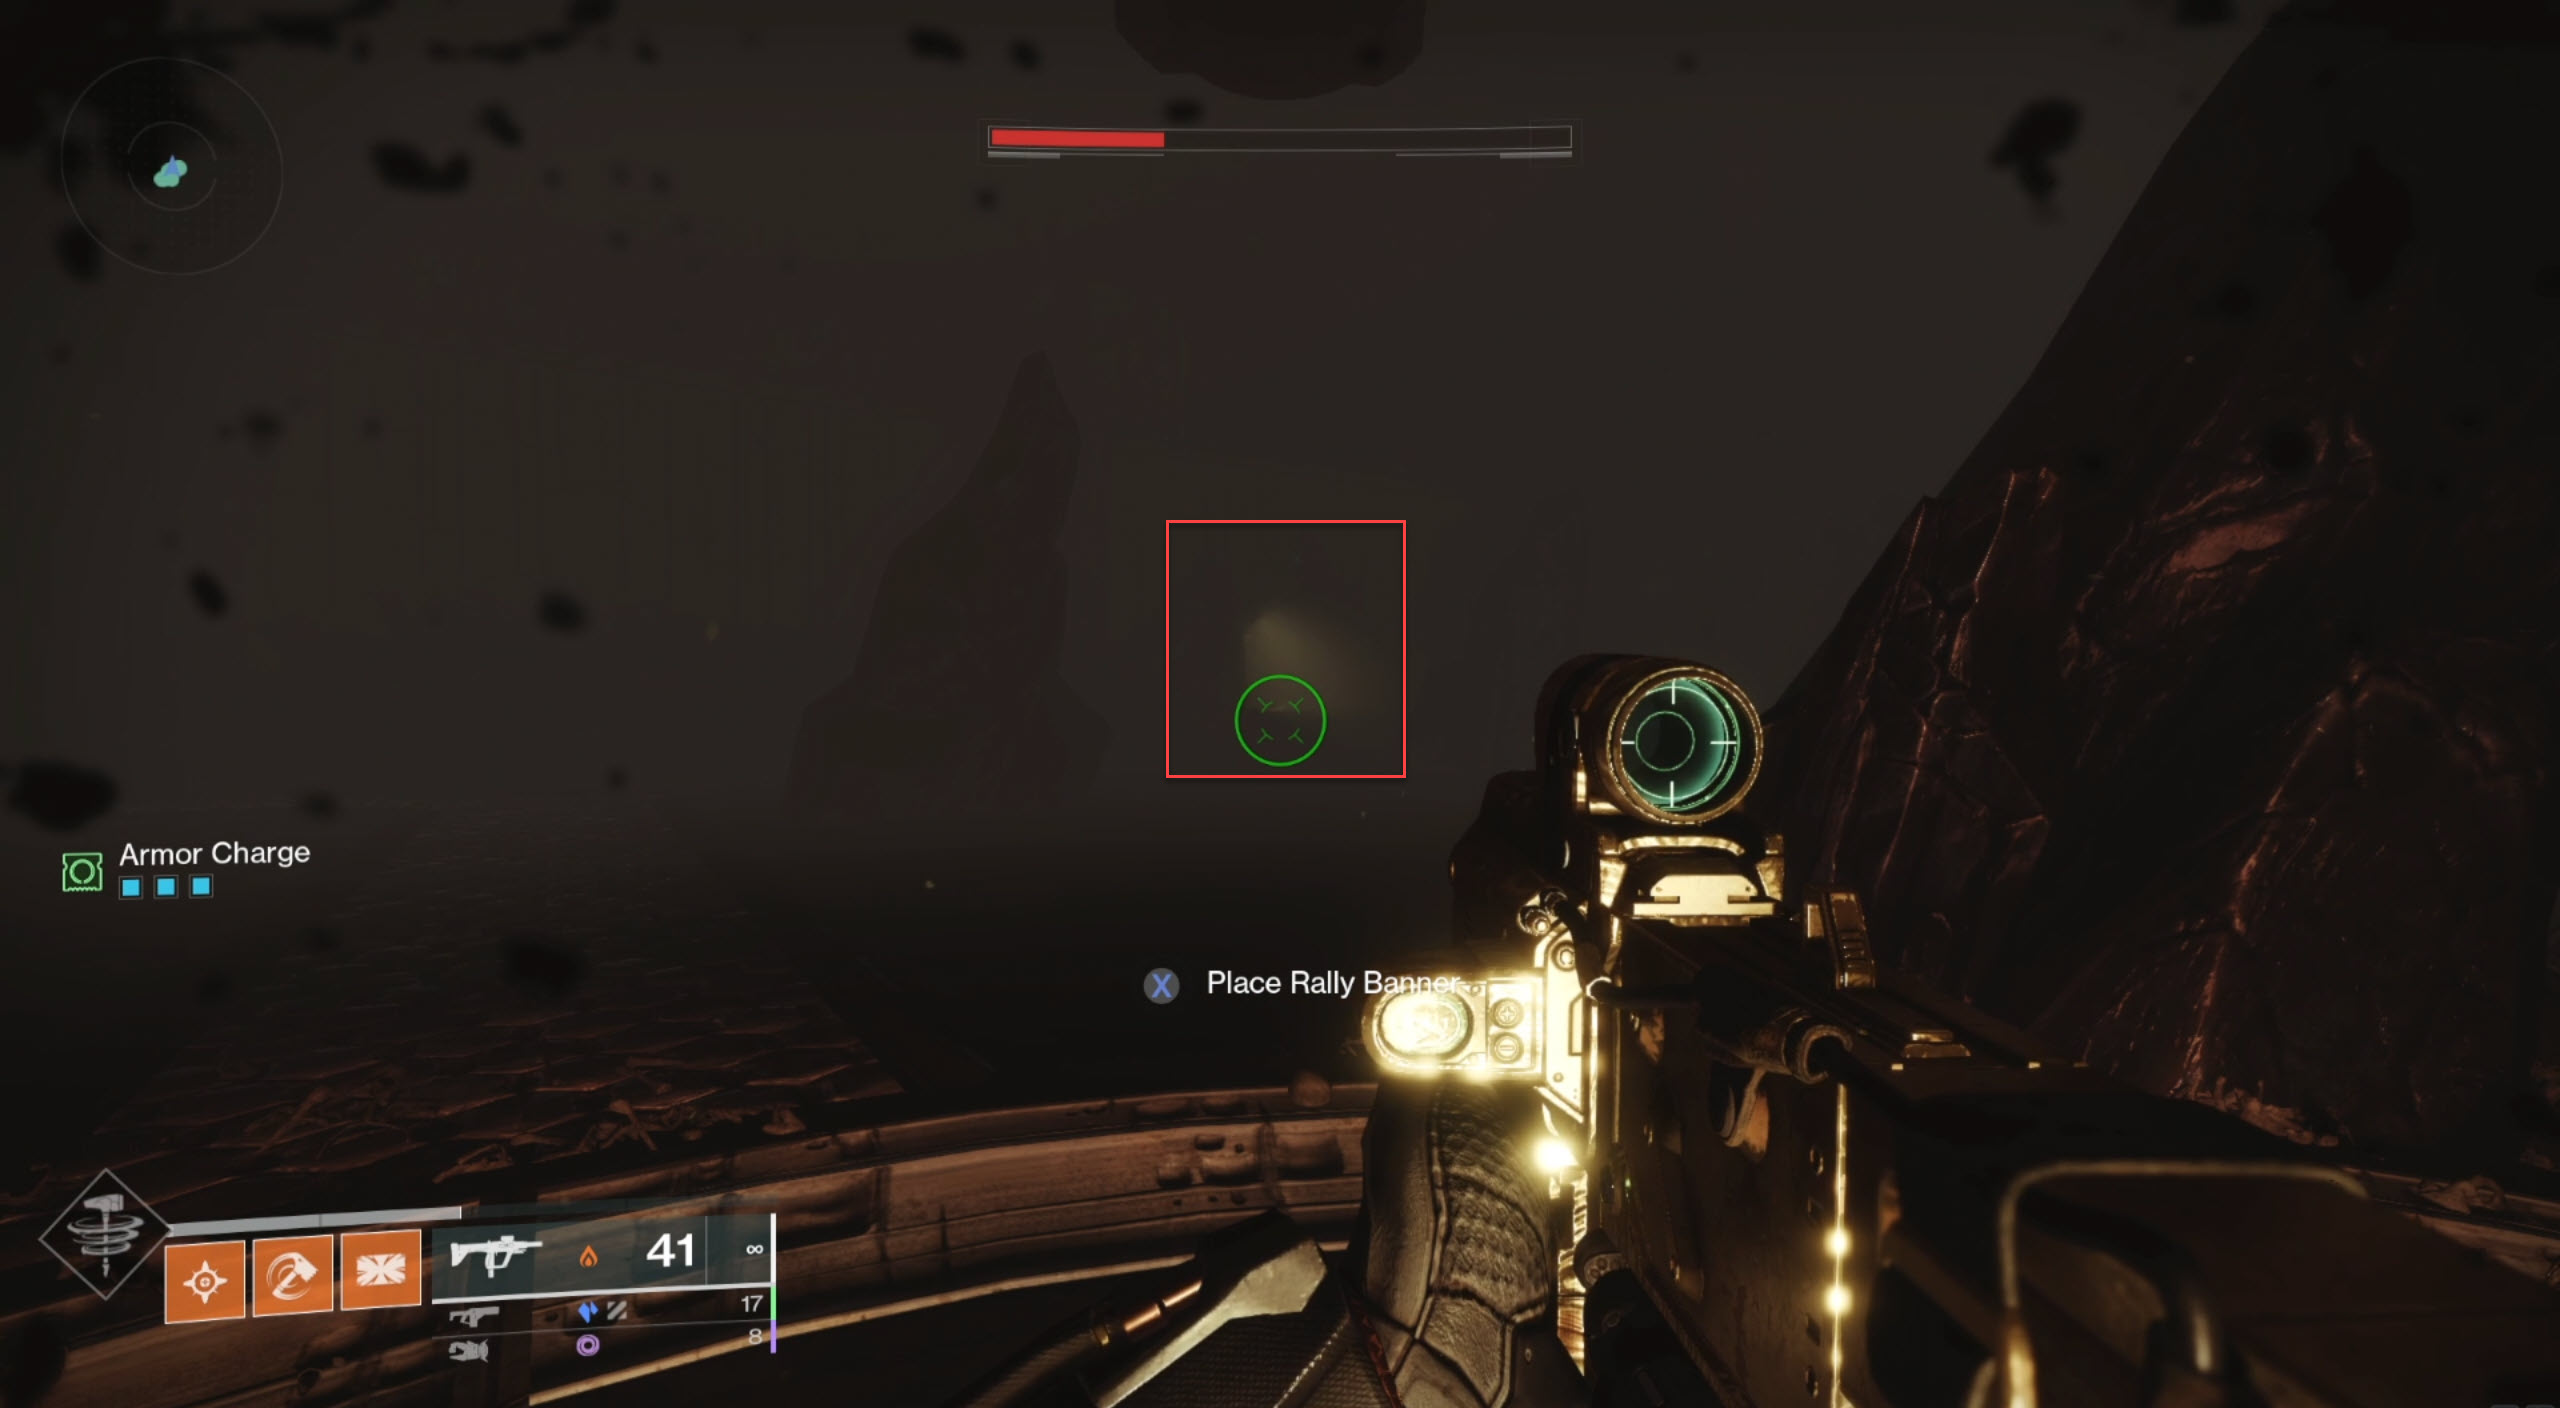
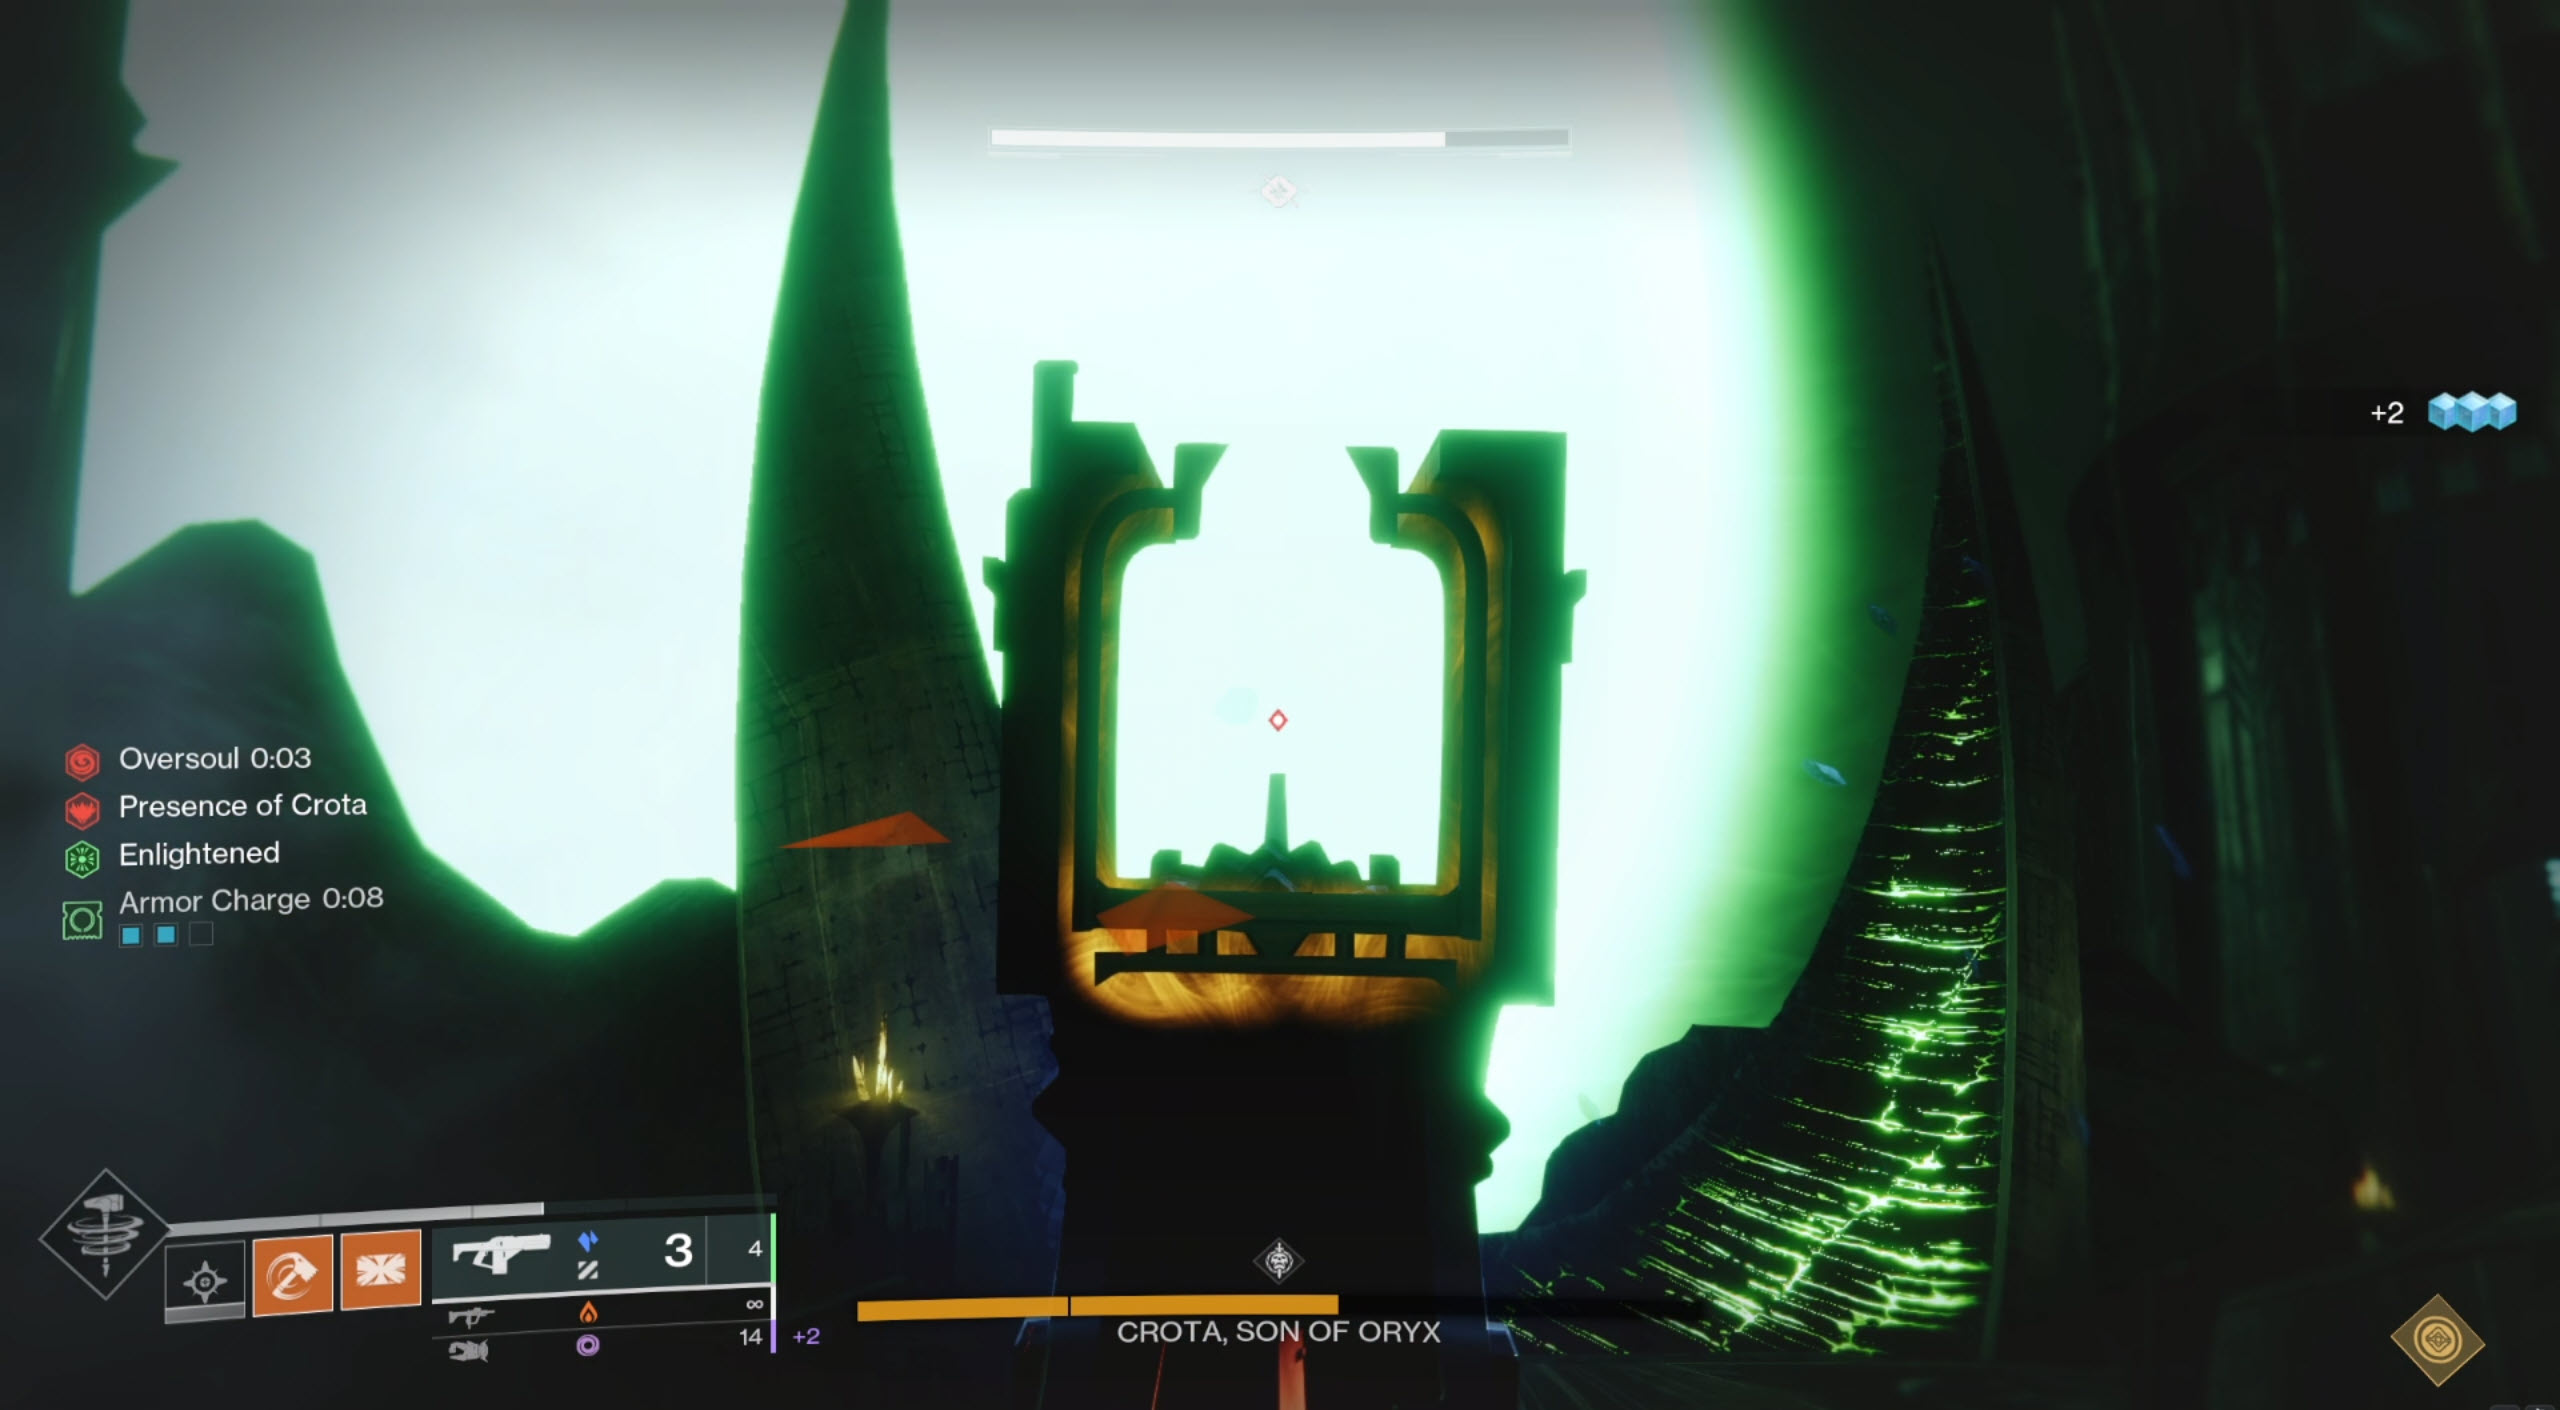
the "Presence of Crota" debuff prevents players from taking the chalice of light buff from another player, except for a spot glowing with light, so keep that in mind when getting people enlightened for the sword During damage, a timer called "Oversoul" will appear. Oversoul wipes the team when it hits 0. In order to prevent this wipe, one can shoot the Oversoul with the Enlightened buff. The Oversoul is a massive green orb at the back of the map; it is incredibly hard to miss. Players tend to use rapid-fire fusions on the oversoul; two shots can kill it. Killing the oversoul ends the damage phase.
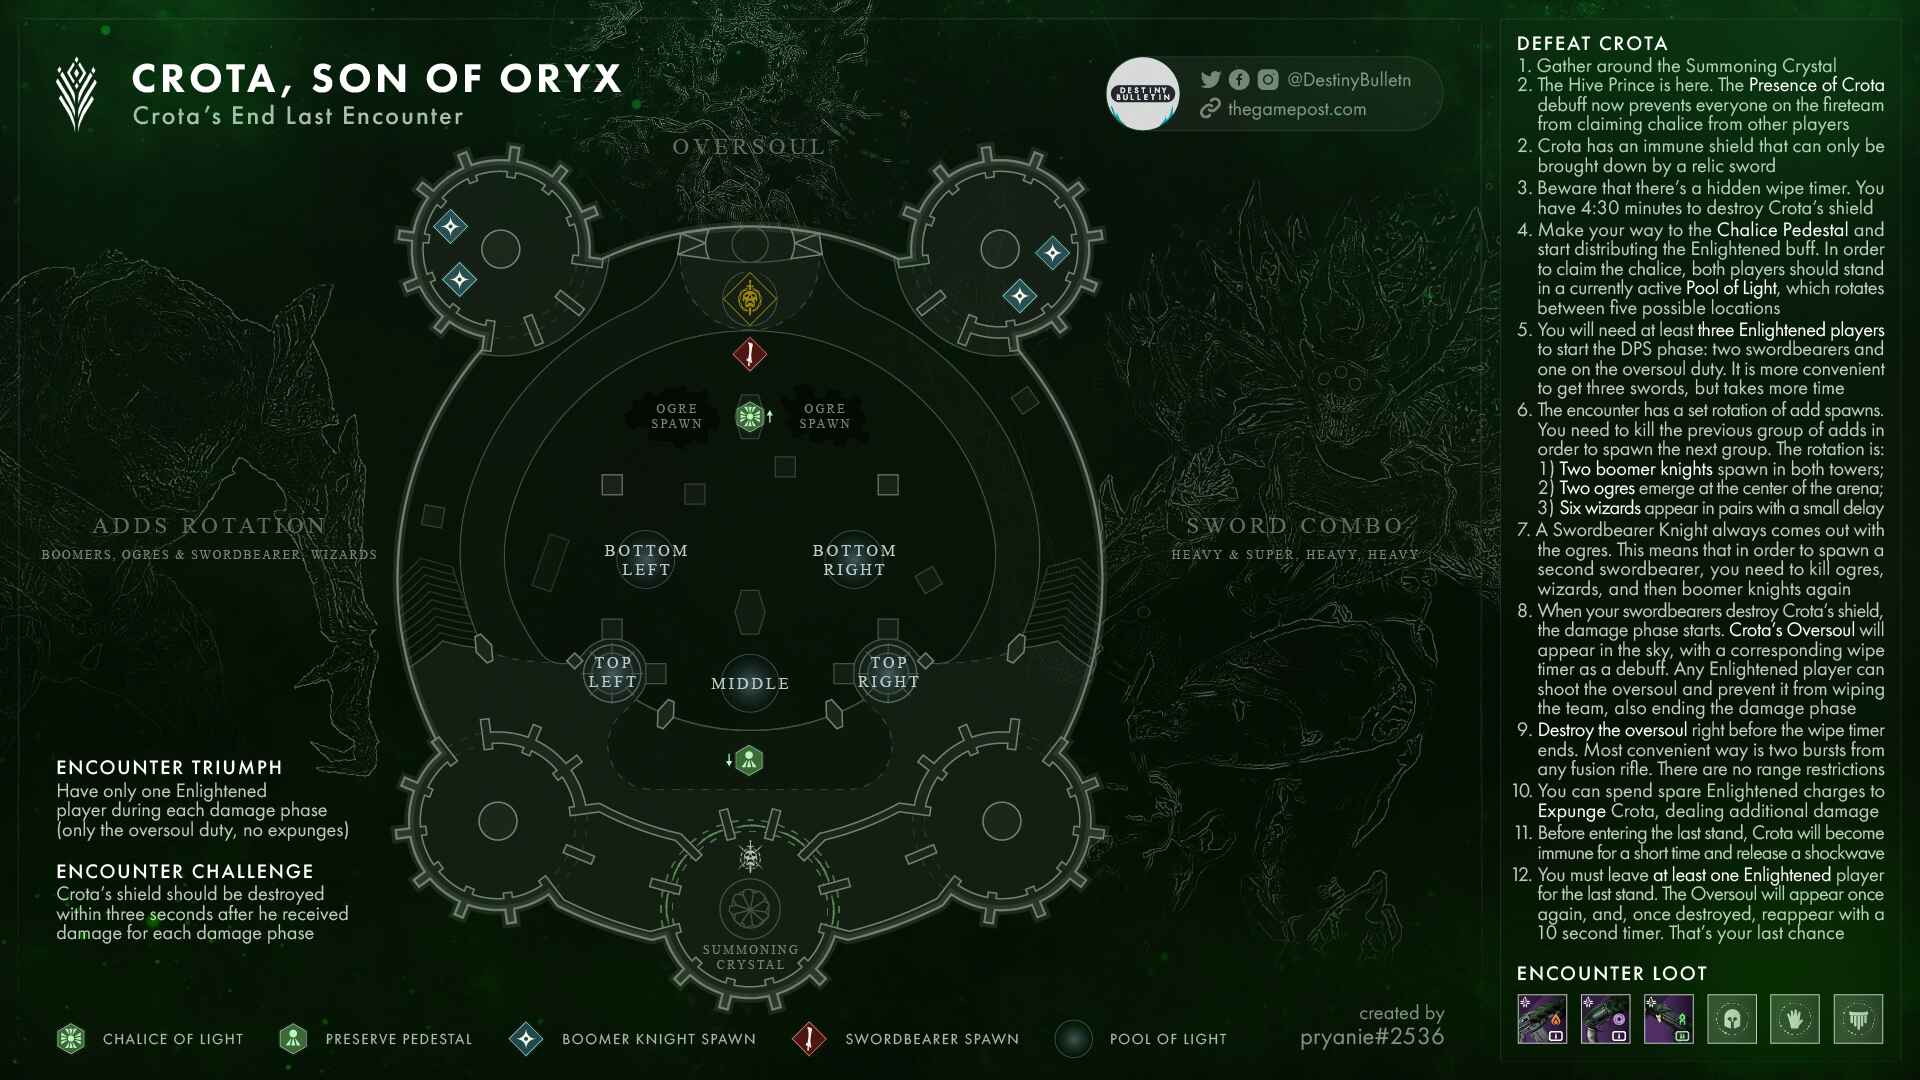
The encounter starts when everyone stands around the crystal in the middle room; this will create a portal that summons Crota. The walls around the team will disappear, allowing the team to move to the sides and back into the pit, where a player can pick up the Chalice. Most teams tend to use two swords to take Crota's shield down, though if one wants to play it safe, three swords are more reliable. The table below shows the roles of each player in the order that they pick up the chalice:
| Player | 2 Swords on Crota | 3 Swords on Crota |
|---|---|---|
| 1 | Sword | Sword |
| 2 | Sword | Sword |
| 3 | Oversoul | Sword |
| 4 | Dunker | Oversoul |
| 5 | DPS | Dunker |
| 6 | DPS | DPS |
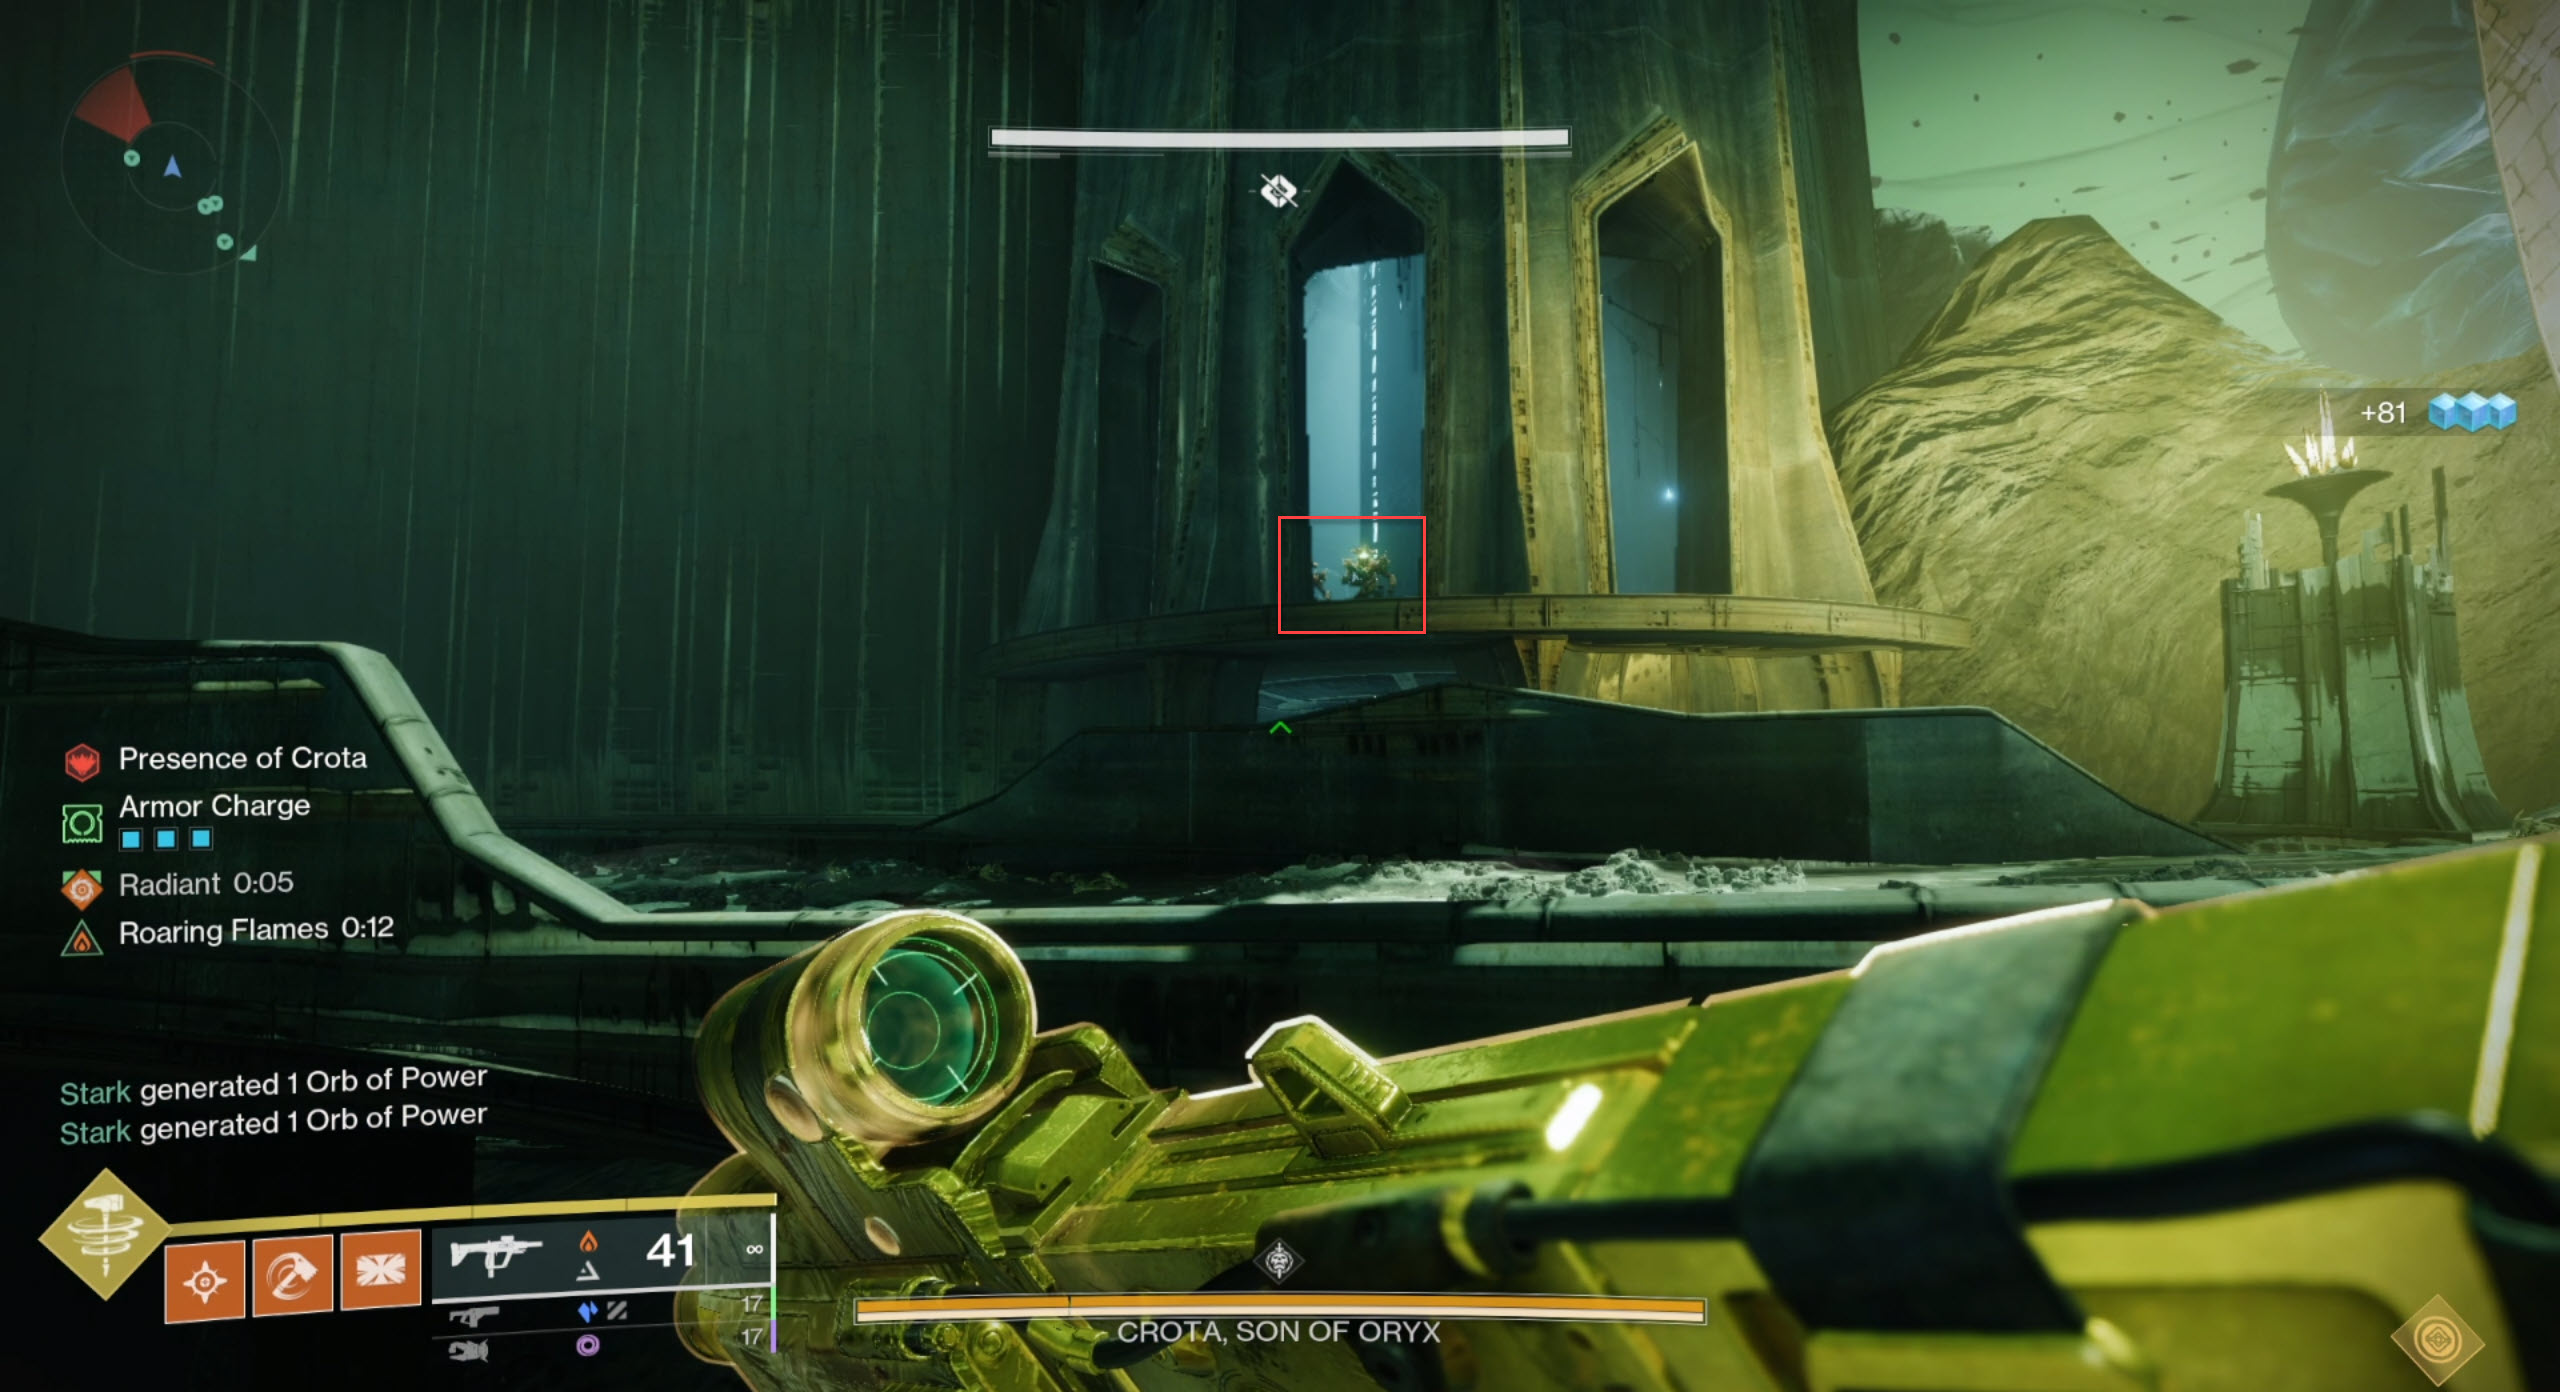
Just like in the second encounter, killing Swordbearers drops the sword. The swordbearer, alongside 2 ogres, is spawned by killing 4 Revenant Knights with Hive Boomer weapons, 2 on each of the 2 towers, at the top left and top right rooms from the previous encounter. Cycle the chalice and kill Knights and Swordbearers until the players who need swords have the sword, the oversoul killer has his Enlightened and the chalice has been dunked. The team can then prepare for damage.
Get the team together, ready to damage Crota. The team can then:
- Have the Well warlock and tractor cannon rush Crota; apply Tractor and cast Well.
- Sword Wielders can rush the boss and use the following Sword Damage combo:
- Light attack -> Heavy attack -> Super -> Heavy attack
- Once the combo is finished, the Sword wielders' swords should disappear.
If the sword wielders have executed their sword combo properly, the damage phase begins with Crota kneeling down for a short while before rising again and attacking. His attacks may destroy the well, so teams may opt to have multiple wells or bubbles. At around 4 seconds left on the Oversoul timer, the player in charge of destroying the Oversoul can begin destroying the Oversoul, ending damage. The first player can pick up the chalice again and continue passing the chalice around and getting swords.
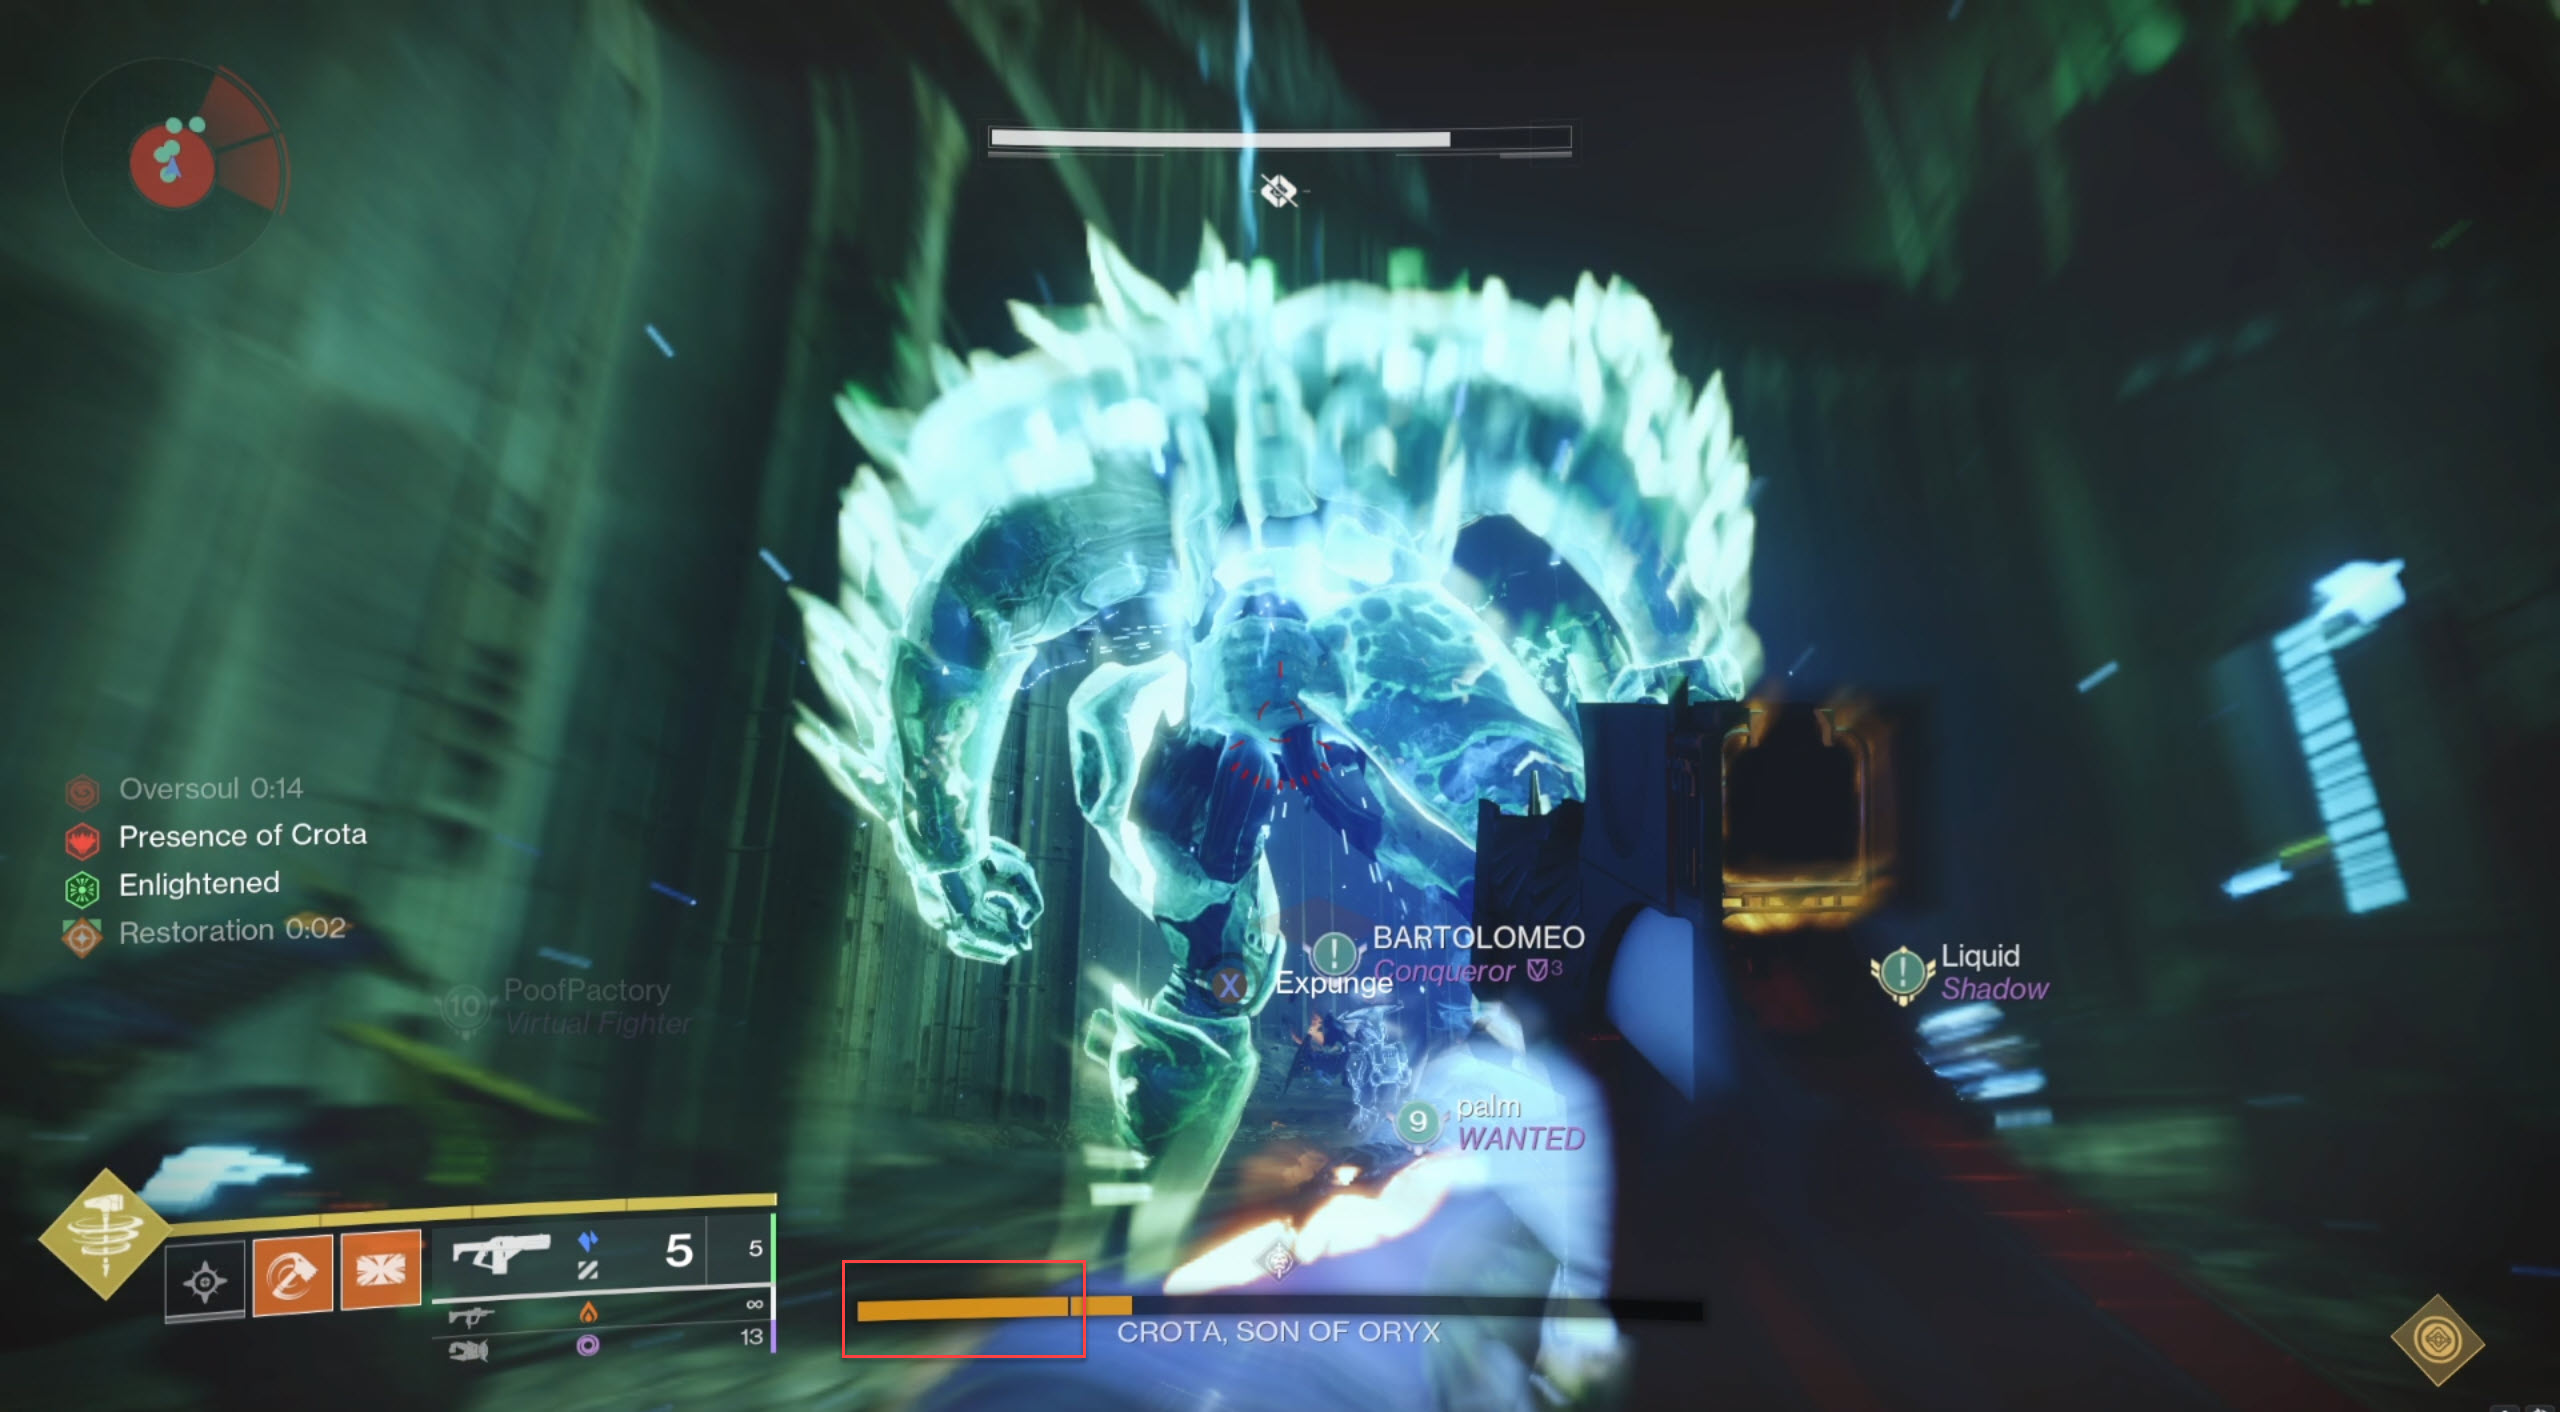
Final Stand
At around 20% of his health, Crota will enter his Final Stand. He will crouch for a few seconds before emitting a blast that pushes players back. He will shortly become vulnerable. Thus, players can hide behind cover first and emerge after Crota does the blast.
Once he is vulnerable again, damage him. The oversoul timer will be present again for 20 seconds; when the timer gets low, destroy the oversoul. Rather than ending damage, killing an Oversoul during the final stand will extend the final stand for another 10 seconds before Crota wipes out the team. Once Crota is killed, the encounter and thus the raid is complete.
Encounter Triumph:
Singular Sensation - Complete the Crota, Son of Oryx encounter with only one player Enlightened at a time.
Challenge Mode:
All For One - Bust down Crota's shield at once, preferably with three swords.
Master Difficulty:
- Unstoppable Champions Ogres spawn in the middle. Colossus.
- Knights have arc shields (excluding swordbearers).