Done by: Vedallion#7774 | December 3rd 2023
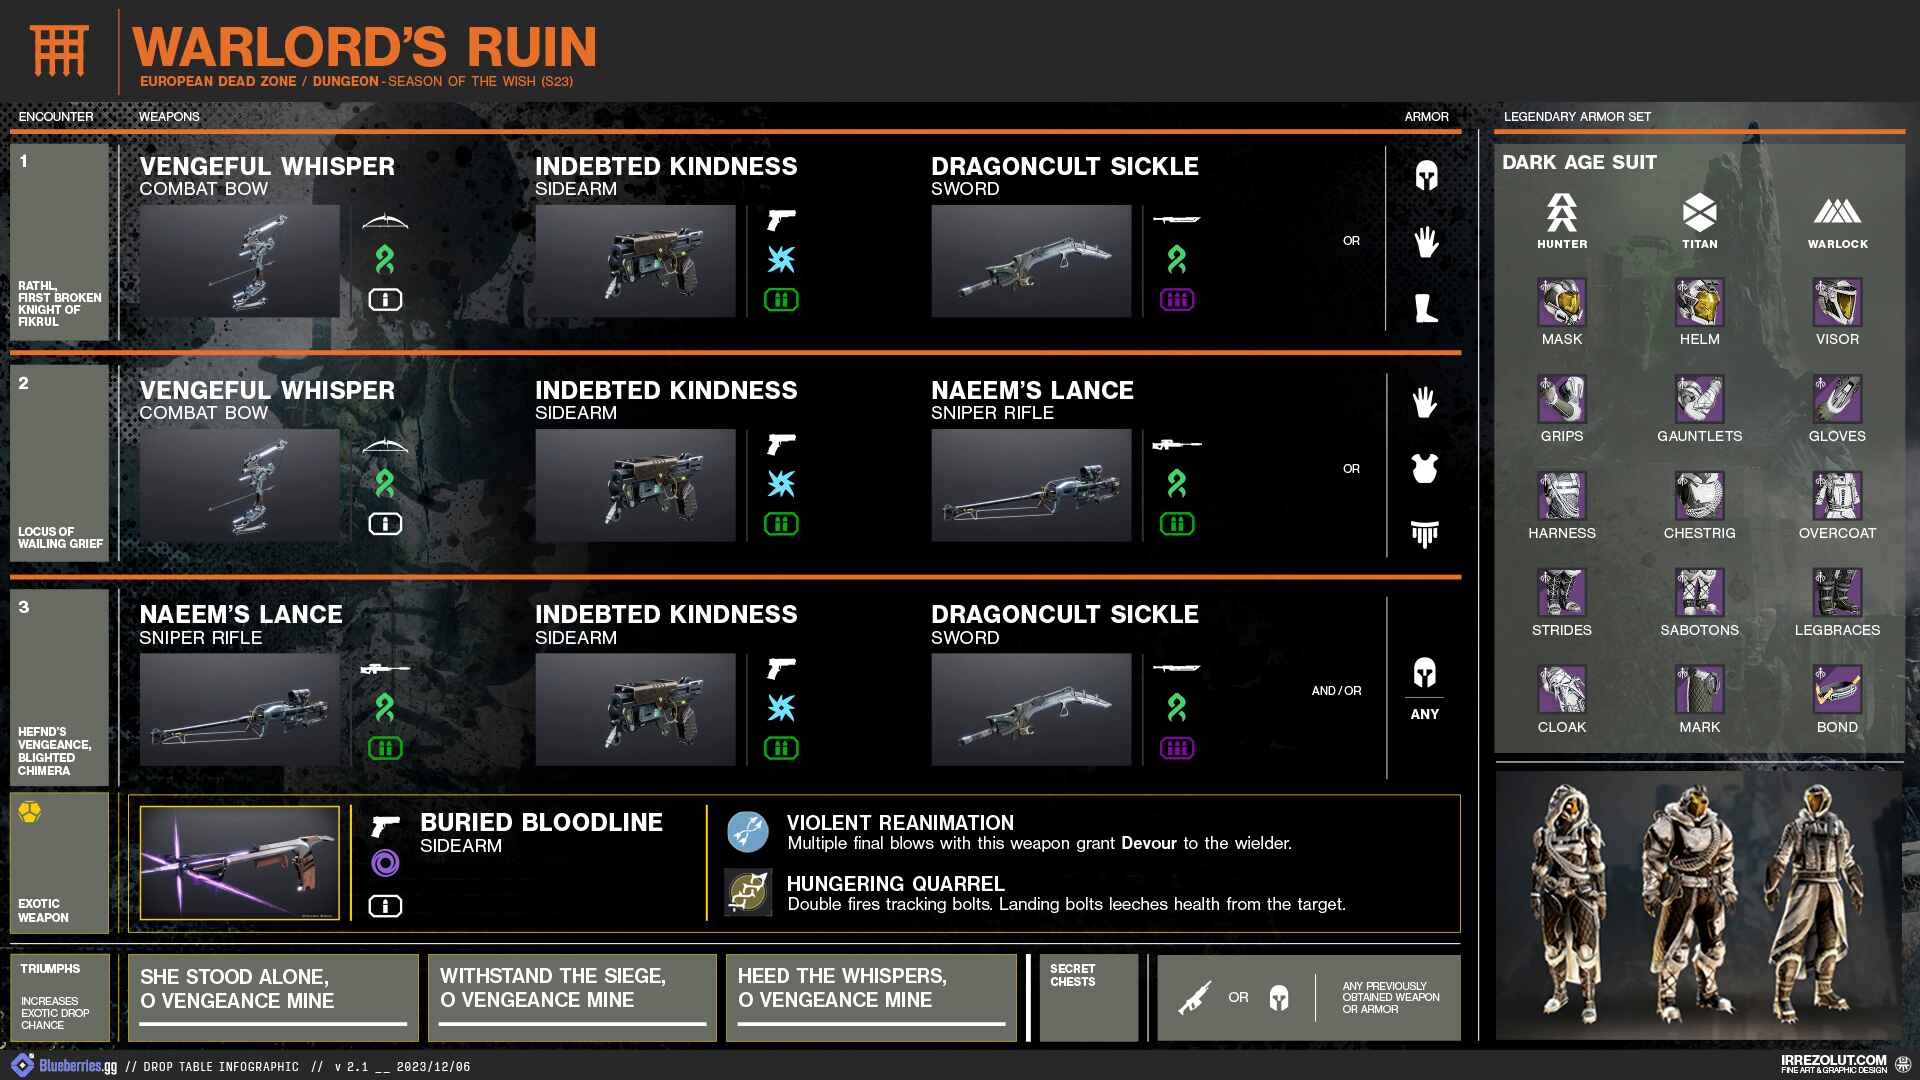
Drop Table
Secret Chests & Collectibles
The Warlord's Ruin dungeon in Destiny 2 has collectible Ahamkara Bones, which are crucial to both the “In the Shadow of the Mountain” quest and the “Heed the Whispers, O Vengeance Mine” triumph. The latter increases the likelihood of obtaining the Buried Bloodlines Exotic sidearm.
"In the Shadow of the Mountain" Quest
After you complete the dungeon for the first time, you will be given the "In the Shadow of the Mountain" quest, which requires you to obtain 30 Dark Ether Tinctures, 3 Blighted Wishing Glass, and 4 Ahamkara Bones. Unlike previous dungeons, you need to do 3 runs ofo the dungeon to obtain all of the collectibles.
Getting Dark Tinctures
Dark Ether Tinctures are obtained by eliminating unique Screeb-like foes known as Thieving Wretches. These enemies can respawn, so you can farm them to obtain enough Dark Ether Tinctures. The first Thieving Wretch will spawn on the bridge prior to the first encounter; the second will appear in the maze following the defeat of the first boss; and the third will appear on the mountainside following the defeat of the second boss.
Getting Blighted Wishing Glass
You will receive one Blighted Wishing Glass per encounter completion from the loot chest. After completing that quest step, you will need to gather the following three bones along with additional Dark Ether Tinctures and Blighted Wishing Glass. After completing that step, you will need to repeat the process until all ten bones have been collected.
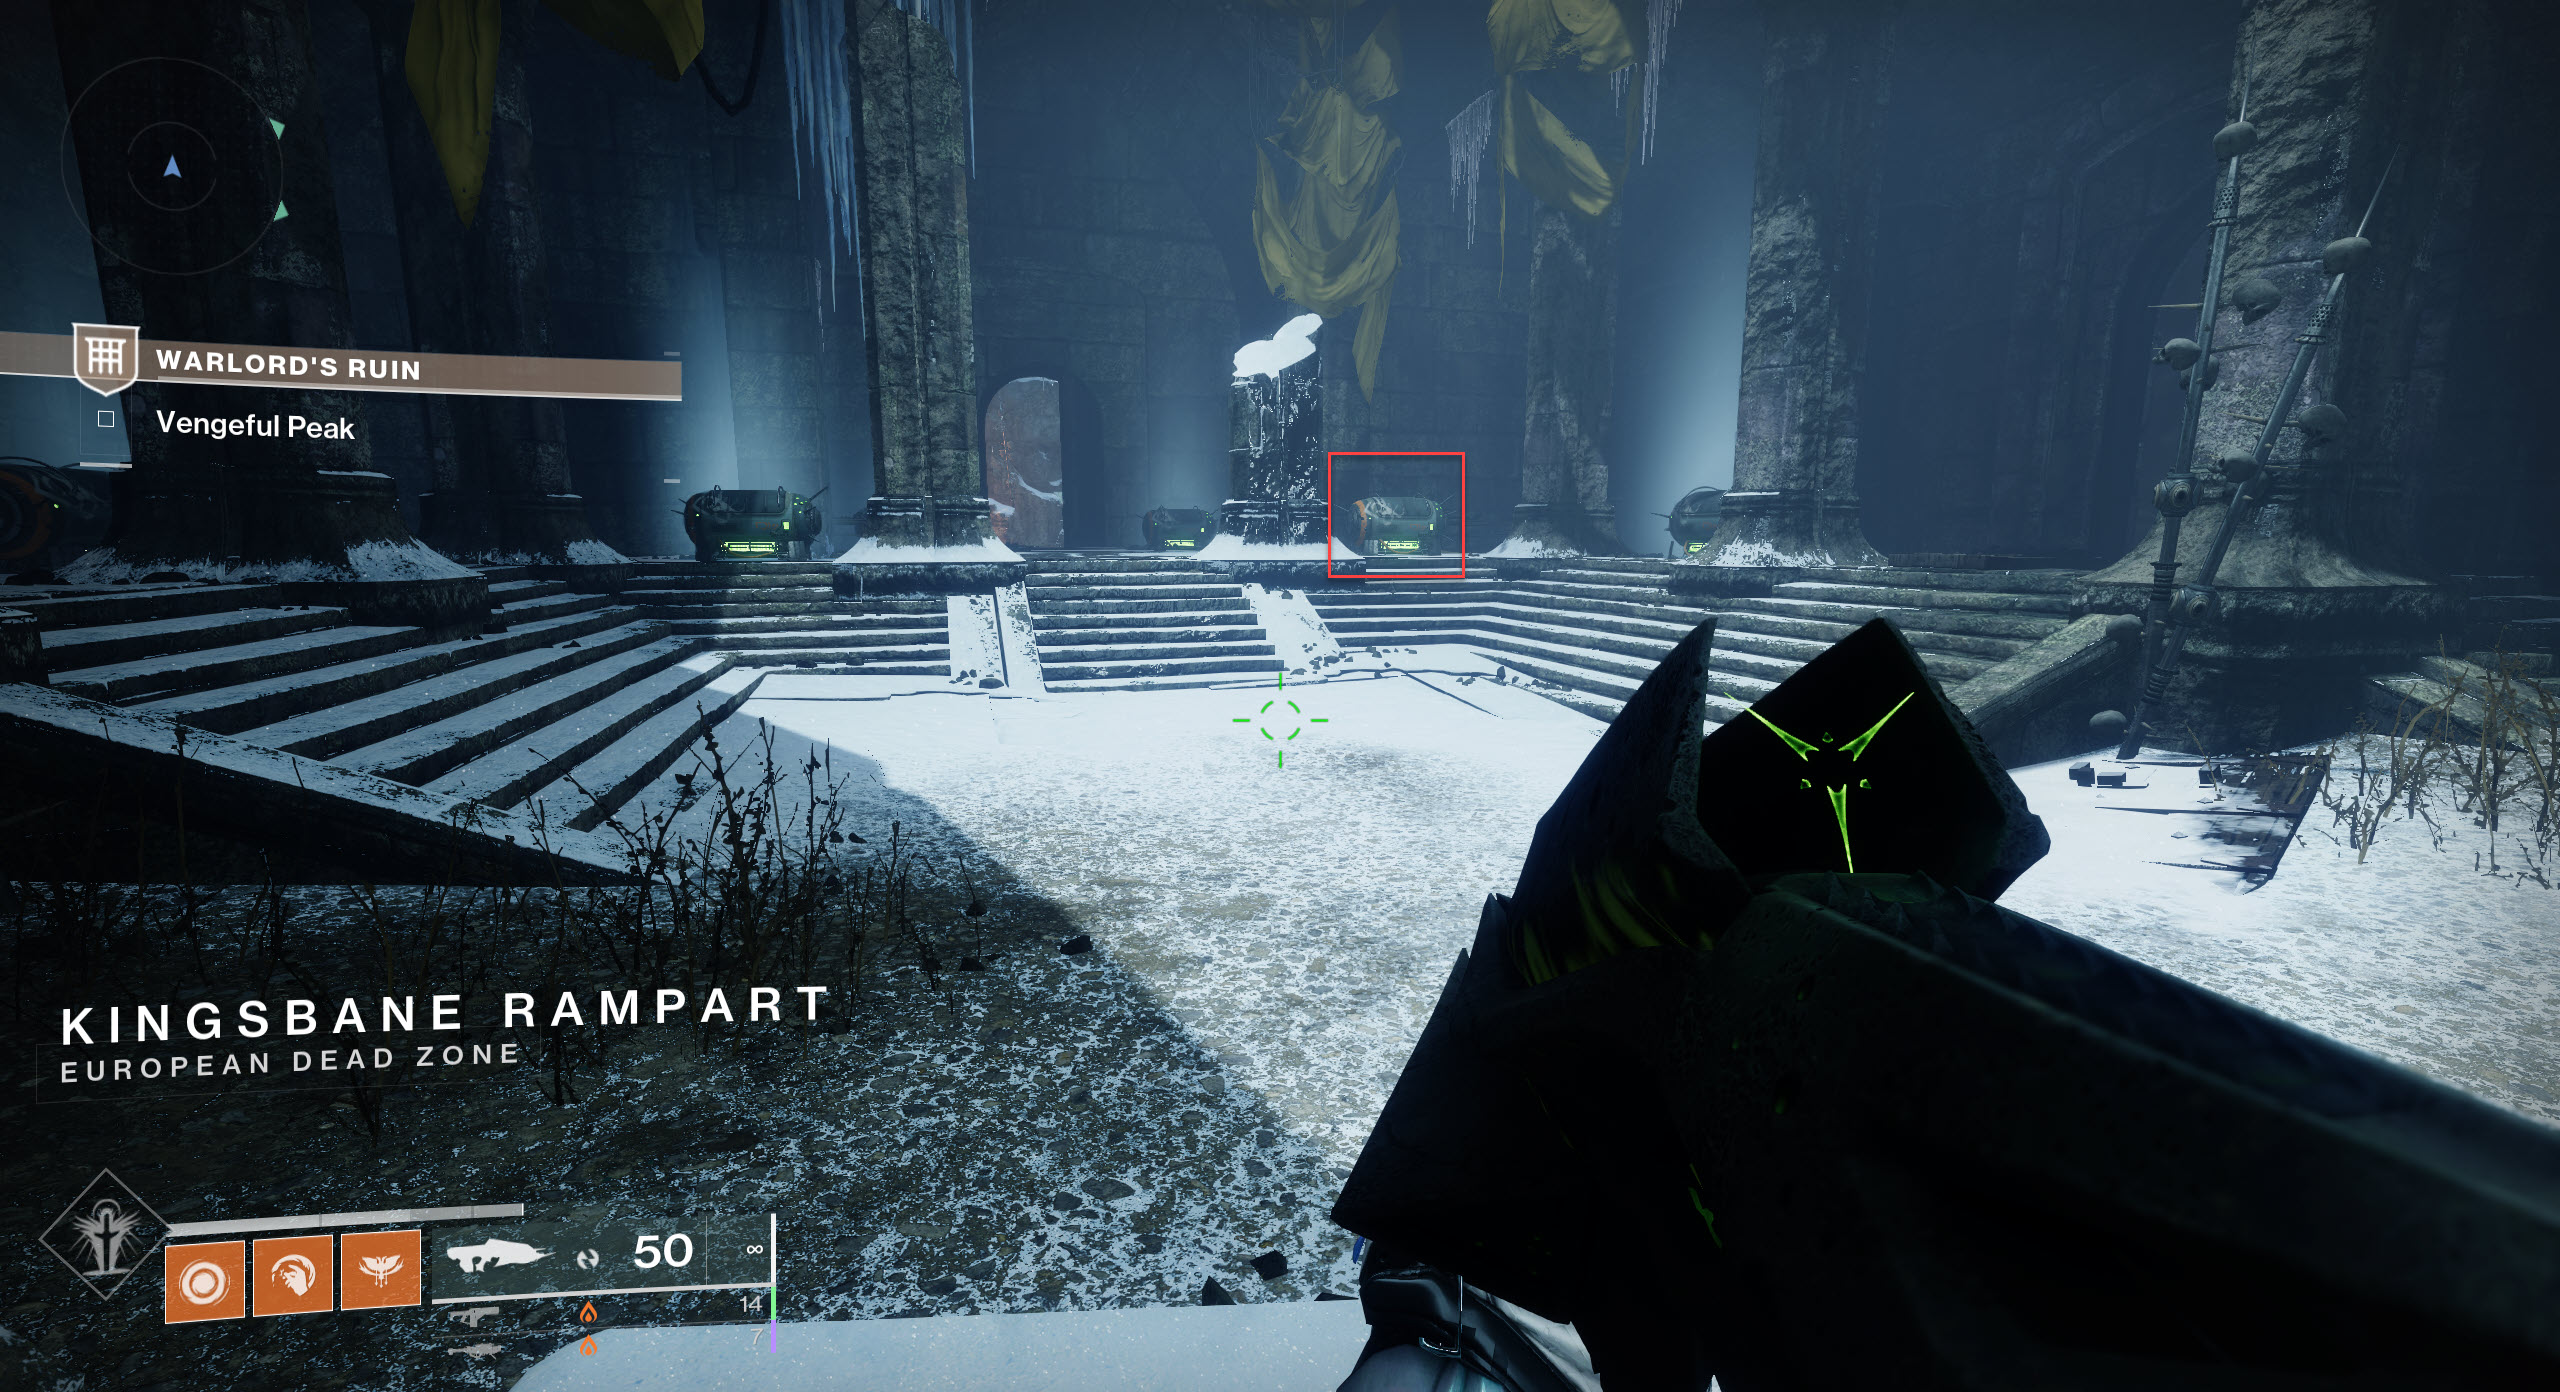
Secret Chests
There are a tonne of fake chests in the dungeon, which forces the user who interacts to be stunned and summon screebs. The fake chests have a strange blue ether glow, TWO of these chests will not have the glow and are the real chests which drops loot. These 2 chests will be different for each run, so make sure you check all of them. One person may test the chests and sacrifice themself while the rest stand back.

Weapons

Sundering - Destroying vehicles and constructs grants this weapon bonus reload speed and charge rate. Constructs include barricades, turrets, Stasis crystals, and other objects created in the field.
 Vengeful Whisper
Legendary //
Precision Frame // Bow
Desirable Perks
- Bowstring:
- Agile Bowstring
- Arrow:
- Carbon Arrow Shaft
- Column 1 Perks:
- Explosive Head
- Archer's Tempo
- Slice
- Column 2 Perks:
- Hatchling
- Precision Instrument
- Successful Warm-Up
Masterwork: Reload Speed
Mod Slot: Minor Spec, Major Spec

Mainly used for the sake of its strand synergy. Kinetic bows like the Accrued Redemption will fare better than this bow in higher level content, the content bows mainly find themselves used in, thanks to how kinetic weapons do more damage to unshielded enemies than Strand and Stasis weapons. Nonetheless, Vengeful Whisper's perks are still competitive, and if you do not have a good top slot bow then you may consider trying for a good roll of this bow.
 Naeem's Lance
Legendary //
Rapid-Fire Frame // Sniper Rifle
Desirable Perks
- Barrel:
- Arrowhead Brake
- Magazine:
- Accurized Rounds
- Column 1 Perks:
- Reconstruction
- Column 2 Perks:
- Slice
- Precision Instrument
Masterwork: Reload Speed
Mod Slot: Boss Spec

Reconstruction is a very good perk, however it cannot make up for the lack of competitive perks in the weapon's second column. Precision Instrument may be a decent perk, however it also suffers from the issue of being a strand weapon, meaning it loses out on extra damage that competitors like The Supremacy have. This weapon's frame and perks make it essentially unusable in PvP.
 Indebted Kindness
Legendary //
Rocket-Assisted Frame // Sidearm
Desirable Perks
- Barrel:
- Volatile Launch
- Magazine:
- Tactical Magazine
- Column 1 Perks:
- Beacon Rounds
- Column 2 Perks:
- Voltshot br
Masterwork: Stability, Reload Speed
Mod Slot: Major Spec

Indebted Kindness is the first legendary special sidearm in the game. Definitely a strong weapon but it finds itself having a lack of use cases. Special sidearms tend to be beaten at close range by fusions and shotguns, at ad clear by grenade launchers and at long range by snipers. Where this weapon finds its niche is that with anti-barrier effects (anti-barrier sidearm/radiant), it is able to destroy the shield in one shot, making it useful for content with champions.
 Dragoncult Sickle
Legendary //
Caster Frame // Sword
Desirable Perks
- Blade:
- Hungry Blade
- Guard:
- Balanced Guard
- Column 1 Perks:
- Reconstruction
- Demolitionist
- Column 2 Perks:
- Hatchling
- Chain Reaction
- Surrounded
Masterwork: Impact
Mod Slot: Boss Spec

Caster Swords are quite weak currently, so this weapon tends to see little use. Its best use is probably a niche ad-clear setup, but even then machine guns can do its job easily. If caster frames get buffed to the point that they can compete with top sword contenders, this sword with Surrounded will be quite valuable.
 Buried Bloodline
Exotic // Sidearm
Details
Hungering Quarrel:Double fires tracking bolts. Landing bolts leeches health from the target.
Violent Reanimation:Multiple final blows with this weapon grant Devour to the wielder.
Splitvein Lineage(Catalyst):While Devour is active, Weakens enemies on hit.

Similar story to its legendary counterpart, the Indebted Kindness. This weapon, however, has a fairly useful niche in that it allows for all subclasses to use Devour, which is still a fairly strong perk despite its recent nerf. Whether it is worth using this weapon just to get Devour is another matter entirely, as the healing that most classes have access to (Restoration, Cure, Rifts etc) is oftentimes sufficient for most content.
Rathil, First Broken Knight of Fikrul
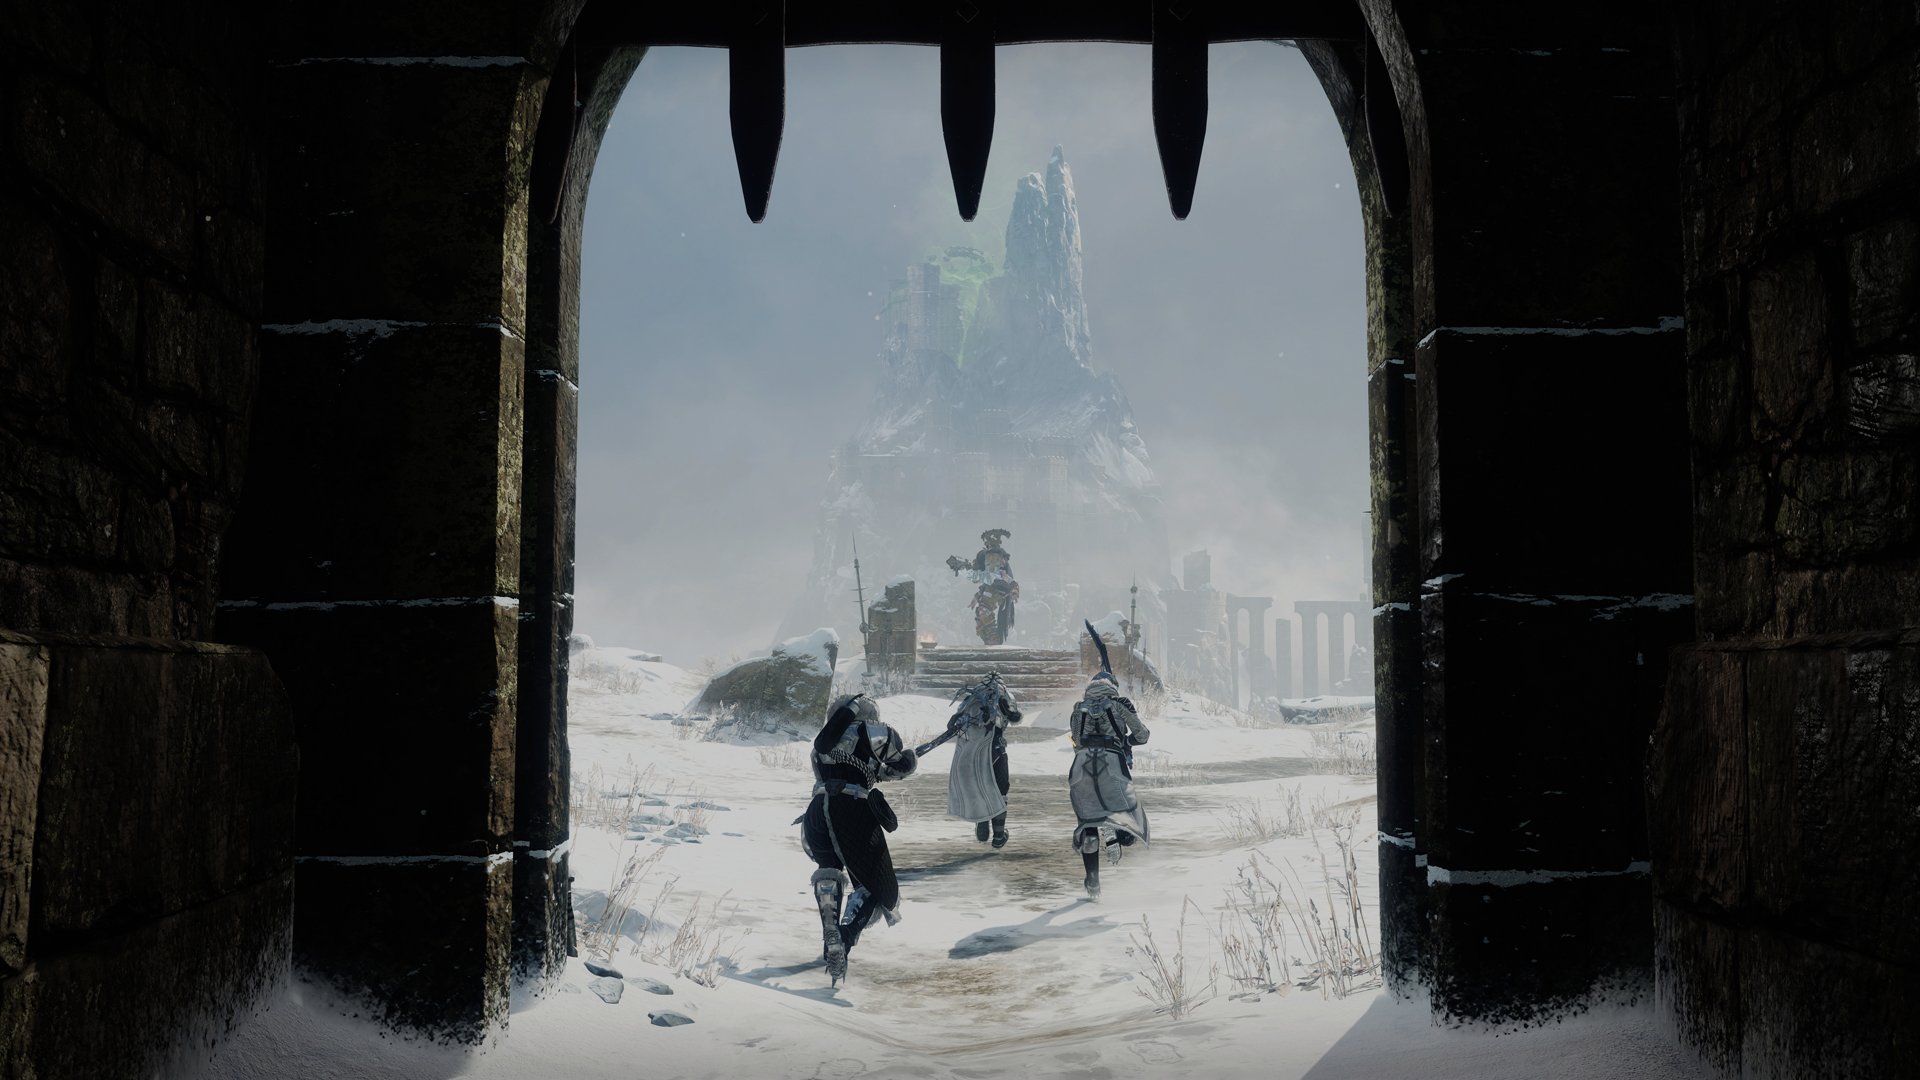
Once you have entered the fortress, you are up against Rathil. This is a simple encounter with a few stages, but it provides excellent teaching material for the main dungeon mechanic of Warlord's Ruin.
The Scorn Laterns
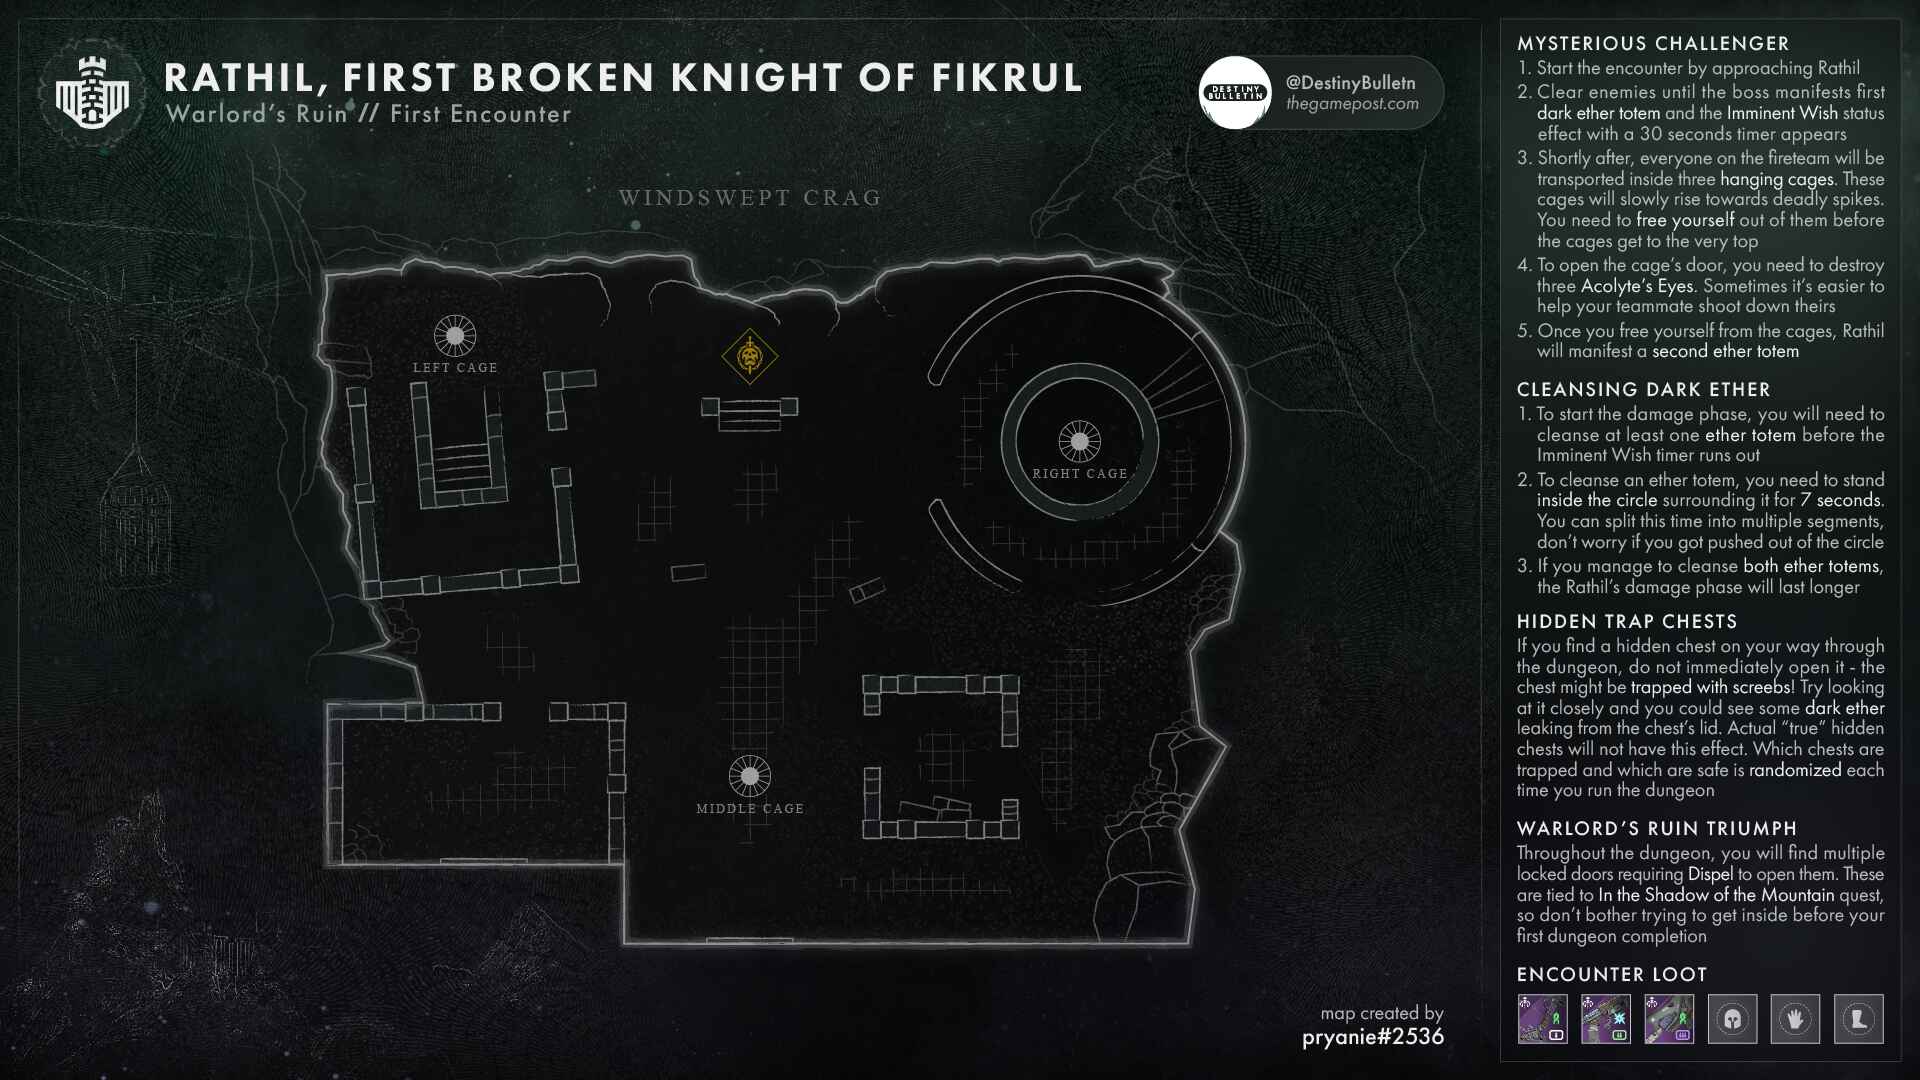
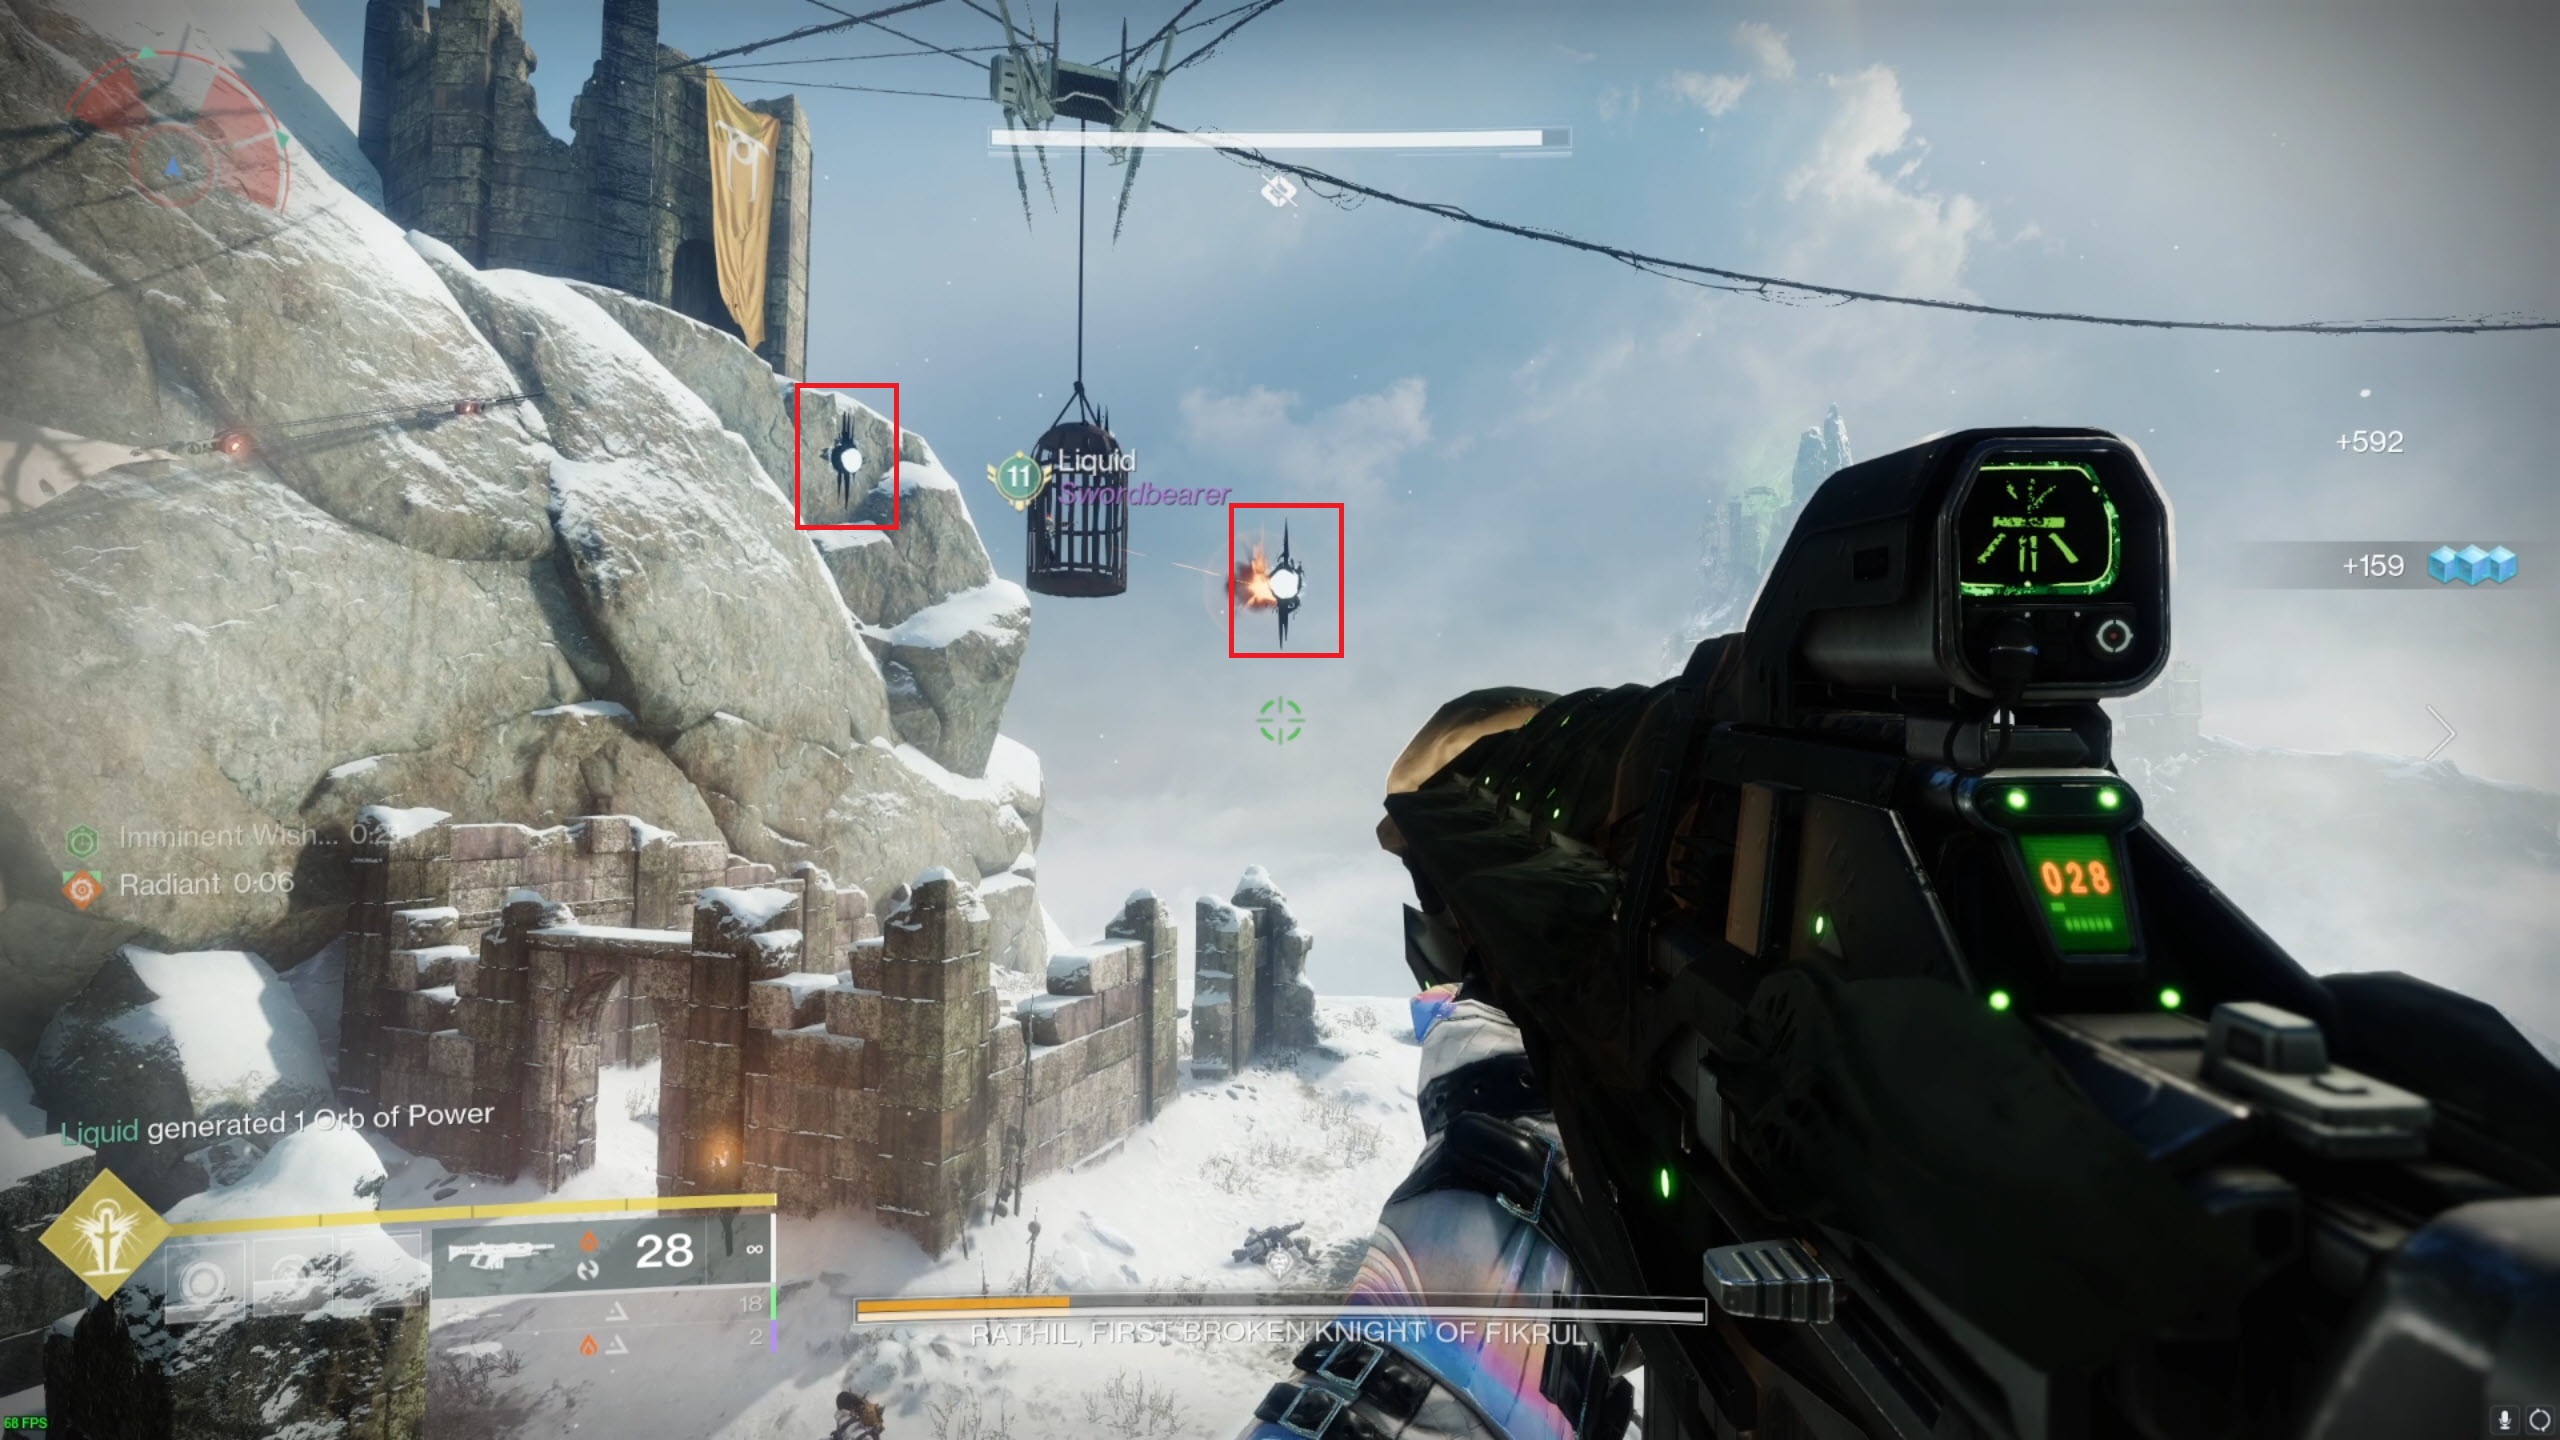
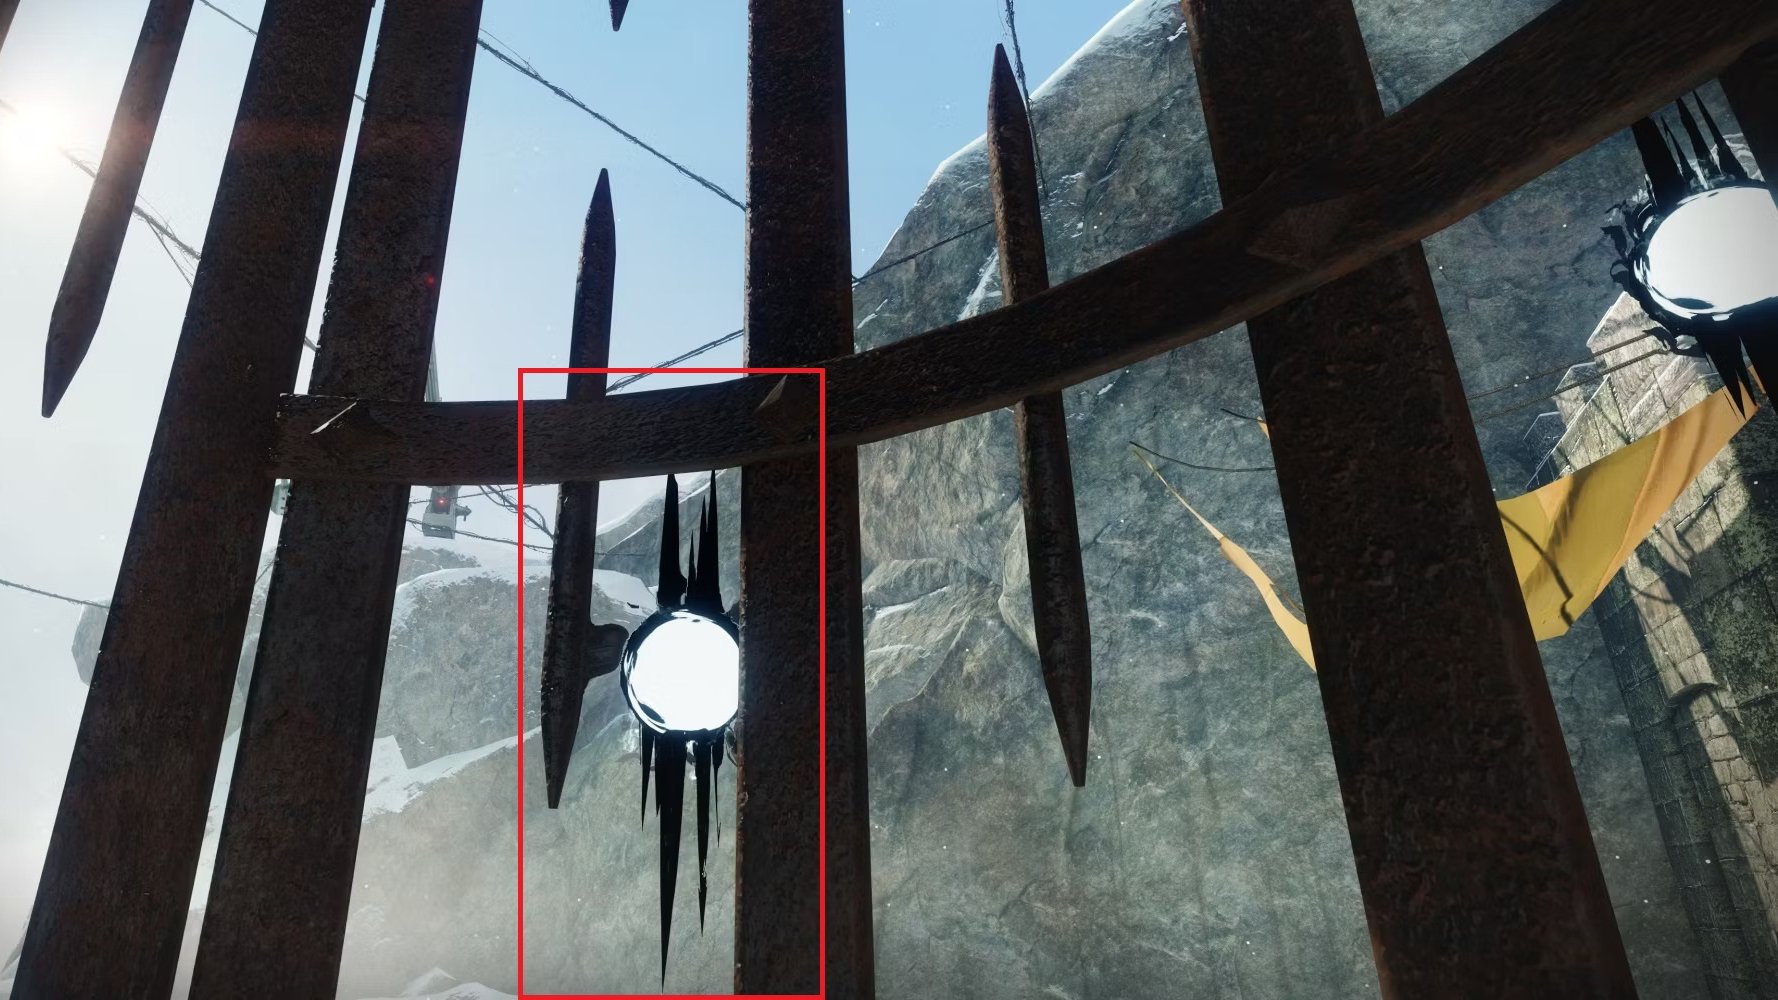
The objective of Warlord's Ruin is to eliminate all Taken Blights from the battlefield before the "Imminent Wish" timer on the left side of the screen reaches zero. The boss or an enemy will drop Scorn Lanterns onto the battlefield in each of the three encounters. The main thing that you will want to pay attention to is the small Taken Blight in the centre. Each lantern will have a white circle around it, denoting its radius. Standing in that white circle will cause the Taken Blight to disappear and fade into a blue light with bones floating inside. This process takes about five seconds, but moves more quickly if there are multiple players in the circle.
 A player must stand inside the radius to cleanse the taken
coruption in the latern.
 Once the latern is cleansed, the taken ball in the middle with
disappear.
The Cages
The boss will teleport you into one of the cages hanging above the arena. You will see three Taken eyes around each cage containing a guardian. The door to the cage will open once you kill the three eyes around you. You can help to shoot the eyes of your team mates as well. Once you and your team are out of the cages, activate the Scorn lanterns by standing in the radius. You only need to activate one before the wish timer runs out to get to DPS, but if you activate multiple, you get more time to deal more damage.
DPS
Once you you've cleansed the laterns in time, you'll get the “Naeem's Wish Empowerment” buff to damage the boss. Because of his low health, you can use any technique you are most comfortable with, but rockets or swords are always a good idea. You can damage him until the buff on the left side of your screen counts down to zero and his shields comes back up, then repeat the procedure until he's killed.

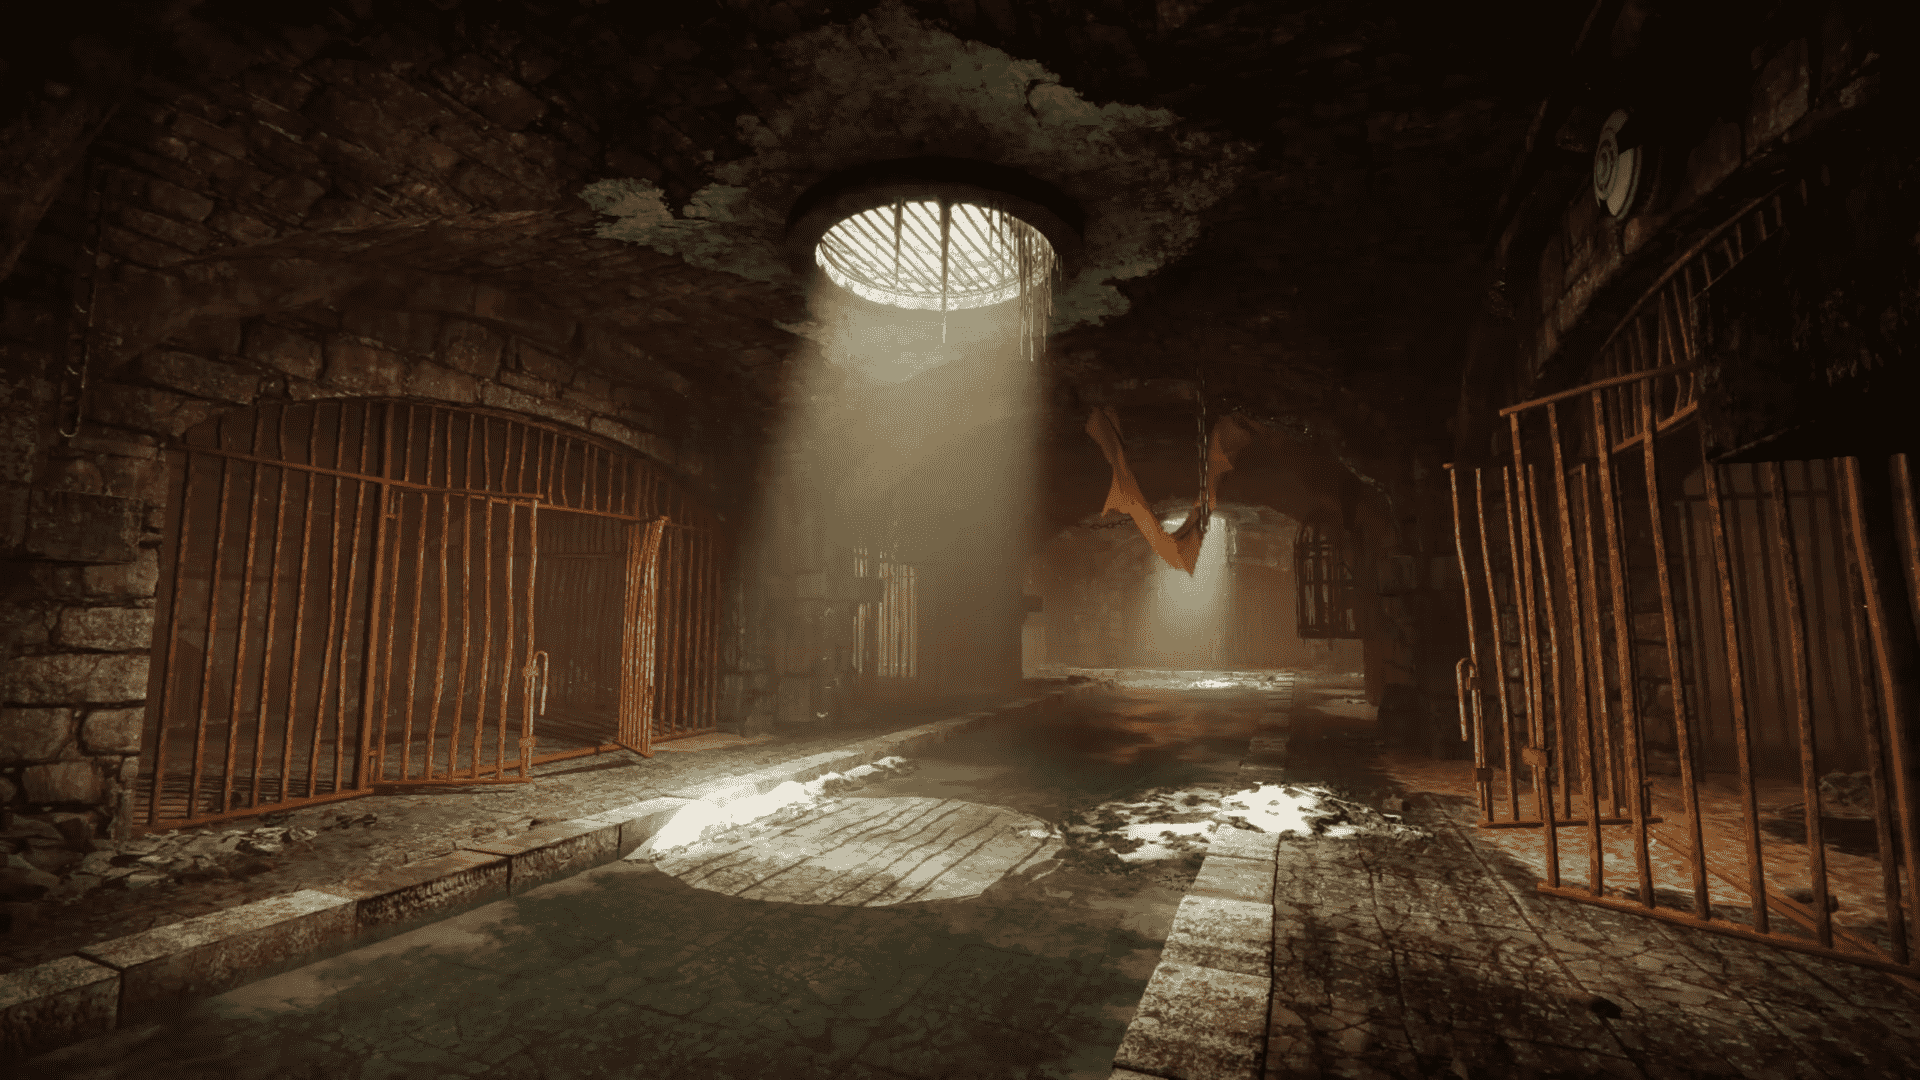
Imprisoned Dungeon
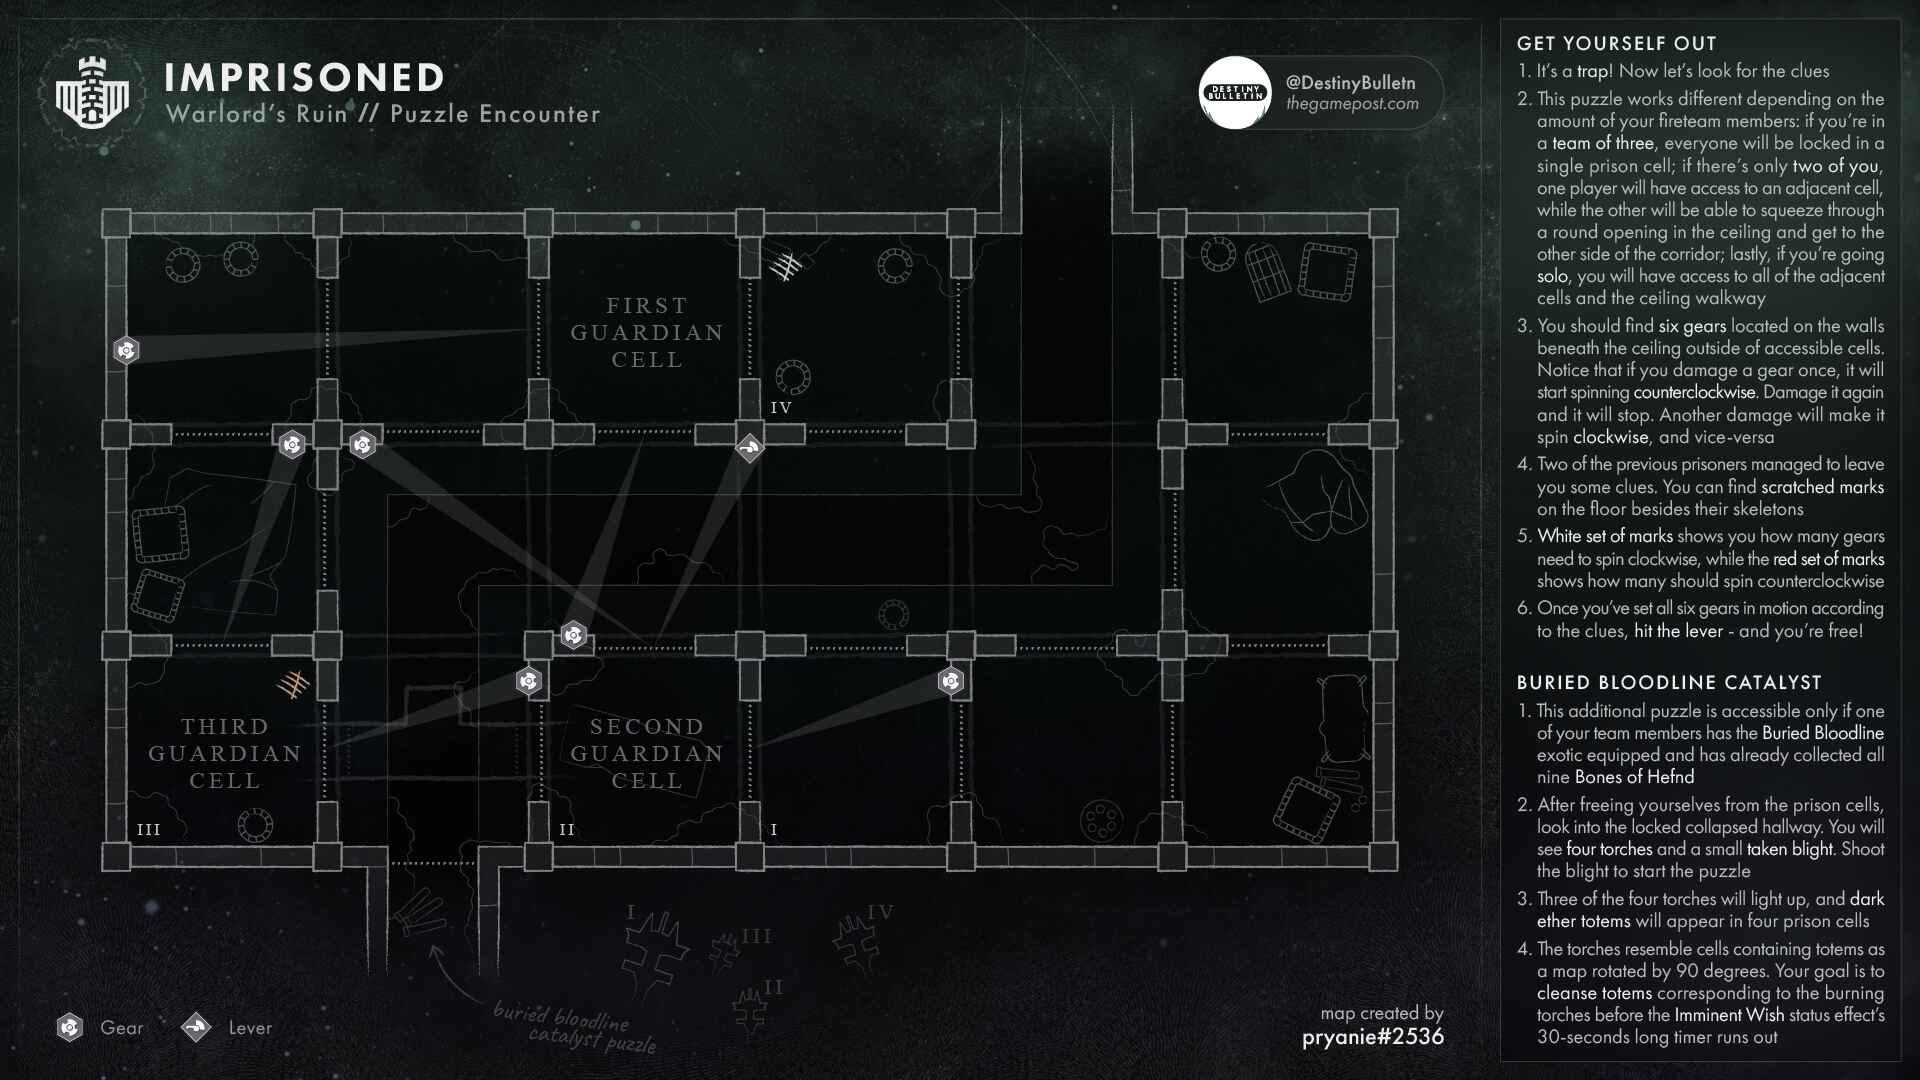
You will be teleported into a prison where you must escape after defeating Rahil. In two of the cells, there will be two sets of Roman numerals inscribed next to skeletons; these two numbers will always sum up to six.
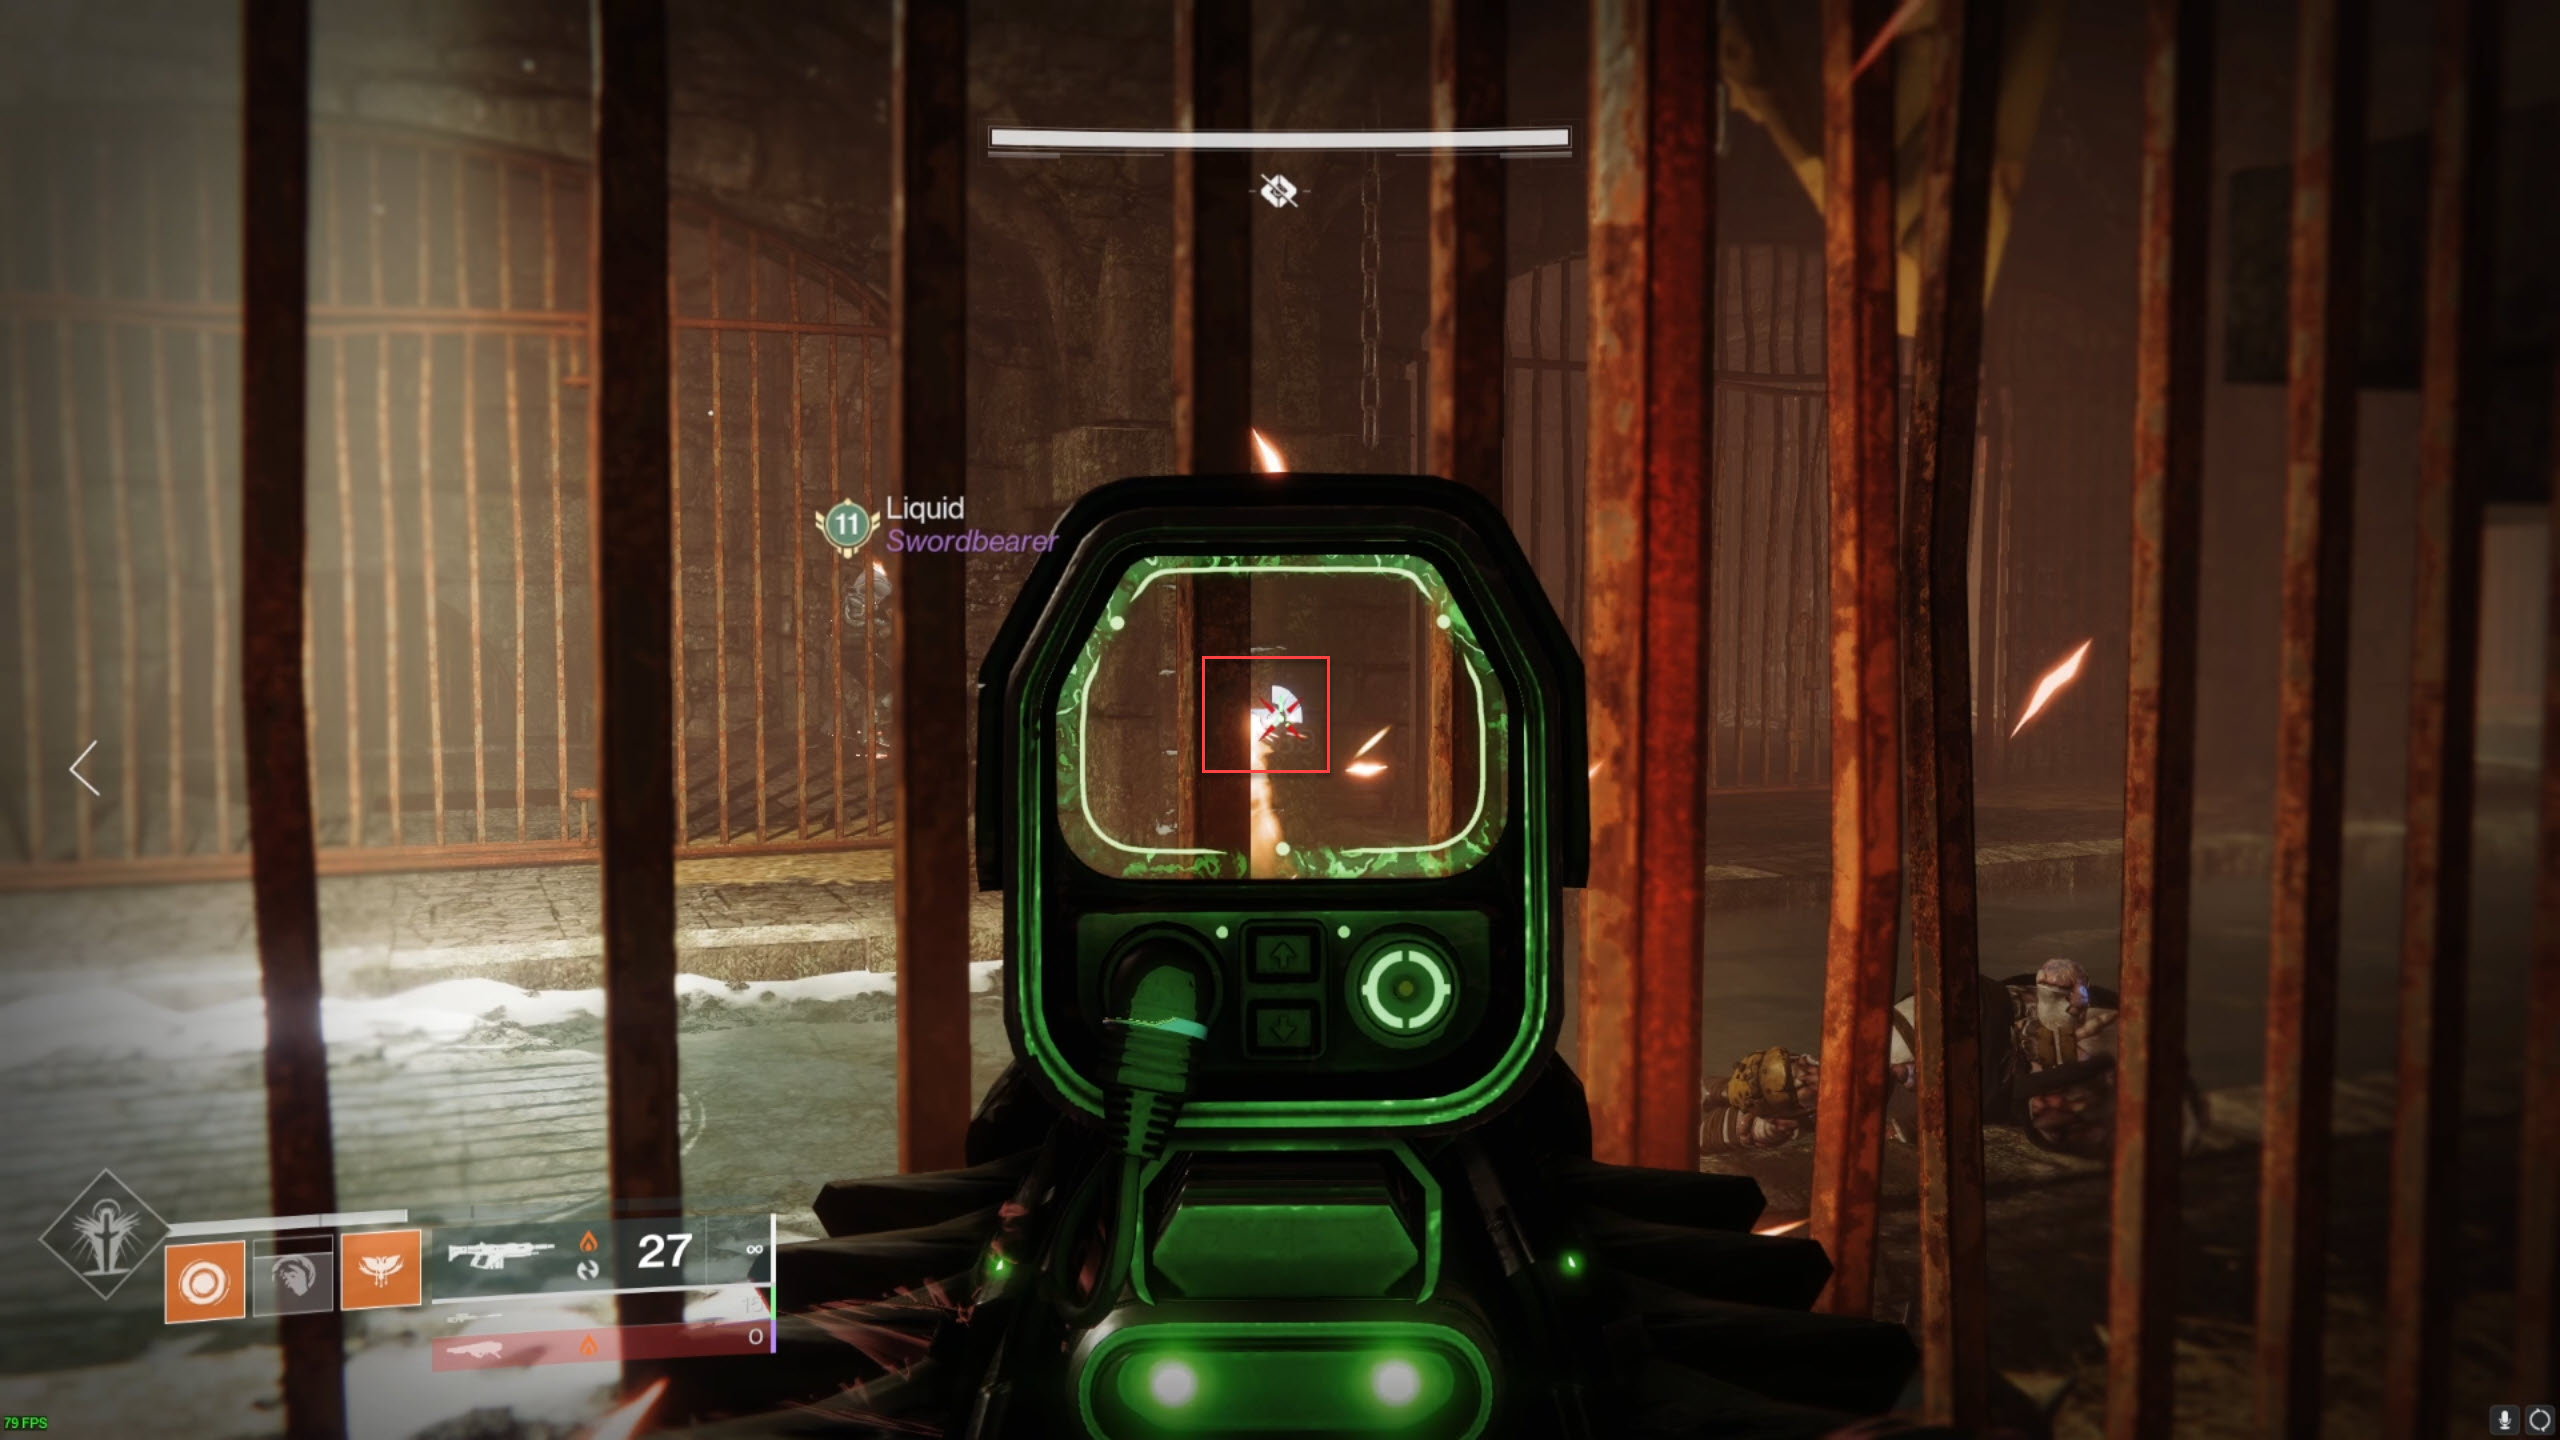
You can shoot the six dials that are located throughout the prison:
- The first time you shoot a dial, it turns on and starts to spin anticlockwise;
- the next time you shoot, it stops spinning;
- and the third time you shoot, it starts to spin clockwise.
The objective is to match the number of clockwise and anticlockwise dials with the number inscribed on the skeletons.
Here is an example:
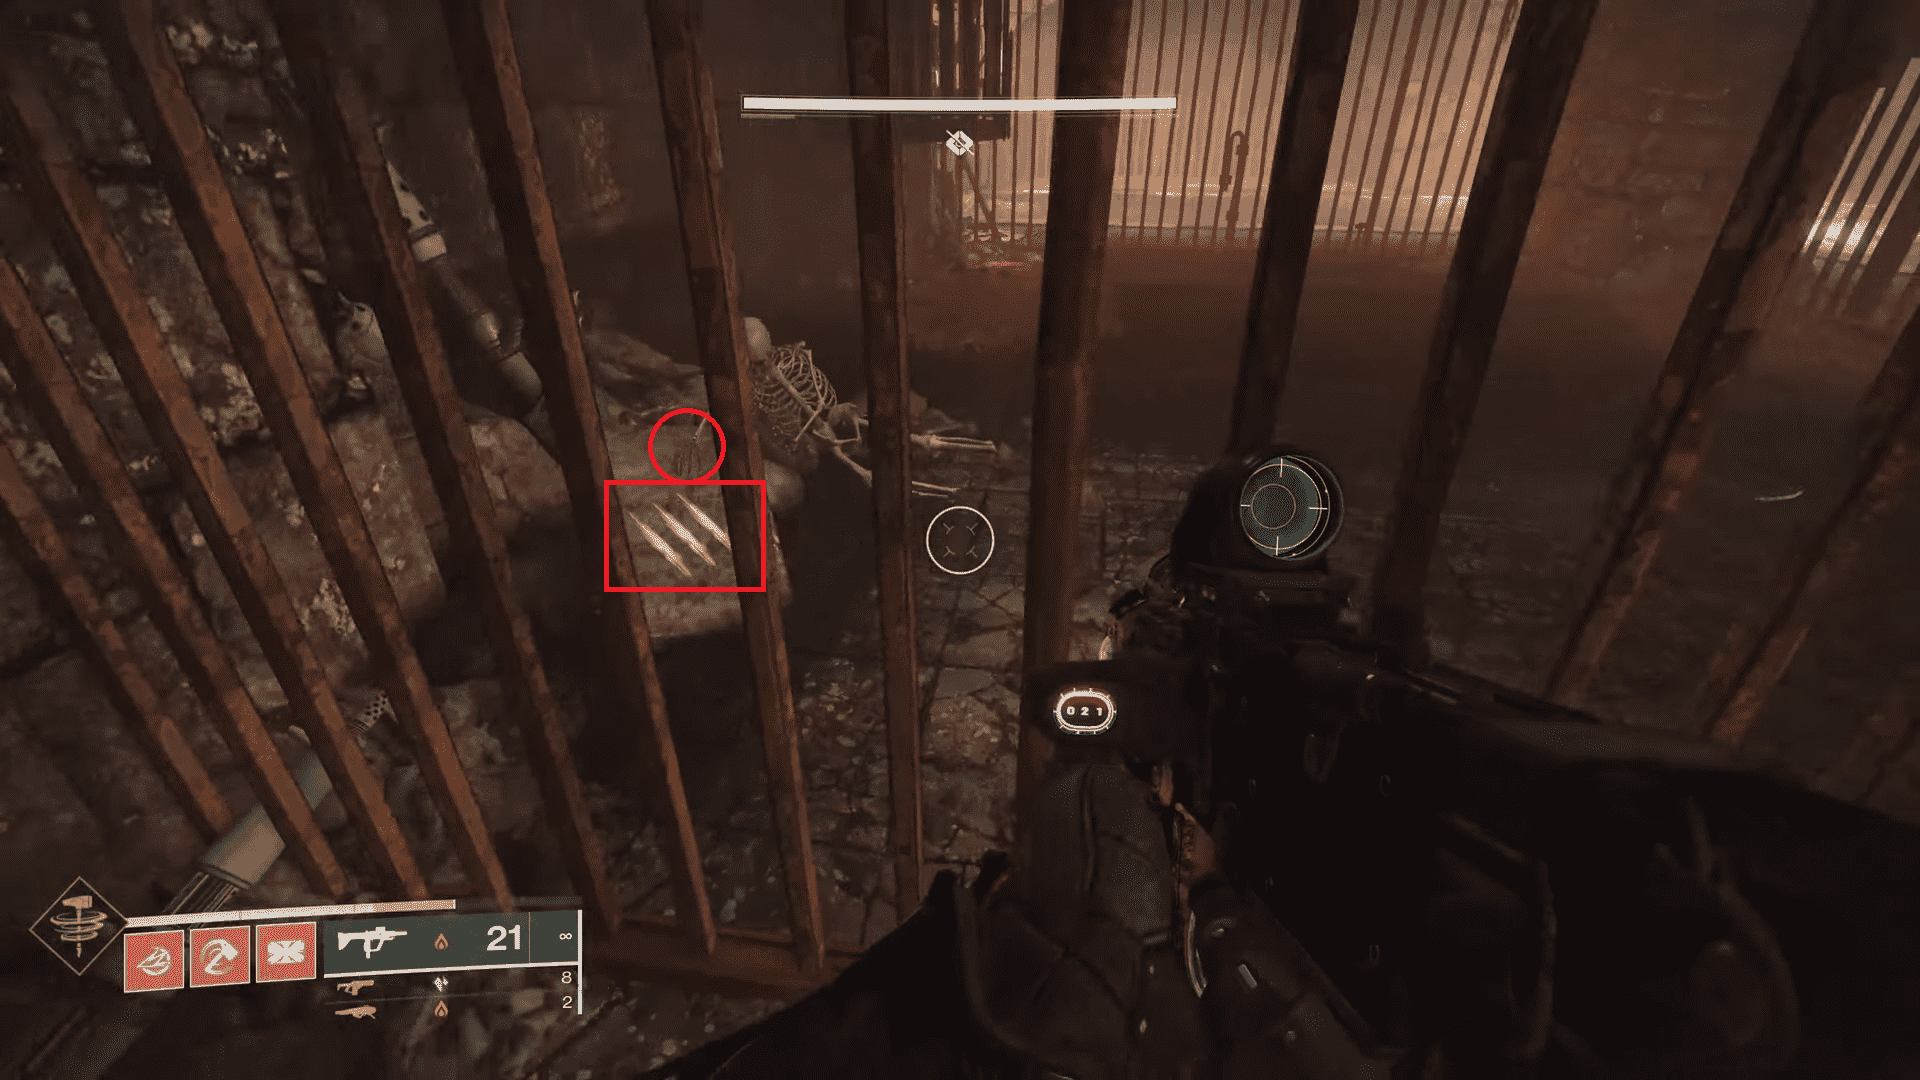 Right-handed skeleton with III inscribed in
white indicate that three dials must be turned in a
clockwise direction.
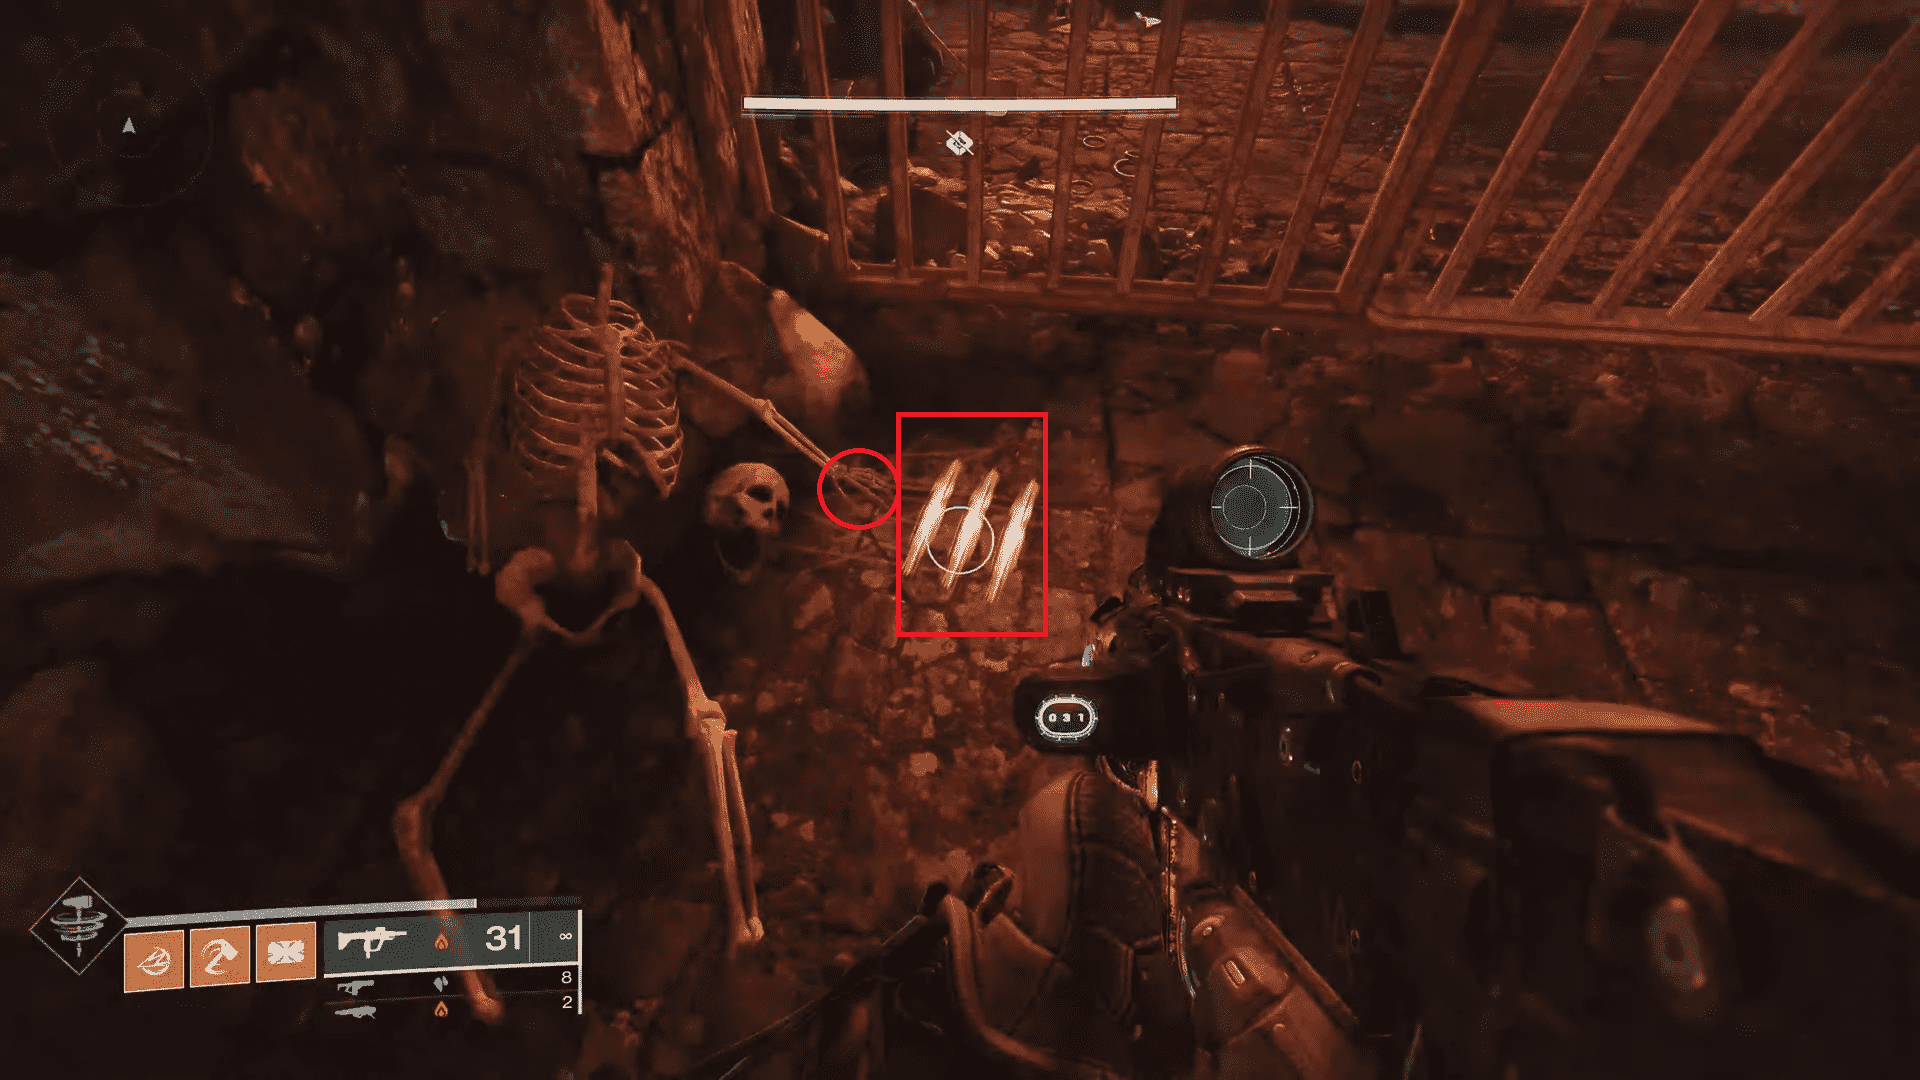 Left-handed skeleton with III inscribed in
orange indicate that three dials must be turned in a
anticlockwise direction.
- Not your left and right hands; it is the left and right of the skeleton. White is always clockwise, and orange is always anticlockwise.
- The number inscribed on the slab and the floor will change with every run. Adjust the dial's direction when needed.
If there are fewer than three players, the cell doors will be open to allow you to move around the space. Collaboratively, shoot the six buttons from your cells to reconfigure them as the skeletons indicate, and then shoot the "confirm" lever.

Locus of Wailing Grief
When the battle begins, you should aim to spawn the Scorn Lanterns by eliminating every Taken eye that appears around the boss. This will cause two Scorn Broken Knights to appear, one on each side of the arena. These enemies will drop one lantern upon dying, and if you give them enough time to live, they will drop another one as well.
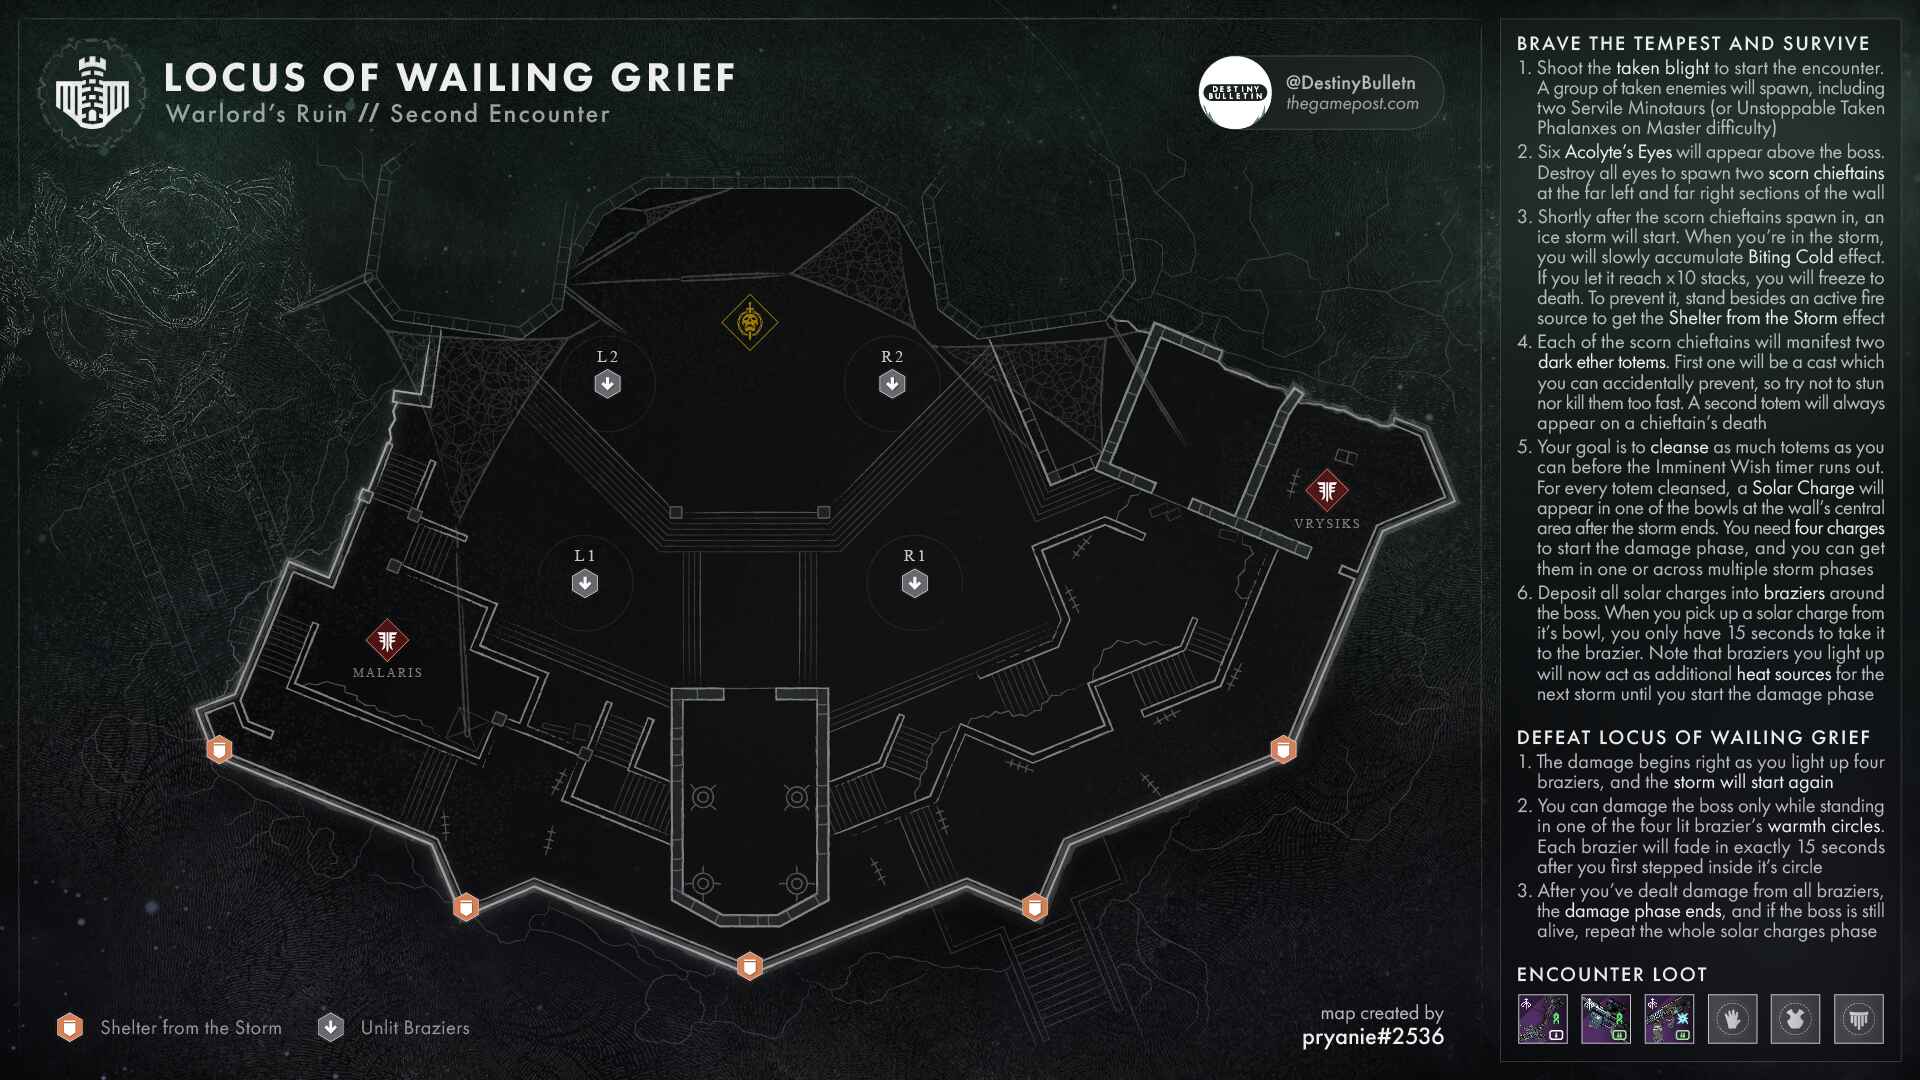
A snowstorm will begin to fill the arena when these enemies spawn, and they will start the wish timer like the first encounter. You can remove stacks of the "Biting Cold" debuff by running near torches that are positioned all along the backside of the arena. "The bones call forth a freezing tempest" will appear in the combat log when this storm begins. If those stacks reach 10, you will die. This will go away once the Imminent Wish timer runs out.


Burning Desire orbs spawn in the middle, close to the rally flag, depending on how many Scorn Lanterns you activate. If you are efficient, you can spawn three or four of these, which will allow you to get to DPS faster. Take each of these orbs to one of the pyres surrounding the boss. Once you activate all four, DPS begins.

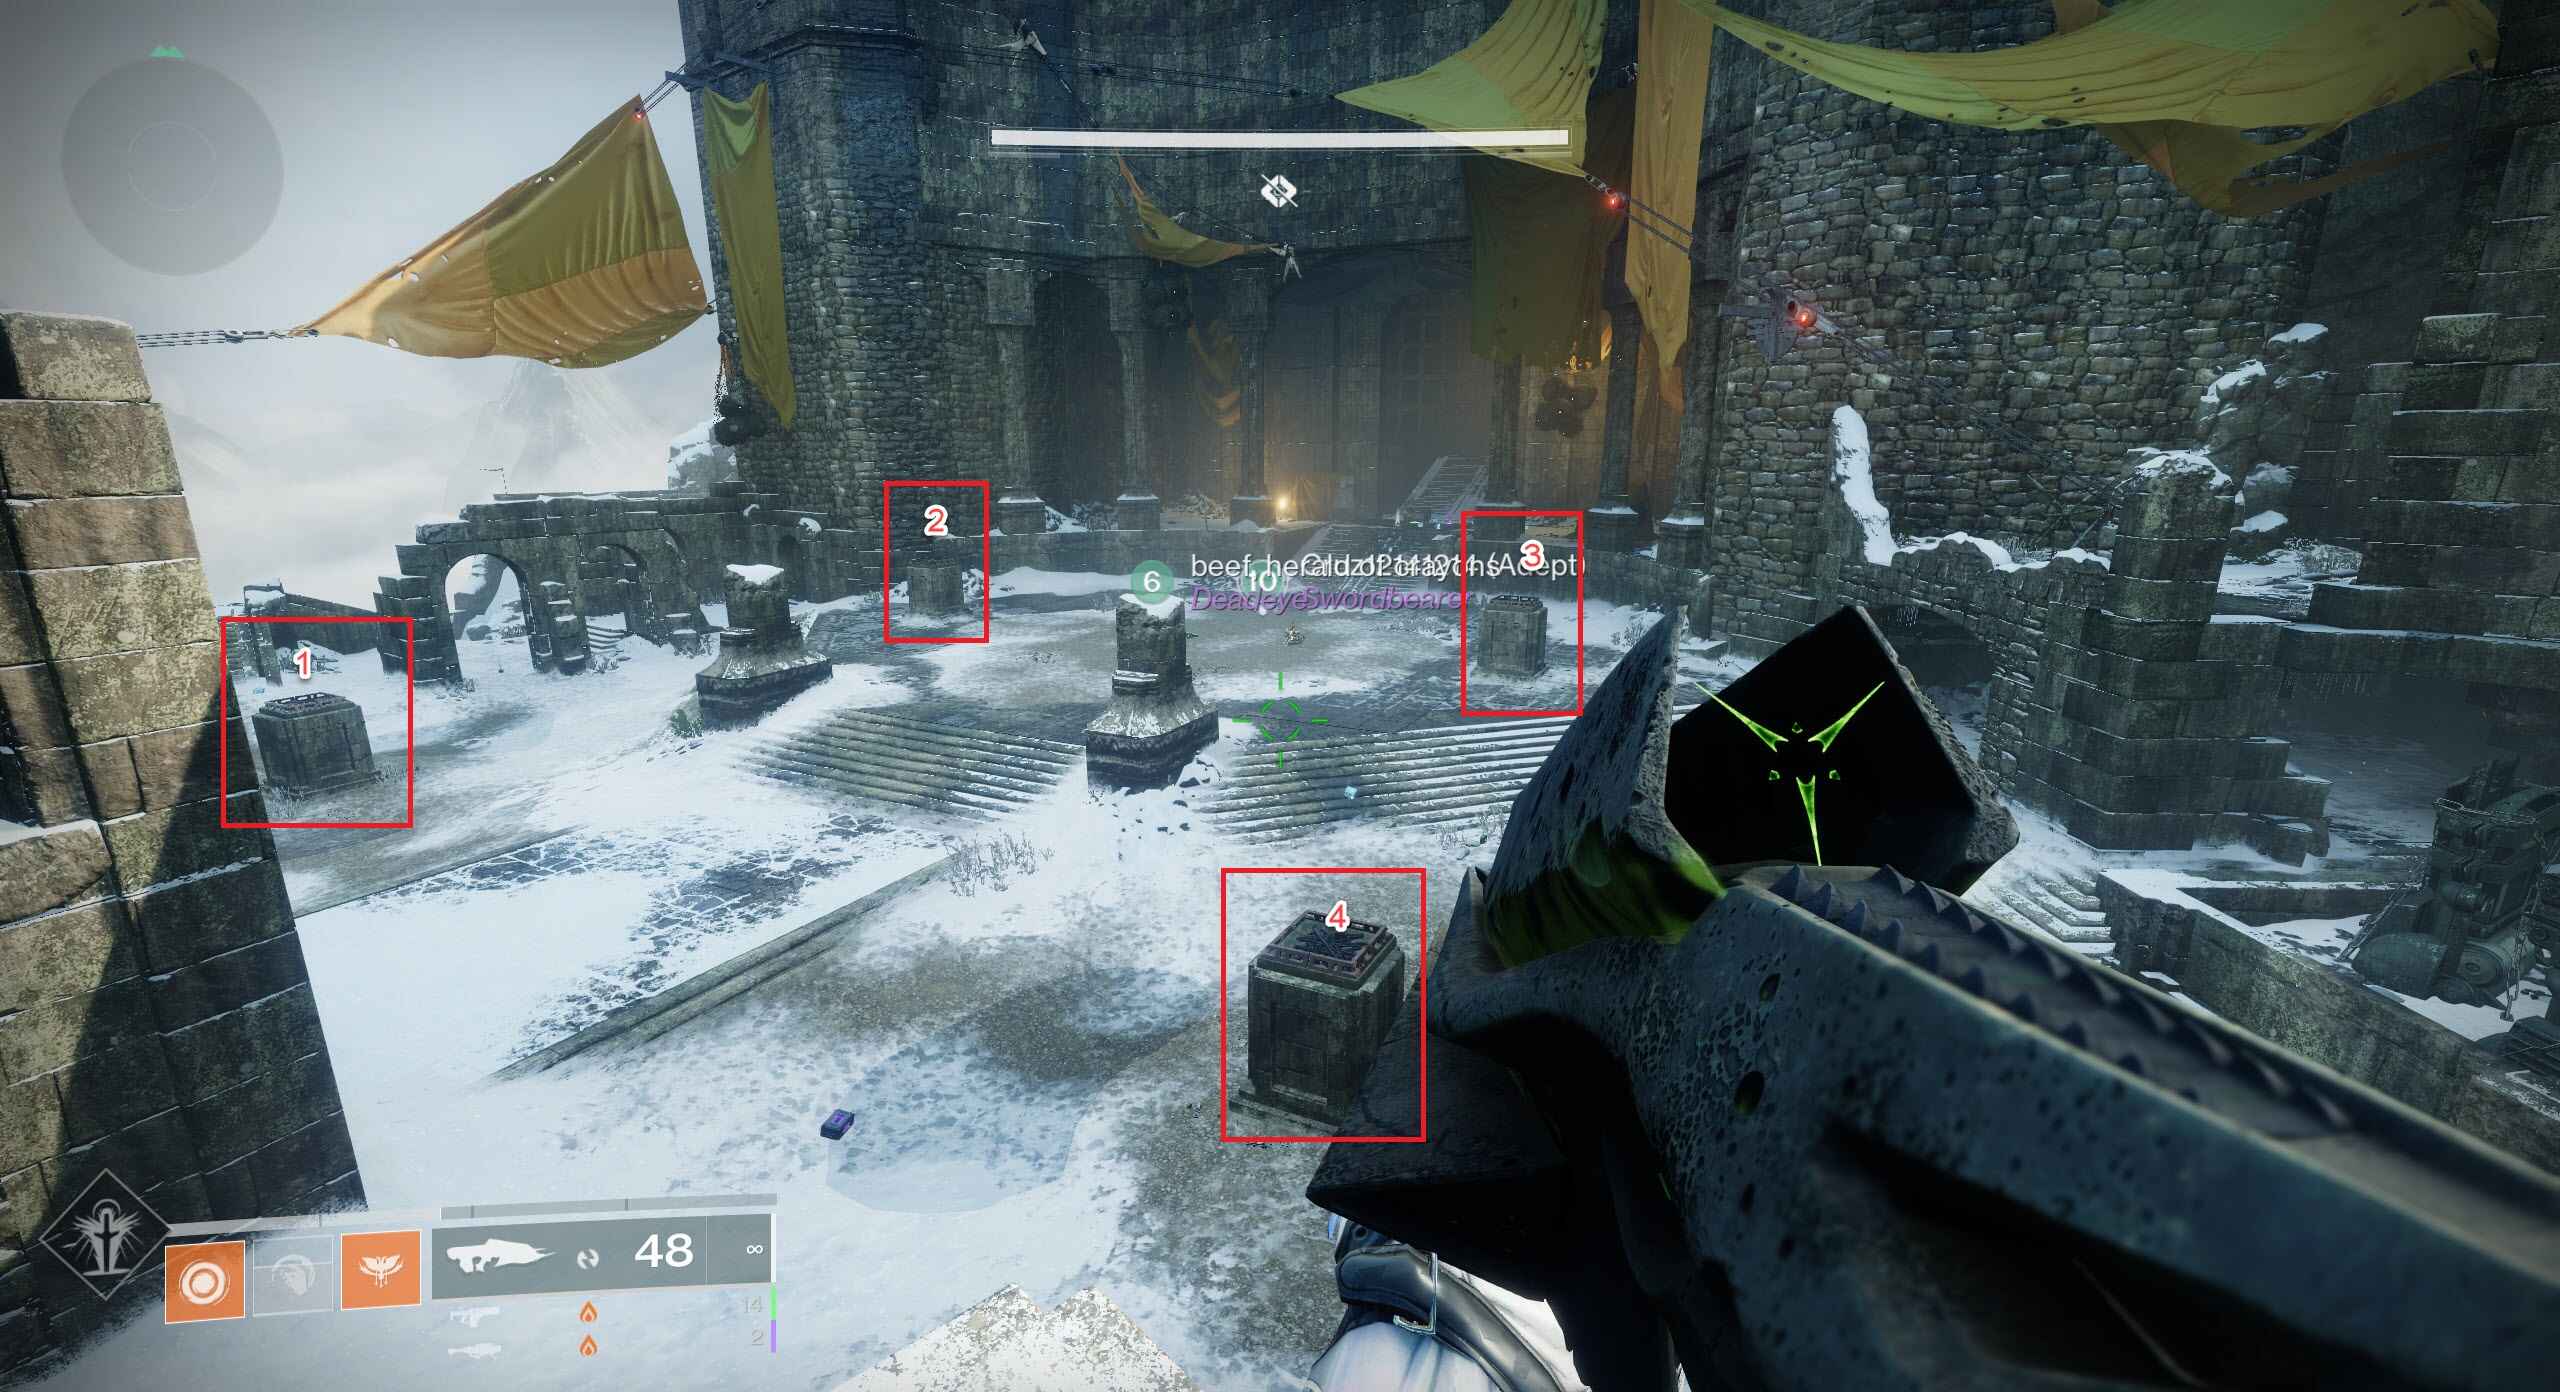
DPS
Gather around the last activated pyre for DPS. Each pyre grants you about 15 seconds of DPS where you can hit the boss. You must stay close to the pyres because the snowstorm will return and they shield you from the Biting Cold. When the timer expires, you must rotate to the next pyre.
The rotation of the pyres is entirely up to team, whichever flow works best for your team. For example in this image, the team simply rotates left. This boss has a lot of health, so maximize your DPS for a longer encounter. We suggest using rockets and a powerful DPS secondary like the Solar Eremite fusion rifle, or the kinetic sniper rifle The Supremacy with rewind rounds + kinetic tremors/FTTC. Linear fusion rifles may also be a good option. After the fourth pyre runs out of time, repeat the process to relight the pyres until you defeat the boss.

Hefnd's Vengeance, Blighted Chimaera
In the dungeon's last encounter, your fireteam faces off against the soul of a long-dead Ahamkara, who has assumed the shape of a captured Chimara. This fight goes through the same basic cycle as the other encounters, with you having to activate the Scorn lanterns in order to take off the boss's shield.
As in the previous encounter, defeating all of the Taken eyes will cause the Scorn Broken Knight enemy to spawn, which in turn causes the Scorn Lanterns to spawn. If you give the Scorn Broken Knight enough time to survive, it will spawn an additional lantern; if you activate more than one, the DPS timer—which is symbolized by the “Naeem's Wish Empowerment” buff on the left side of your screen—will be extended.
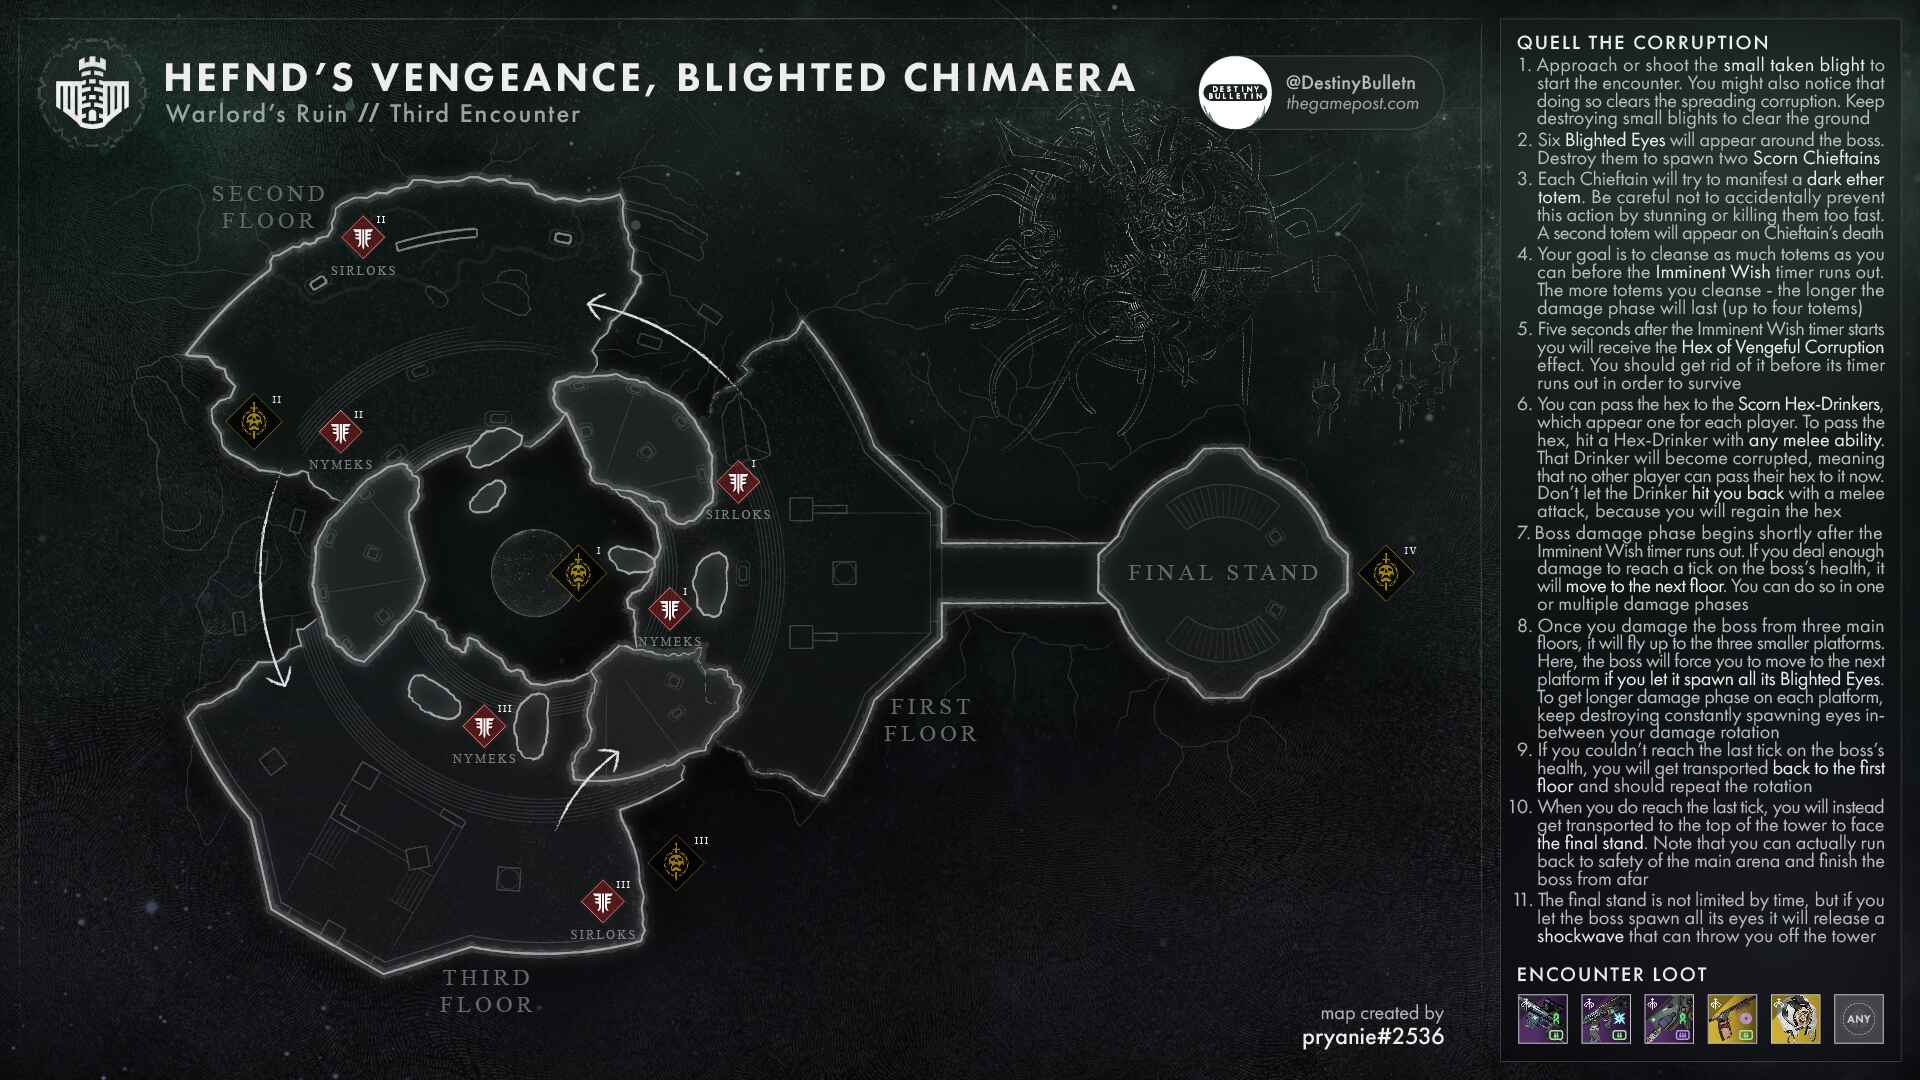
Vengeful Corruption
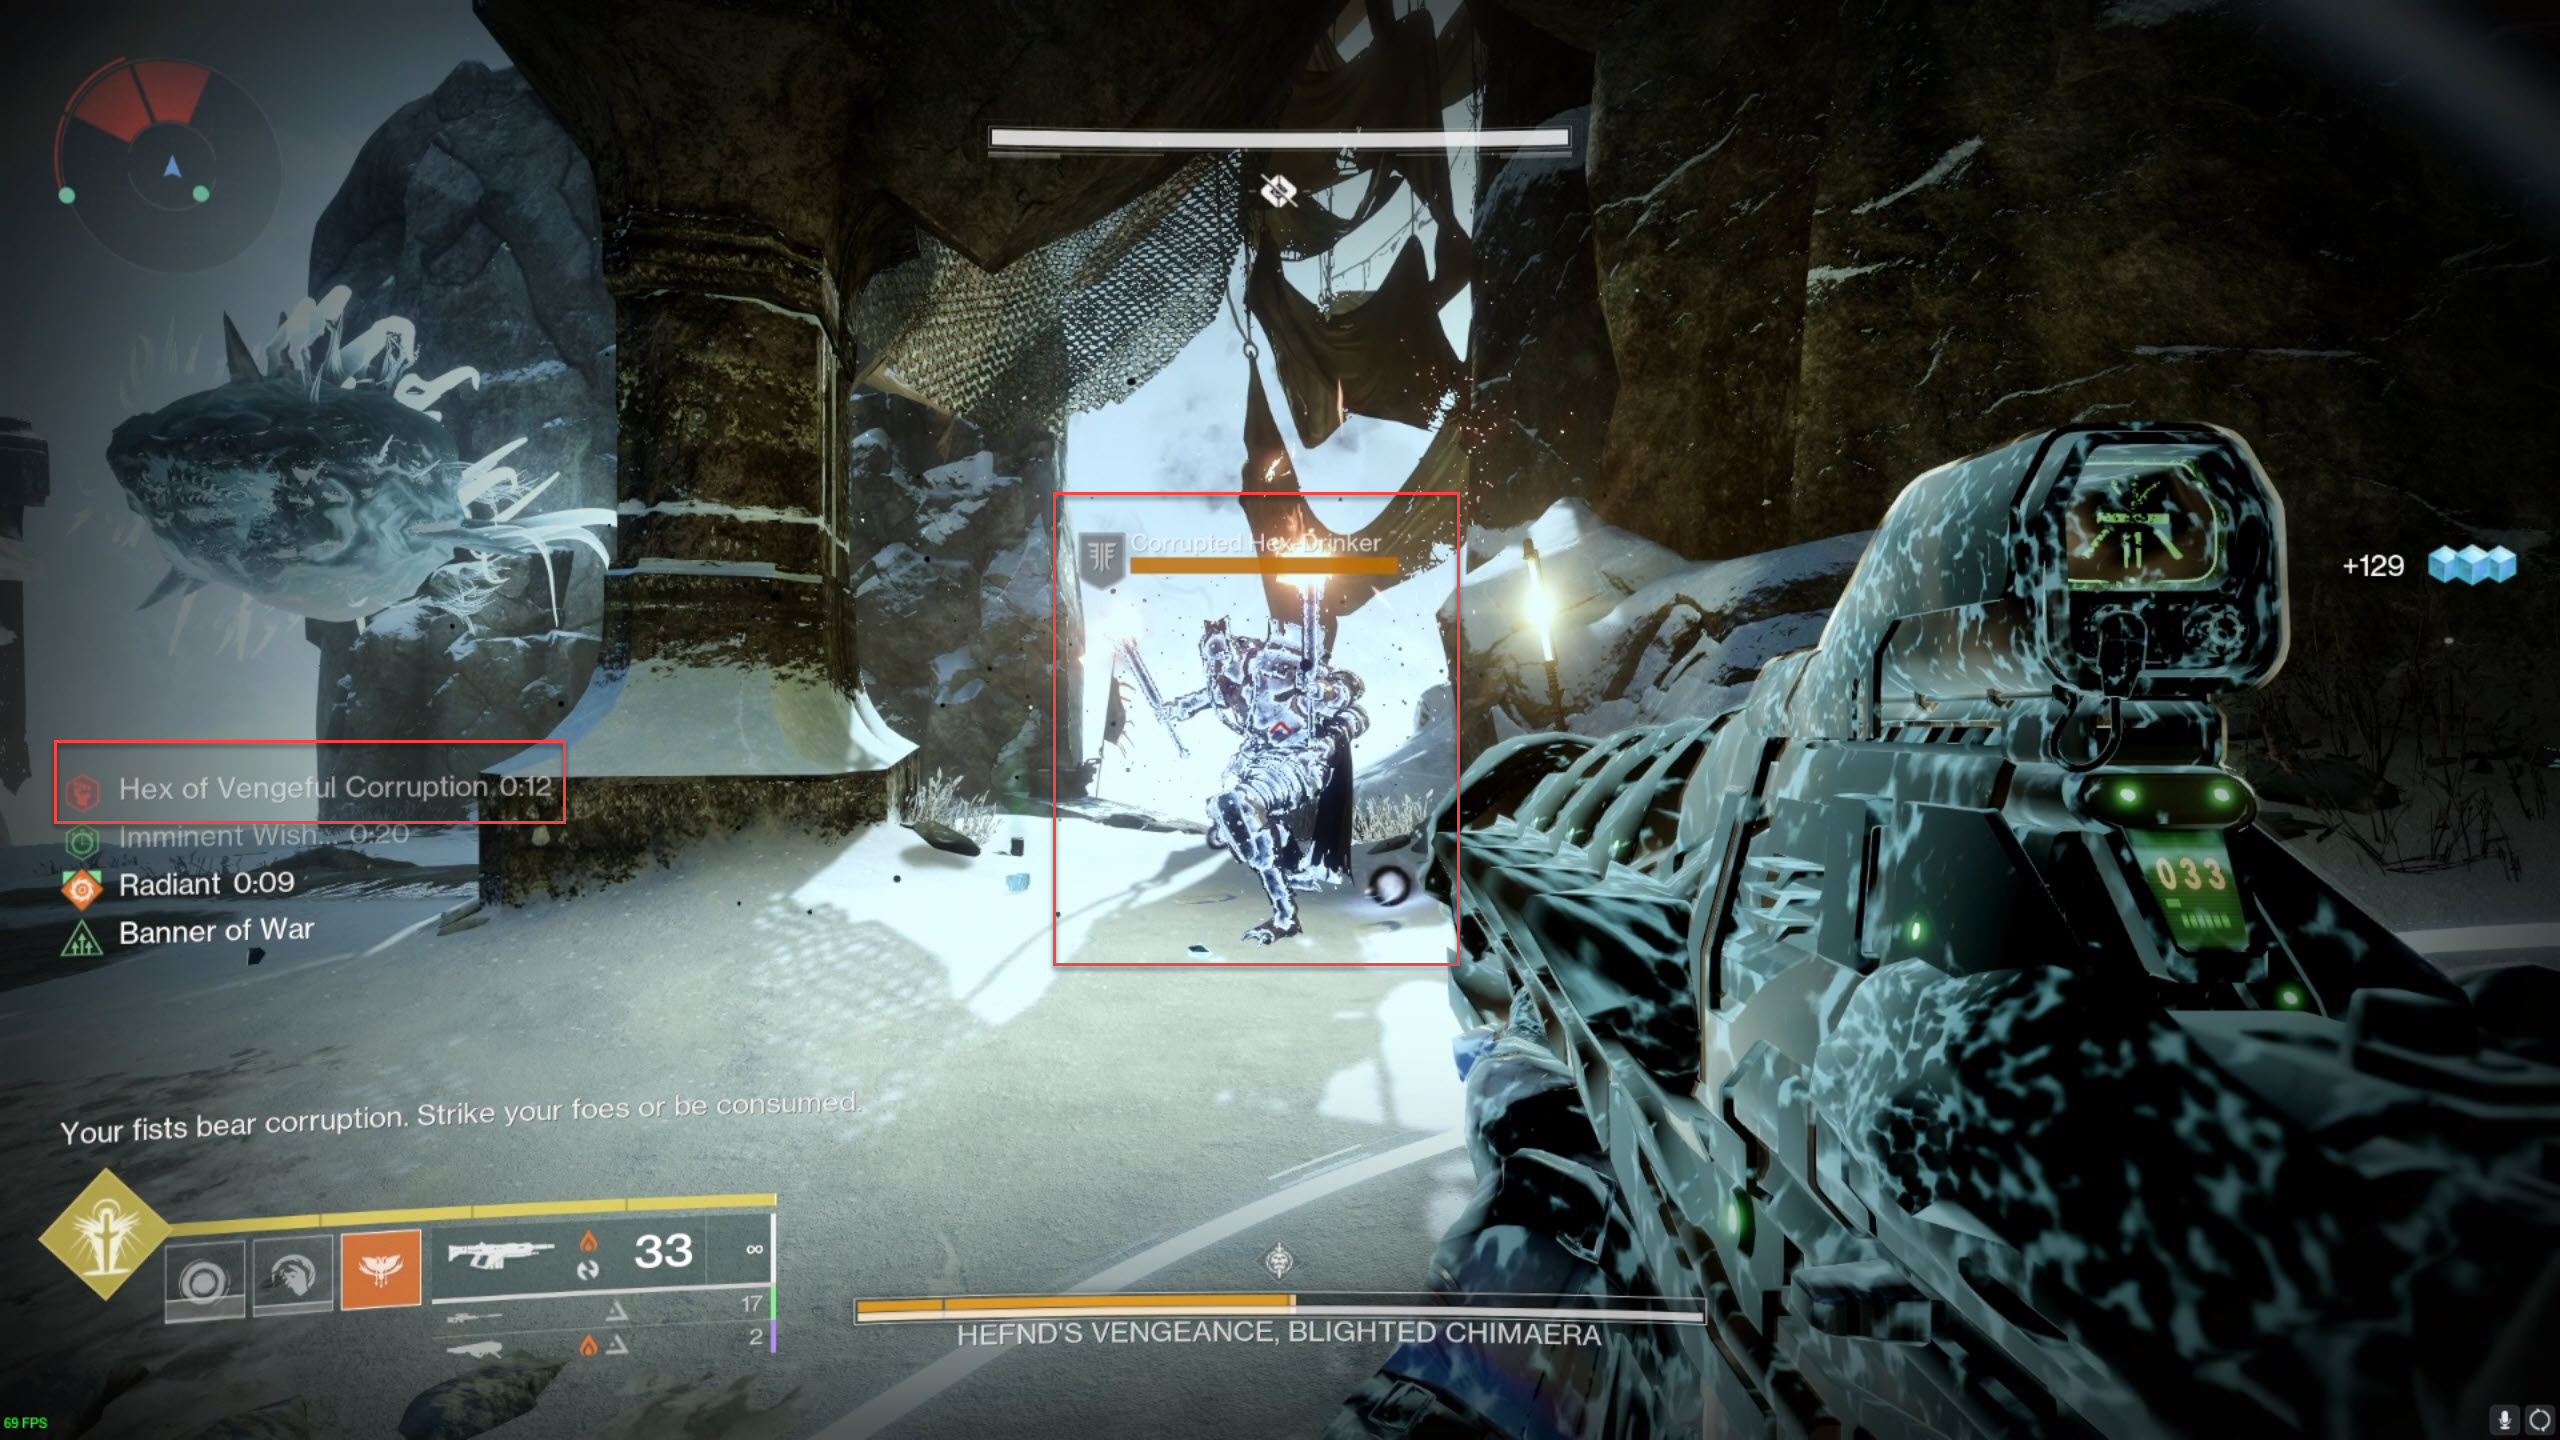
The "Hex of Vengeful Corruption" debuff must be removed in order to activate the lanterns; if you have it when the timer expires, you will perish. To do this, melee an enemy known as a "Corrupted Hex Drinker", and if they melee you back after you pass it to them, they will pass it back to you. Therefore, once you remove the debuff, try to avoid meleeing anyone else.
Tips:- Ranged melees also pass the debuff over (Hammers, Knife Throw, Celestial Fire etc.)
- You can wait until a few seconds left, melee the drinkers and run away briefly.
- The timer of the debuff still counts down while it's being passed over.
DPS starts shortly after the debuff is dealt with.

Climbing the Arena
After spawning the lanterns and dealing enough damage to the boss to make it climb up again, repeat the process until you reach the top and the beginning of the true DPS phase. The boss is represented by the white portion of its health bar at the bottom of the screen. If you deal enough damage to it, it will move up to the next section.
Tips:- The length of your DPS depends on the number of lanterns clensed.
- Use all the time you have to DPS the boss as this will save you more time later. Don't be afraid to use ults.
DPS
The full DPS phase begins after you reach the summit. Deal damage until you see "My hide is thick, O vengeance mine" in the combat log. This indicates that the boss will become immune and that the platform you are currently on will be covered in Taken corruption. Rotate to one of the other large platforms (there are three total). This will take away the boss's shield and let you deal damage. You can prolong the duration of time you have to damage the boss by killing the Taken eyes floating around it. Rotate to the last platform and continue dealing damage until the boss becomes immune.
Tips:- Hunter tether (single-shot) will tether damage taken from the boss onto the eyes. This will allow the eyes to be killed instantly and prolongs the DPS significantly.
- Killing the eyes while on a well of radiance with pheonix protocol allows you to get back your ult pretty fast.

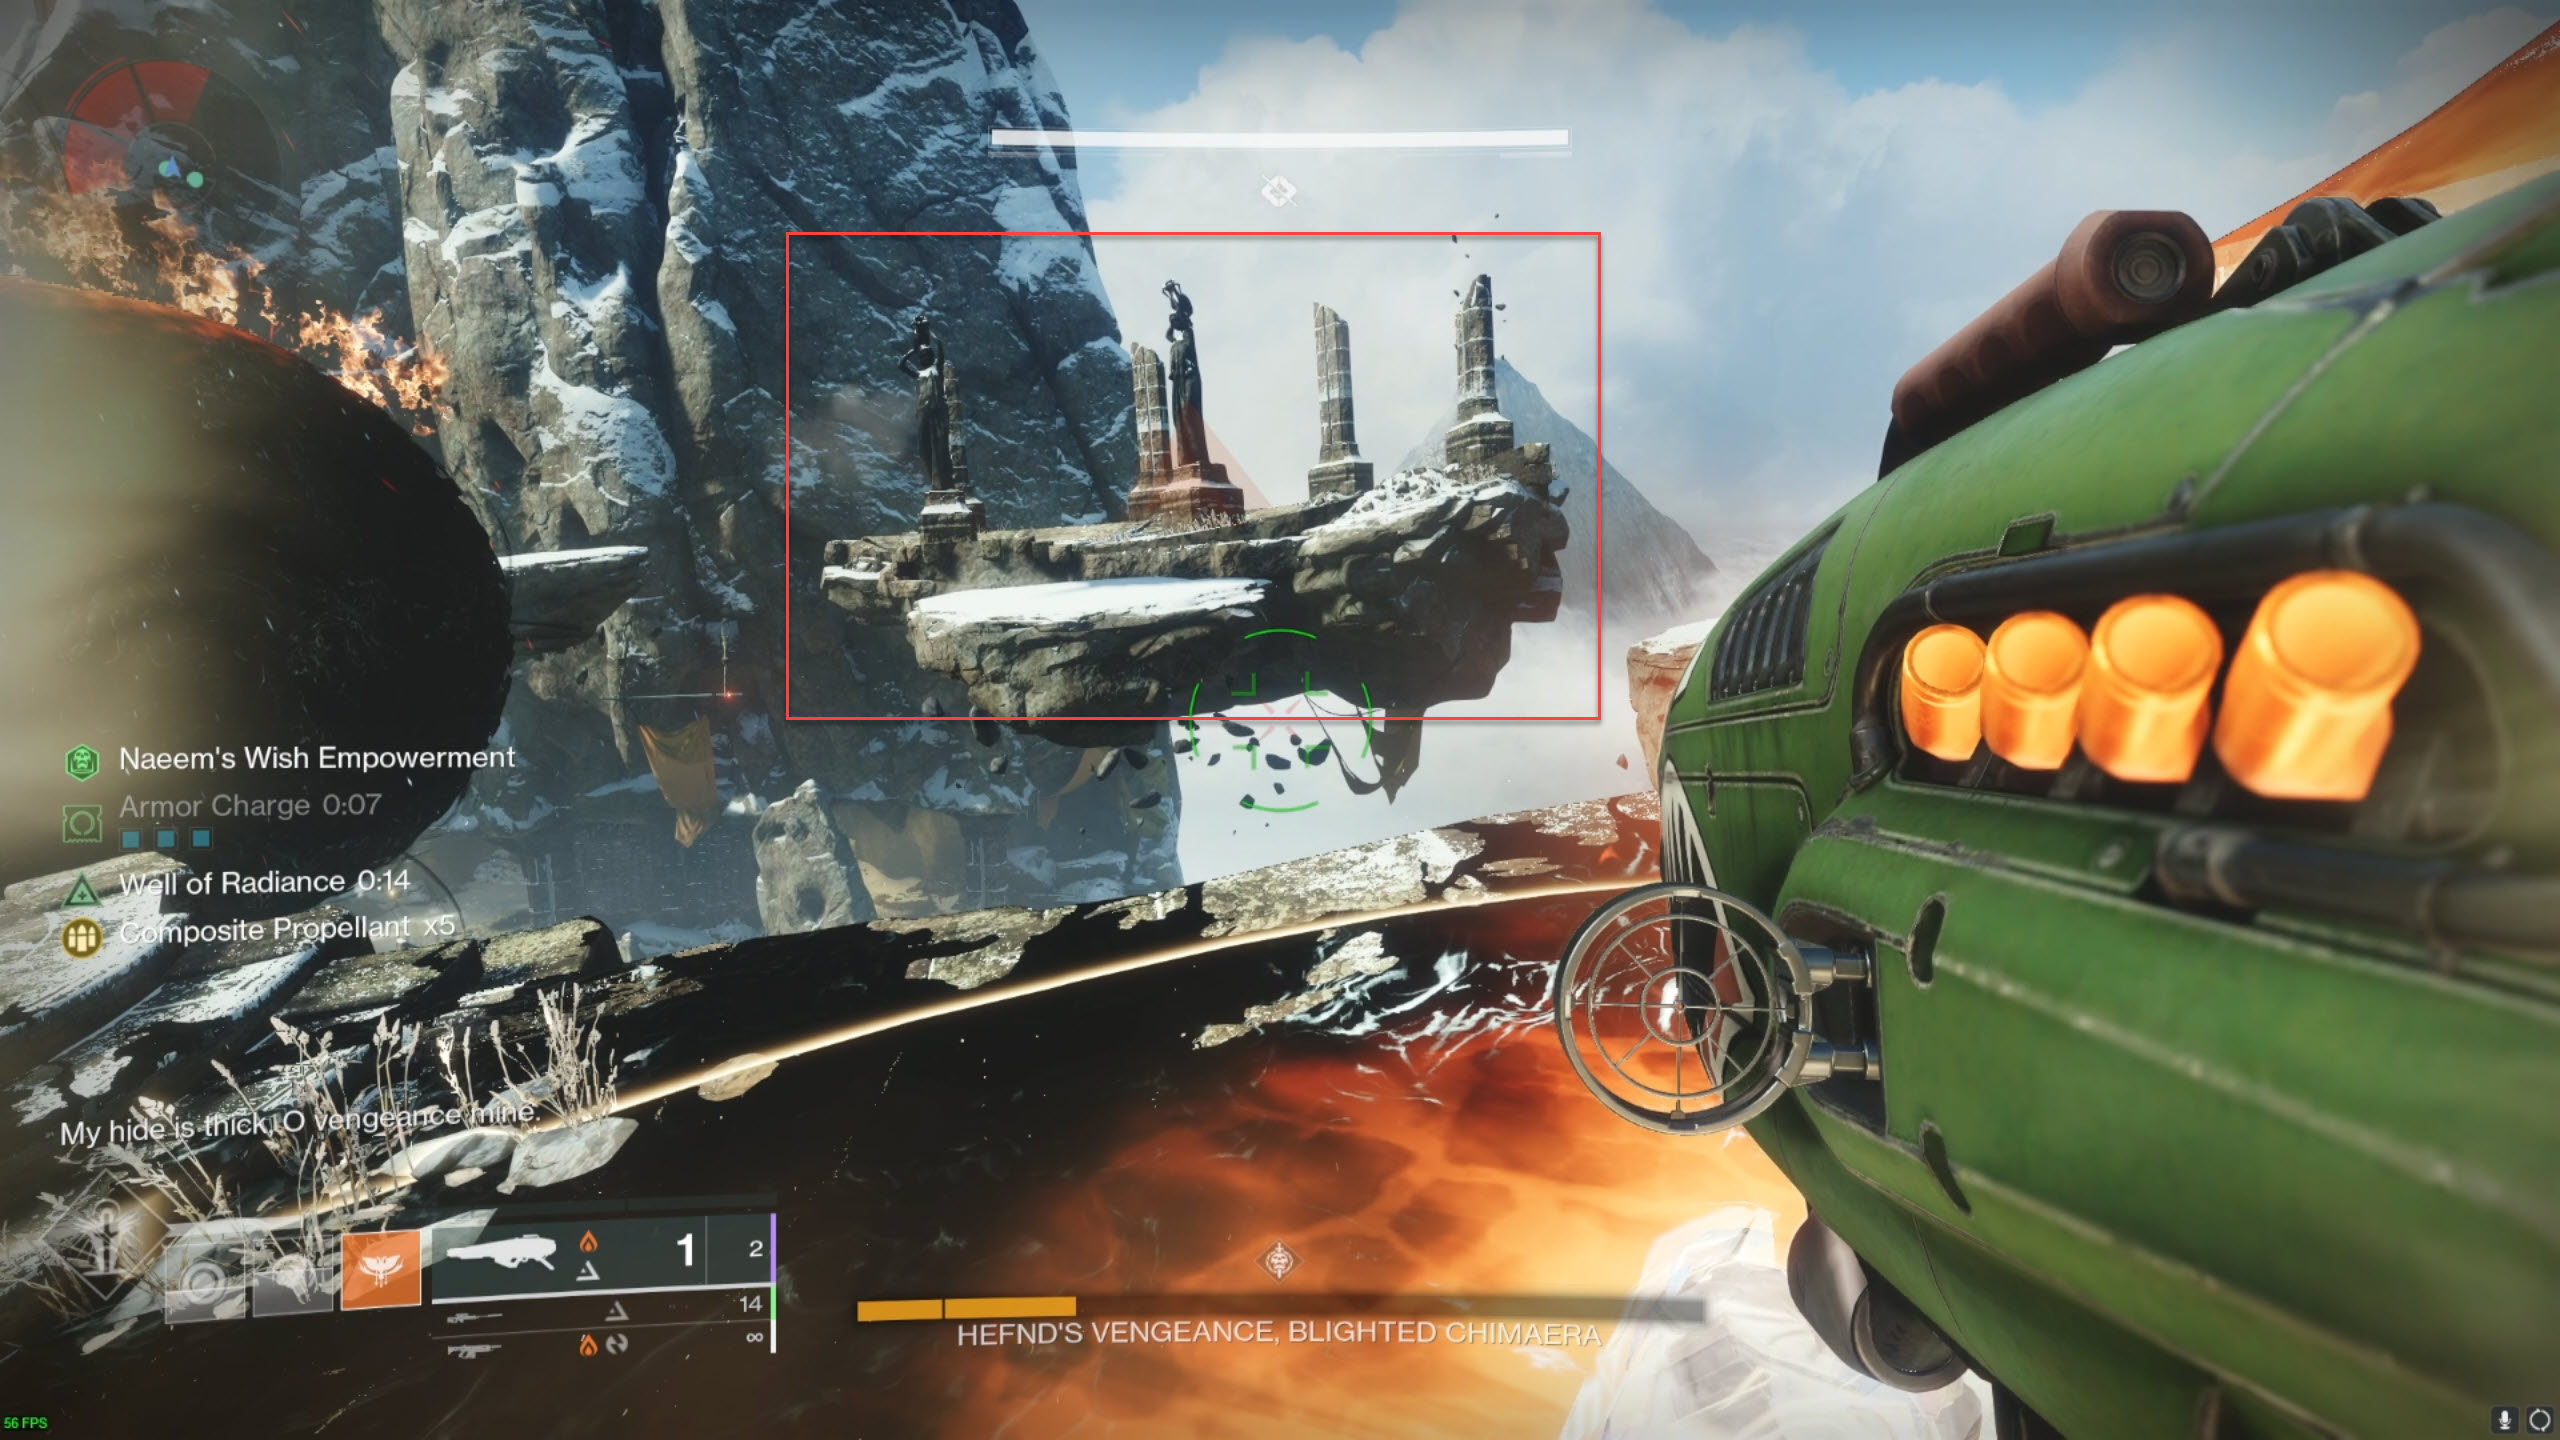
Following that, it will teleport you to the bottom, where you will have to keep going until you deal enough damage to push the monster below the final health gate. This can occur during the DPS phase at the top, but it can also happen while you are climbing.
Final Stand
After you make it to the final stand health gate, the boss will teleport you to an open platform where you must kill it before it kills you. You can hide behind the pillars or deal damage to the boss while it is at risk of killing you. After you defeat Warlord's Ruin's final boss, you will have completed the dungeon.
If this is your first time running the dungeon, you will be given the "In the Shadow of the Mountain" quest, which requires you to search the dungeon few more times in search of different collectibles.
Tips:- There is neither a timer nor a wipe mechanic for final stand, you have infinite time to kill the boss from here on out, just don't die.
- Important for master or solo runs, when you get teleported, you don't have to stay on the platform to DPS. You can actually move back all the way to one of the 3 platforms and DPS from a distance, safe from all the attacks of the boss.
